

How To Build Your Own Design System With Nested + Stacked Presets In Divi 5
Design techniques fail both as a result of they don’t account for each risk or as a result of they turn into too sophisticated to handle. A regular web site wants types for headings, physique textual content, buttons, and containers (to call just a few). Multiply these throughout gentle and darkish backgrounds, completely different sizes, and different use circumstances, and you find yourself managing tons of of CSS courses/presets that overlap, battle, and turn into not possible to keep up.
Stacked and Nested Presets in Divi 5 assist resolve this downside by separating considerations. As an alternative of making a preset for each potential mixture (H1 Darkish Daring, H1 Mild Daring, H1 Darkish Regular, H1 Mild Regular, and so forth), you create modular types that stack collectively.
This tutorial builds an entire design system from scratch, then applies it to a homepage with 4 distinctive sections. You’ll create Design Variables for spacing, typography, and colours, construct Possibility Group Presets for layouts and styling, and nest these Possibility Group Presets inside Component Presets for quick deployment. The perfect a part of that is you can export and import all these presets and variables to make use of and modify on each new web site construct.
The primary 5 components of this tutorial create round 40 Design Variables and dozens of Presets. Partially six, we’ll add modules to the web page and construct out an actual design. To completely comply with this tutorial, you have to between one and three hours, relying in your expertise with net design and/or Divi 5.
Half 1: Creating Design Variables
Design Variables retailer values you reference all through your web site. While you replace a variable, each aspect utilizing that variable updates robotically. The variables proven right here present a basis you can broaden as your design system grows.
Typography Measurement Variables
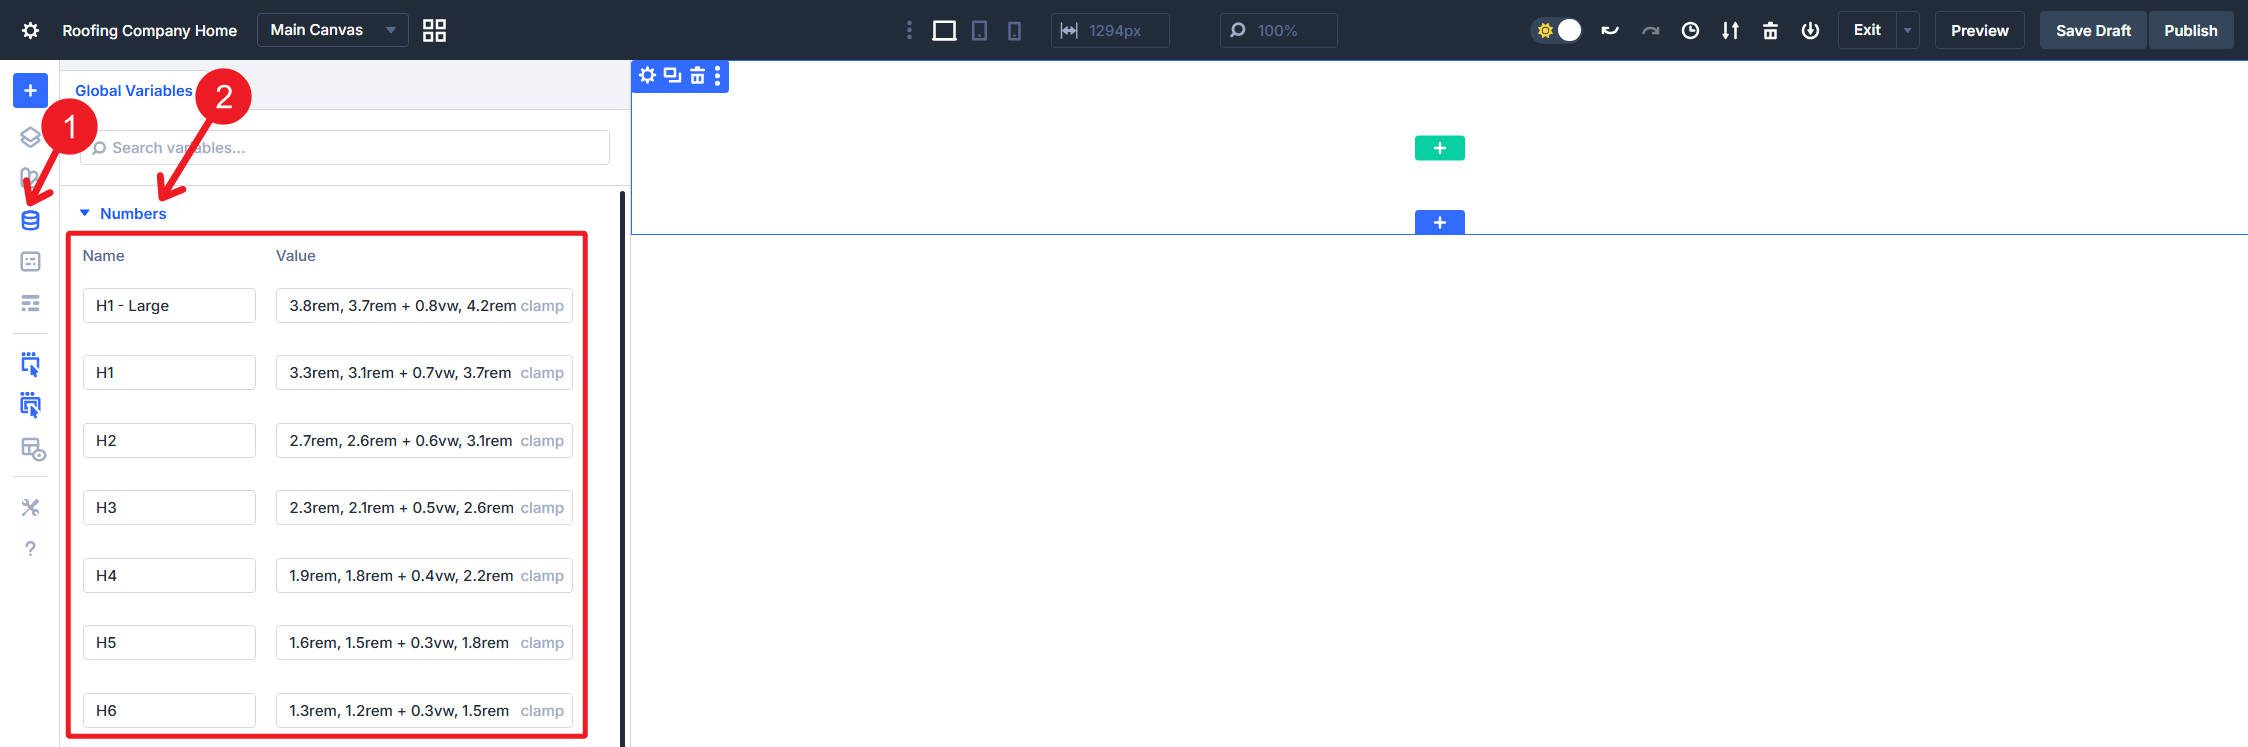
Open the Variable Supervisor by clicking the variables icon within the left sidebar. Create Quantity variables for every typography degree utilizing clamp() features for fluid sizing. The three values in every clamp characterize the minimal dimension, the popular scaling calculation, and the utmost dimension.
Create the next Quantity variables for headings:
- H1 – Giant with the worth clamp(3.8rem, 3.7rem + 0.8vw, 4.2rem) supplies a Hero-sized typography choice for those who want one thing larger in particular circumstances.
- H1 makes use of clamp(3.3rem, 3.1rem + 0.7vw, 3.7rem) for template web page H1 headings.
- H2 makes use of clamp(2.7rem, 2.6rem + 0.6vw, 3.1rem) for main part headings.
- H3 makes use of clamp(2.3rem, 2.1rem + 0.5vw, 2.6rem) for subsection headings.
- H4 makes use of clamp(1.9rem, 1.8rem + 0.4vw, 2.2rem) for smaller content material divisions.
- H5 makes use of clamp(1.6rem, 1.5rem + 0.3vw, 1.8rem) for minor headings.
- H6 makes use of clamp(1.3rem, 1.2rem + 0.3vw, 1.5rem) for the smallest heading degree.
Be sure to click on “Save Variables” usually.
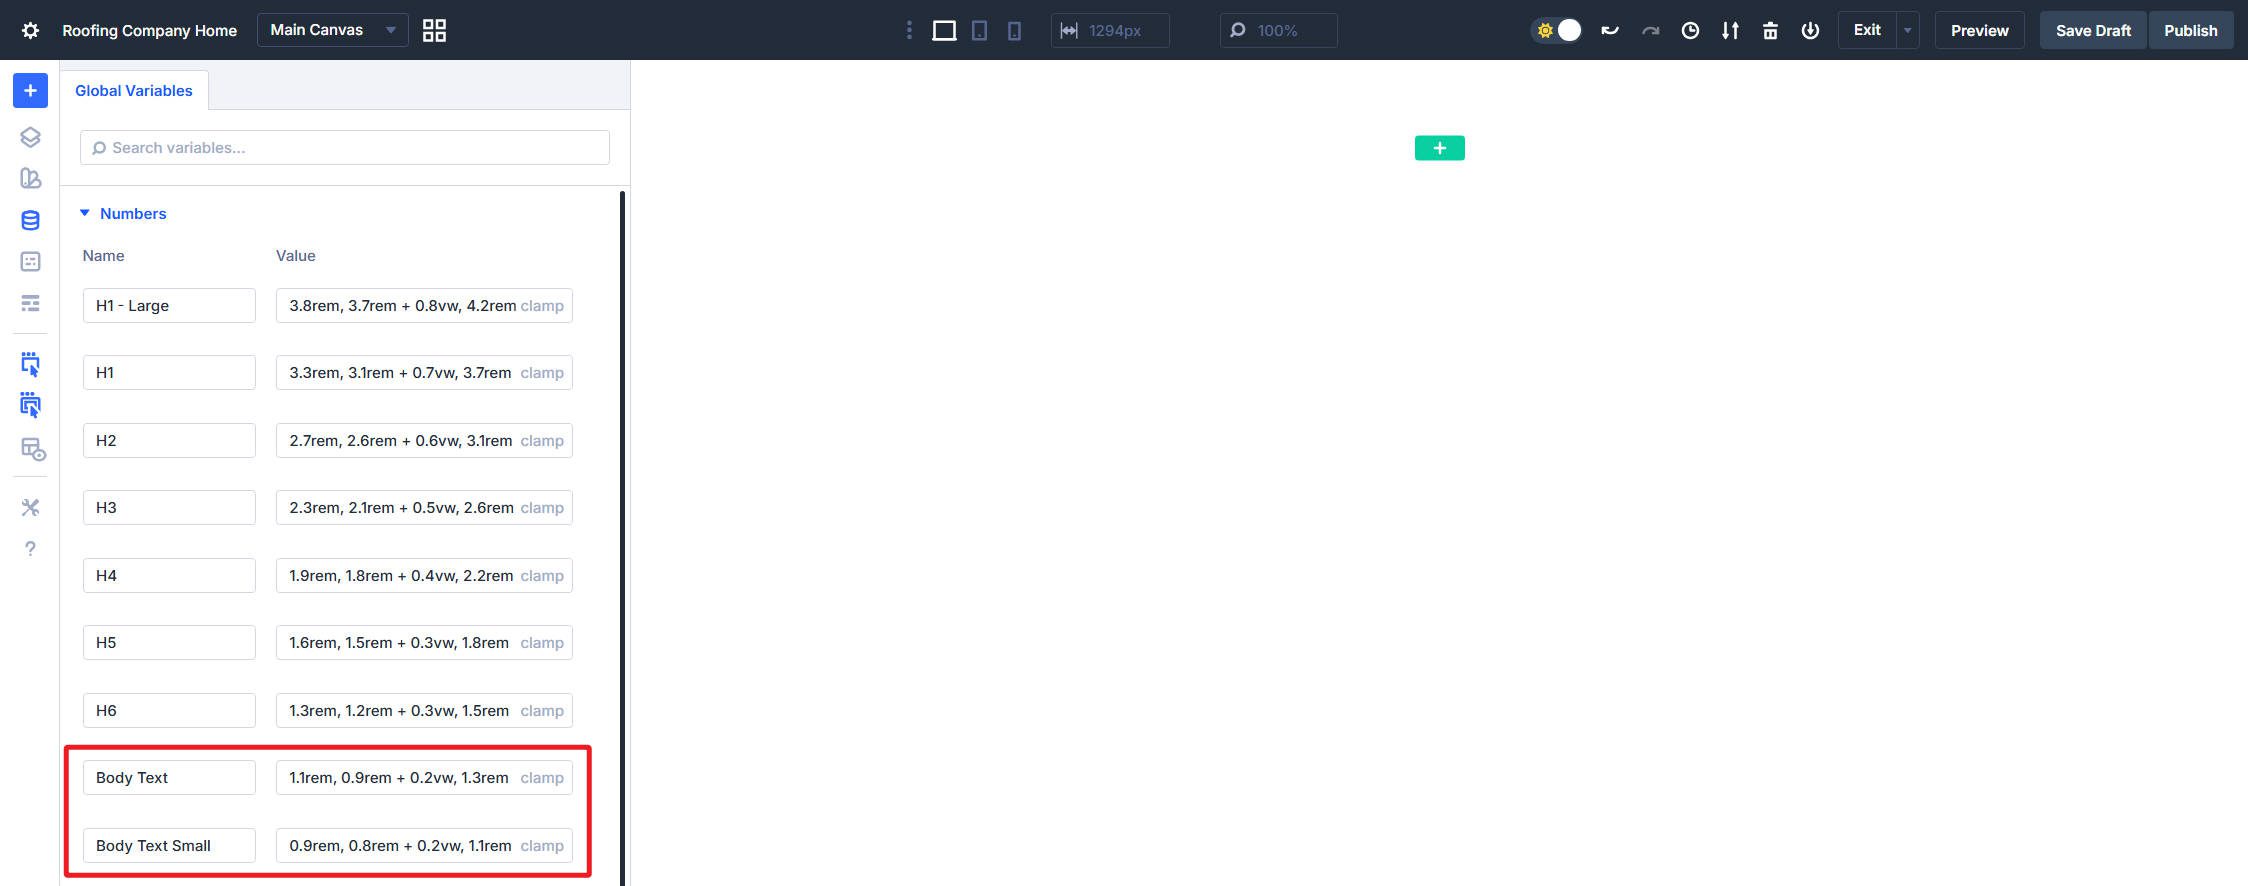
Create two physique textual content dimension variables that will likely be used for many physique textual content and buttons:
- Physique Textual content makes use of clamp(1.1rem, 0.9rem + 0.2vw, 1.3rem) for normal paragraph content material and buttons.
- Physique Textual content Small makes use of clamp(0.9rem, 0.8rem + 0.2vw, 1.1rem) for captions, metadata, and secondary content material, together with smaller buttons.
Typography Line Top Variables
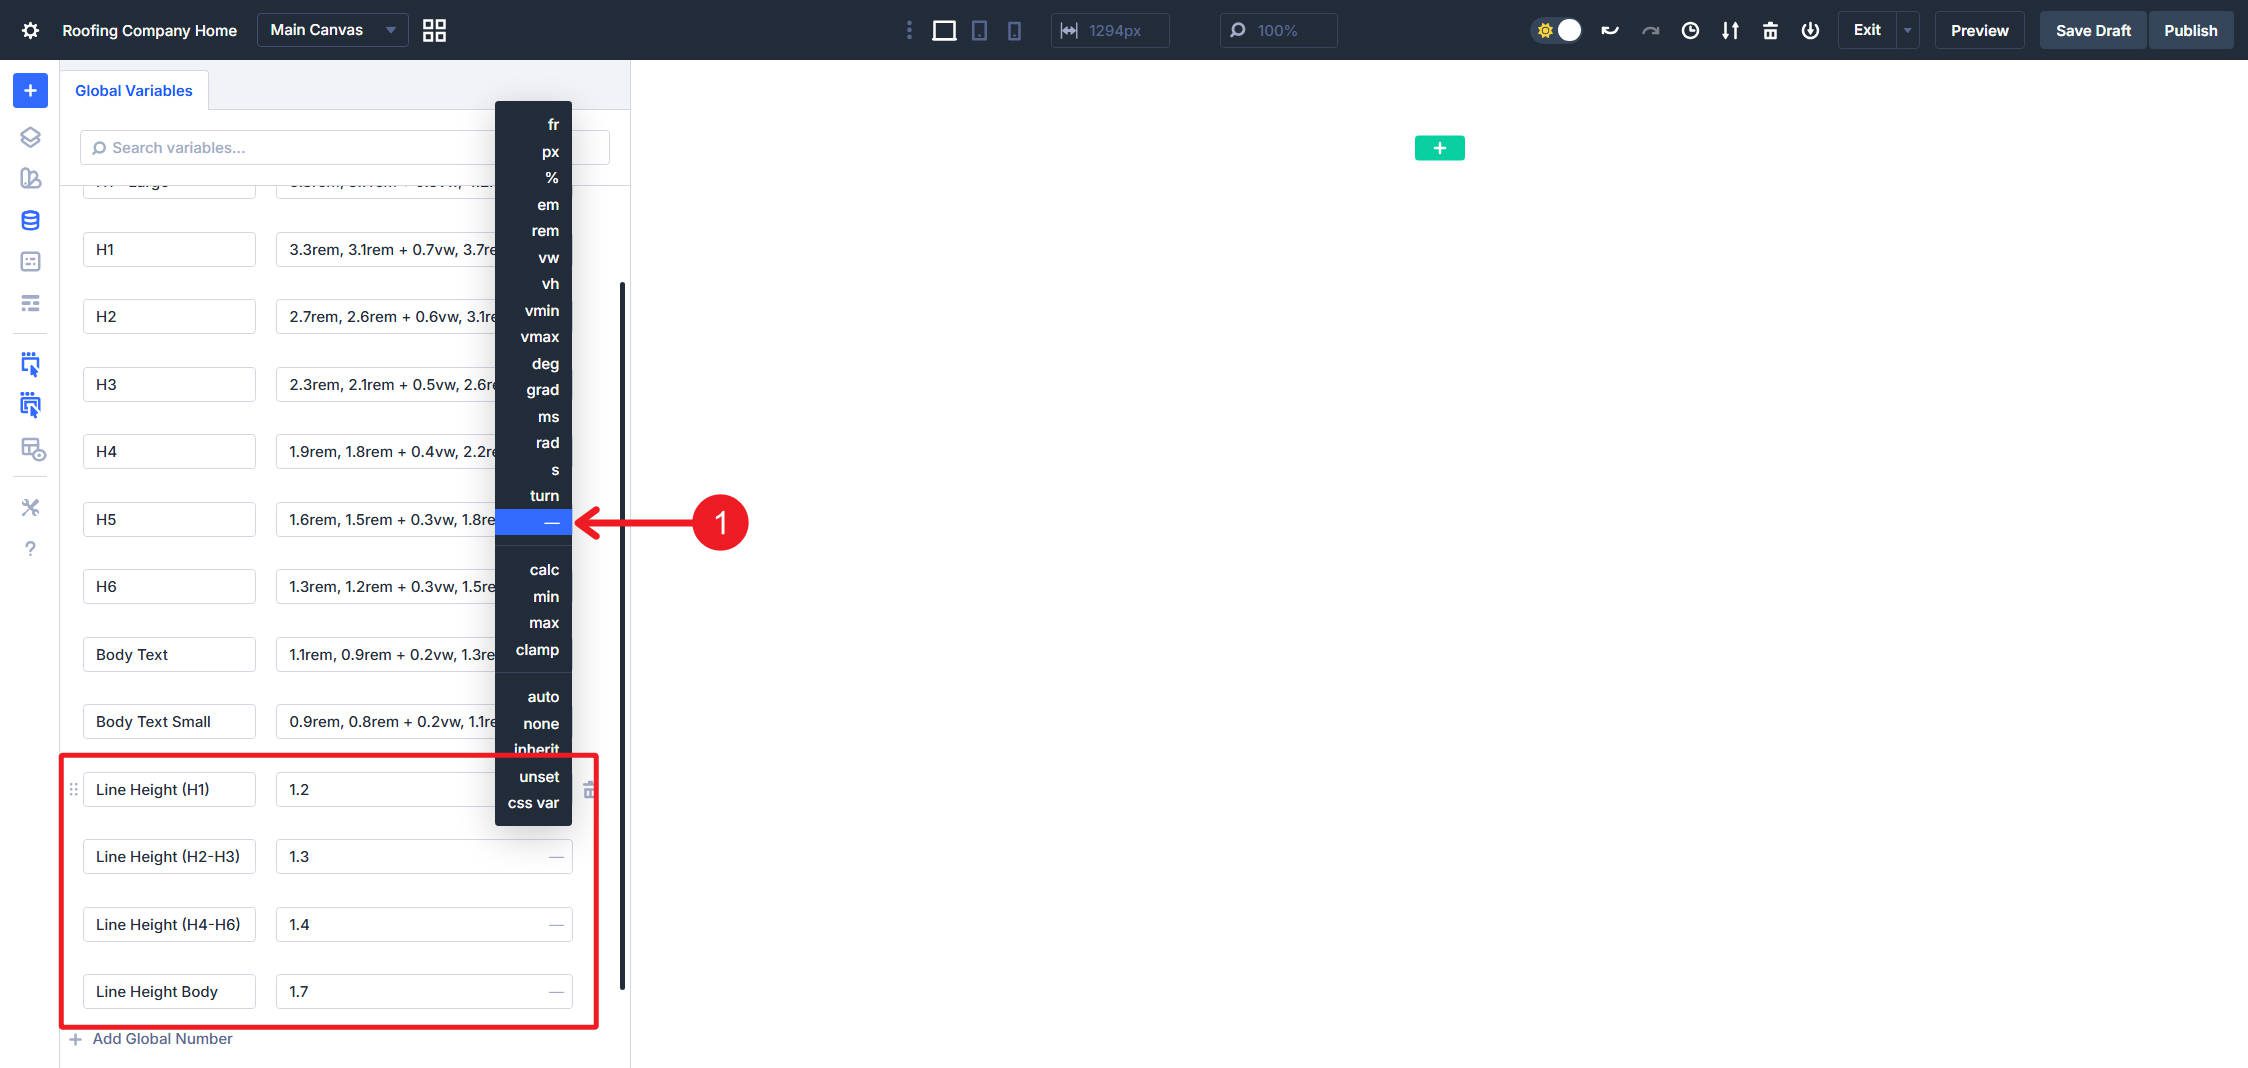
Line Top will complement your font selections and your font sizes for each headings and paragraphs. For this construct, I created 5 variables that ought to work throughout the entire web site:
- Line Top (H1) makes use of a unitless worth of 1.2 and can work for H1 – Giant and H1 font sizes.
- Line Top (H2-H3) makes use of a unitless worth of 1.3.
- Line Top (H4-H6) makes use of a unitless worth of 1.4.
- Line Top Physique makes use of a unitless worth of 1.7.
- Line Top Physique Small makes use of a unitless worth of 1.6.
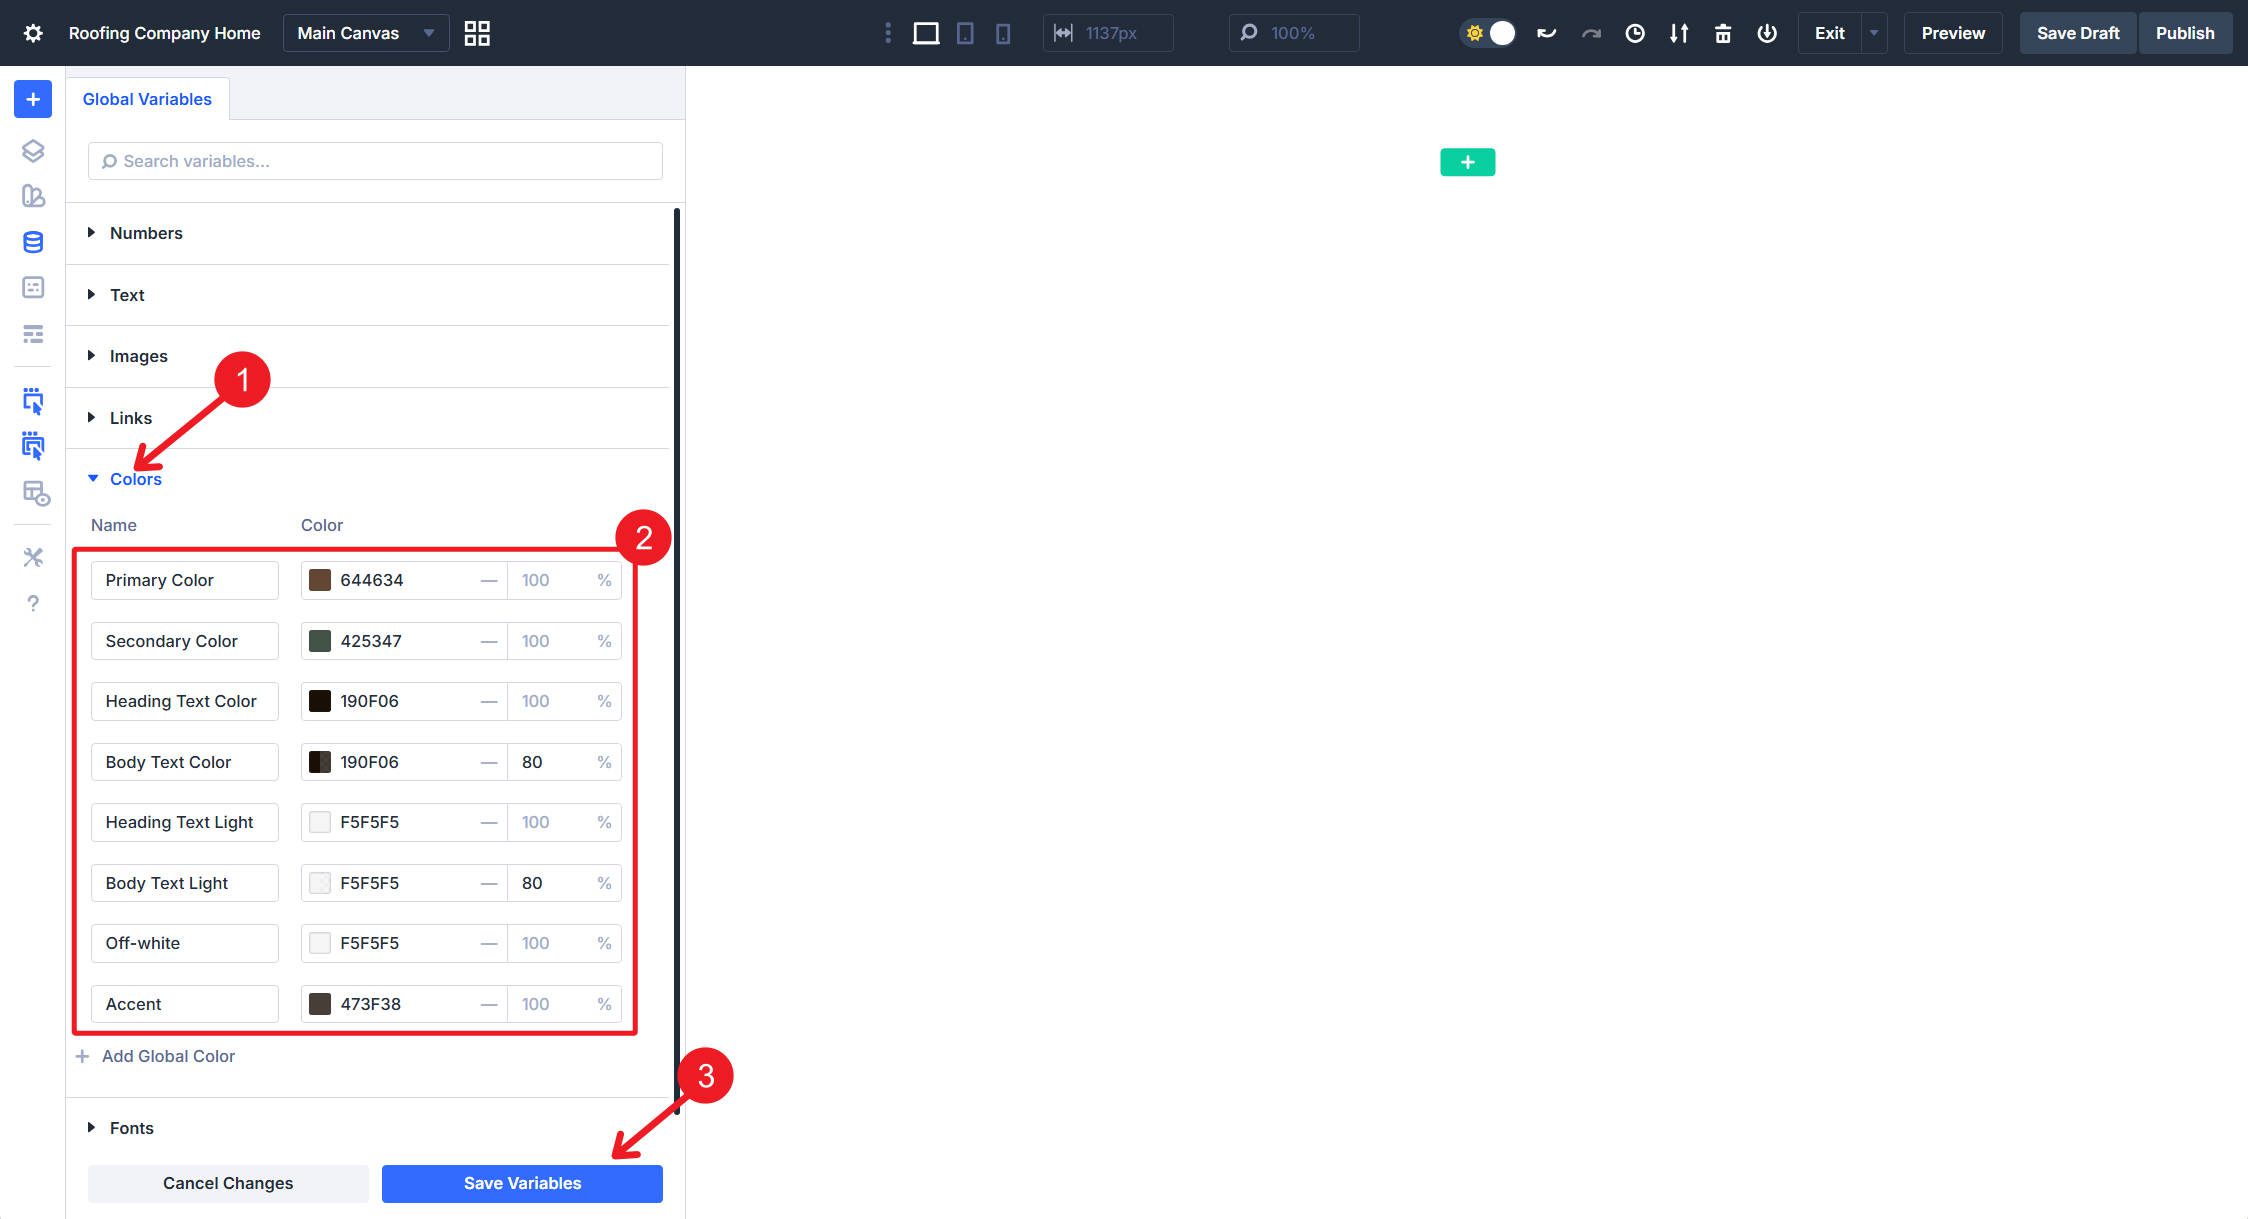
Shade Variables
For a change of tempo (we’ll return to numbers in a second), arrange your Shade variables, separating commonplace colours from gentle variants used on darkish backgrounds.
- Main makes use of #644634.
- Secondary makes use of #425347.
- Heading Textual content makes use of #190f06 for normal heading colour on gentle backgrounds.
- Physique Textual content makes use of #190f06 at 80% Opacity for paragraph content material on gentle backgrounds.
- Heading Textual content Mild makes use of #f5f5f5 for headings on darkish backgrounds.
- Physique Textual content Mild makes use of #f5f5f5 at 80% Opacity for physique content material on darkish backgrounds.
- Physique Textual content Mild Hyperlink makes use of #dcebe1 at 90% Opacity for hyperlinks inside physique content material on darkish backgrounds.
- Off-white makes use of #f5f5f5 for tertiary buttons and subdued parts. Should you assume it’s much less complicated to only use the Heading Textual content Mild for this, you’ll be able to skip this variable.
- Accent makes use of #473f38, which we’ll use for darkish background sections.
Relative Shade Variables
It’s useful to have colour variations for borders, hover results, and different issues as they come up.
- Main Mild makes use of your main colour with HSL filters of –15% Saturation and 30% Lightness.
- Main Darkish makes use of your main colour with HSL filters of –15% Lightness.
- Secondary Mild makes use of your secondary colour with HSL filters of –5% Saturation and 30% Lightness.
- Secondary Darkish makes use of your secondary colour with HSL filters of –10% Saturation and –15% Lightness.
I do that for at the least main and secondary colours, however you probably have different colours you employ regularly, you’ll be able to create variations for them too.
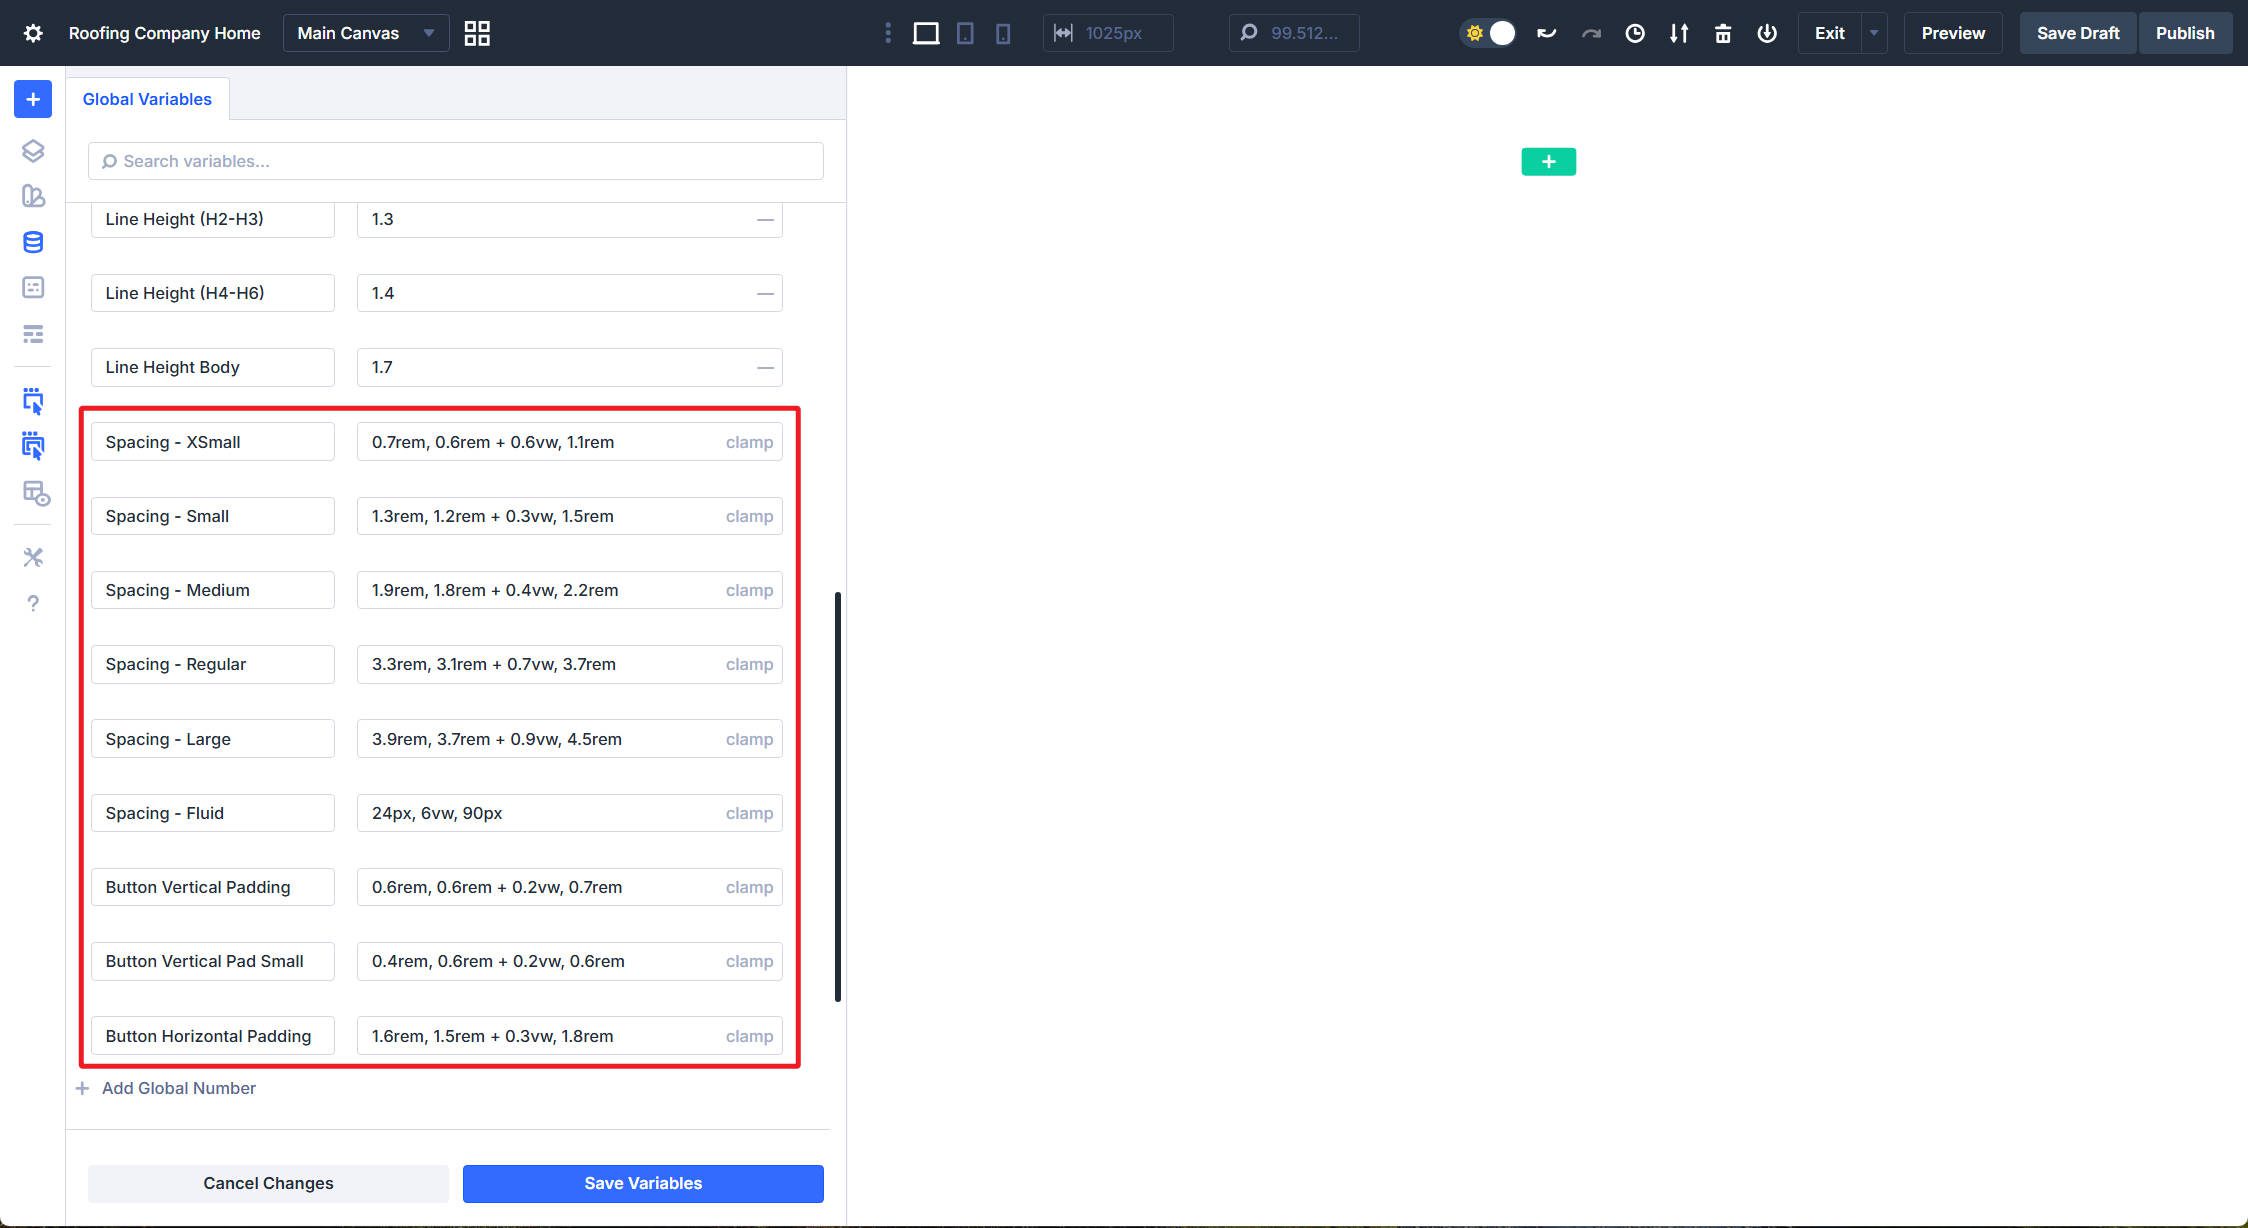
Spacing Variables
Spacing variables deal with padding, margins, and gaps all through your structure. Having a number of sizes permits you to keep proportional relationships throughout your design system. Additionally, you’ll use these usually, so having them arrange at the start is a big assist.
Create the next Quantity variables:
- Spacing – XSmall makes use of clamp(0.7rem, 0.6rem + 0.6vw, 1.1rem) for tight spacing between associated parts.
- Spacing – Small makes use of clamp(1.3rem, 1.2rem + 0.3vw, 1.5rem) for compact inner padding.
- Spacing – Medium makes use of clamp(1.9rem, 1.8rem + 0.4vw, 2.2rem) for normal aspect separation.
- Spacing – Common makes use of clamp(3.3rem, 3.1rem + 0.7vw, 3.7rem) for snug part padding.
- Spacing – Giant makes use of clamp(3.9rem, 3.7rem + 0.9vw, 4.5rem) for beneficiant vertical rhythm.
- Spacing – Fluid makes use of clamp(24px, 6vw, 90px) for responsive gutters that scale considerably between cellular and desktop.
I personally like clamp() values for spacing that match carefully with textual content dimension. However many individuals will use straight rem values and use them throughout breakpoints. No matter works for you.
For buttons, I are likely to choose particular padding values over extra common ones.
- Button Vertical Padding makes use of clamp(0.6rem, 0.6rem + 0.2vw, 0.7rem) for a traditional top button.
- Button Vertical Padding Small makes use of clamp(0.4rem, 0.6rem + 0.2vw, 0.6rem) if you want a tighter button.
- Button Horizontal Padding makes use of clamp(1.6rem, 1.5rem + 0.3vw, 1.8rem) to keep up constant left/proper padding throughout all buttons. You’ll be able to add a small variation for those who like.
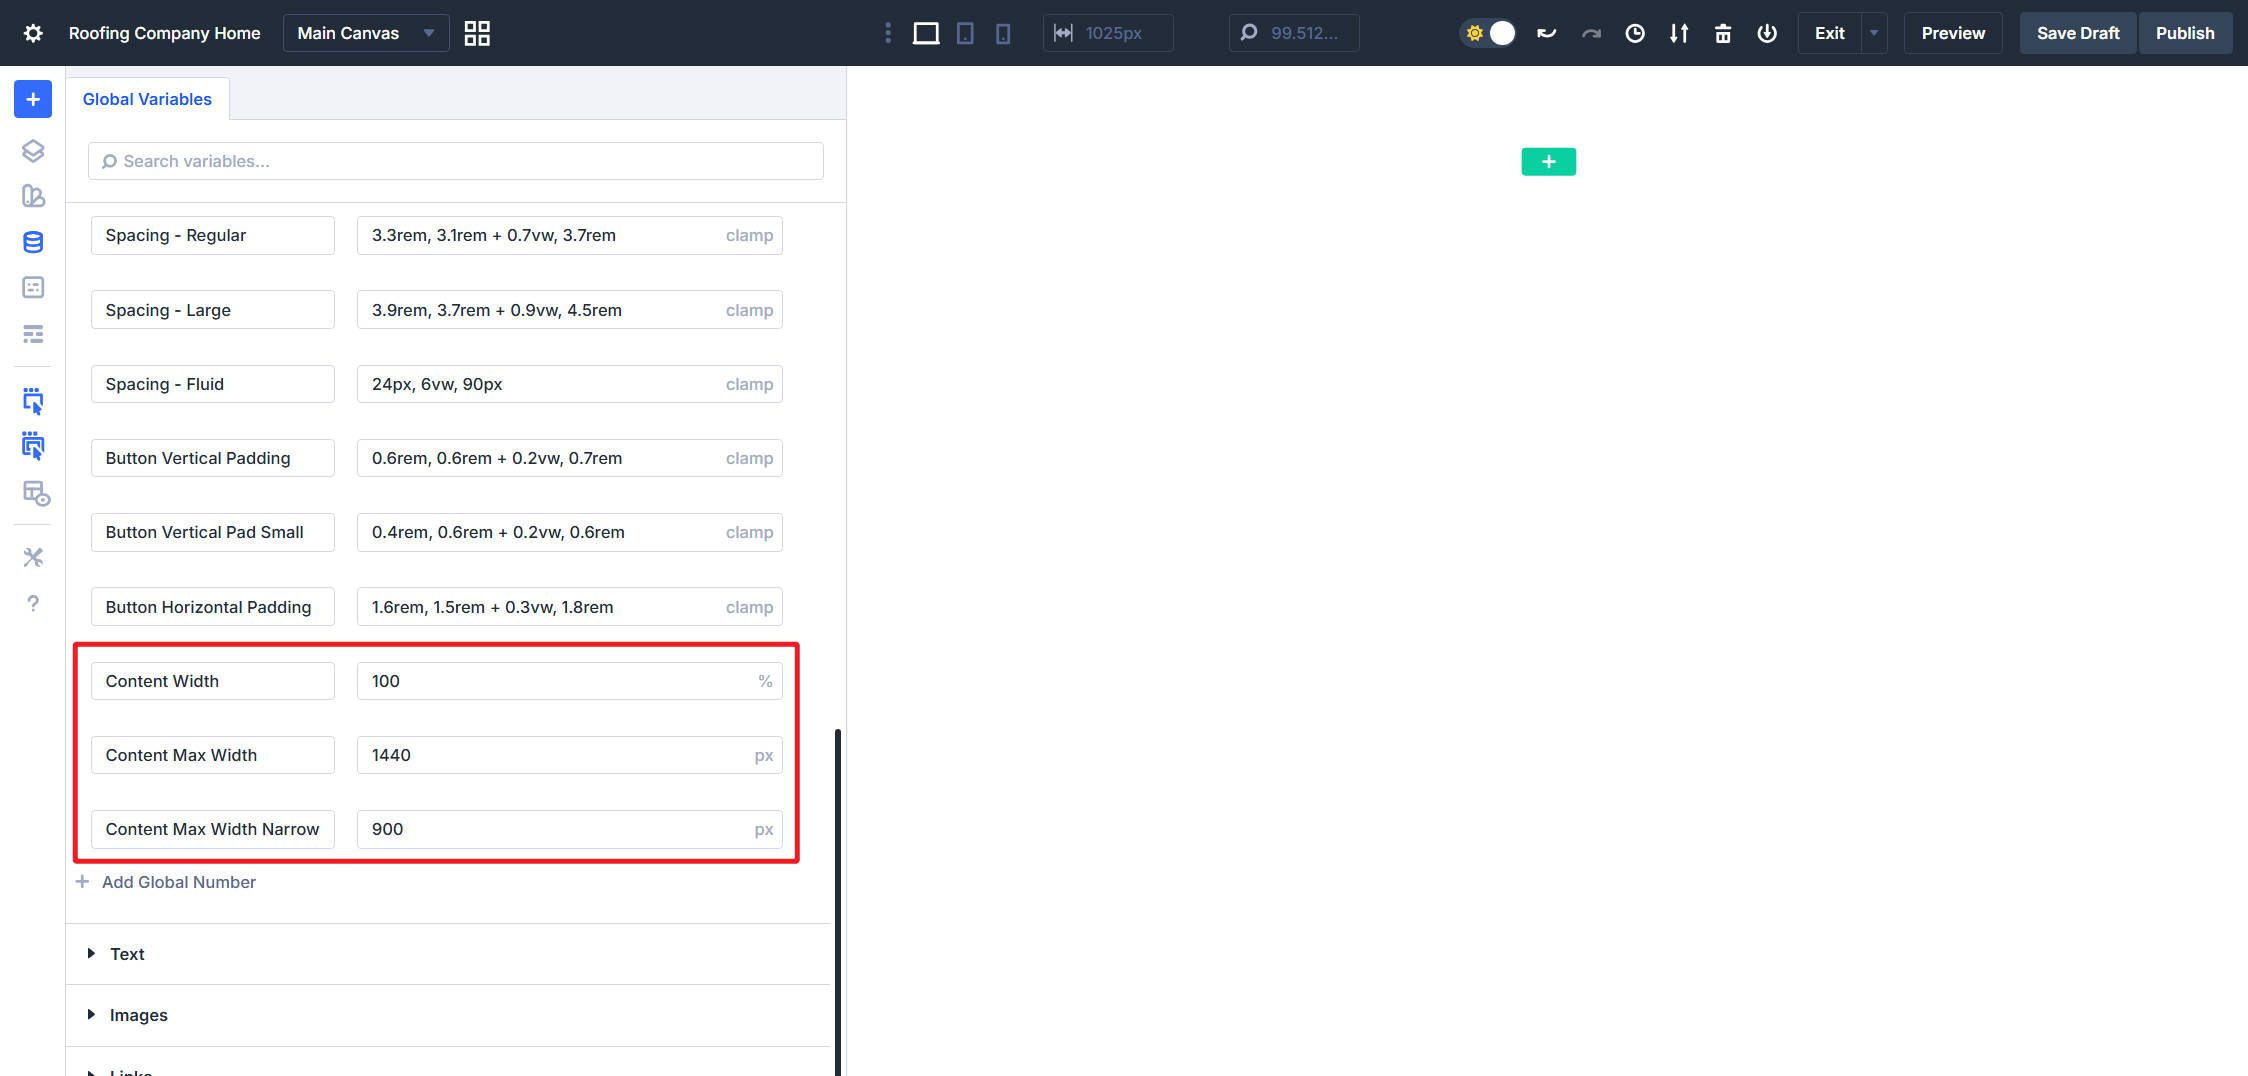
Format Variables
These subsequent ones are nice for setting in your Sections and Rows. Utilizing them as design variables permits you to regulate the width of your web site content material at any time throughout your design course of. Create these variables:
- Content material Width makes use of 100% as the bottom width for rows.
- Content material Max Width makes use of 1440px to cap content material width on giant screens.
- Content material Max Width – Slim makes use of 900px for smaller content material options and is good for selection and text-only callouts.
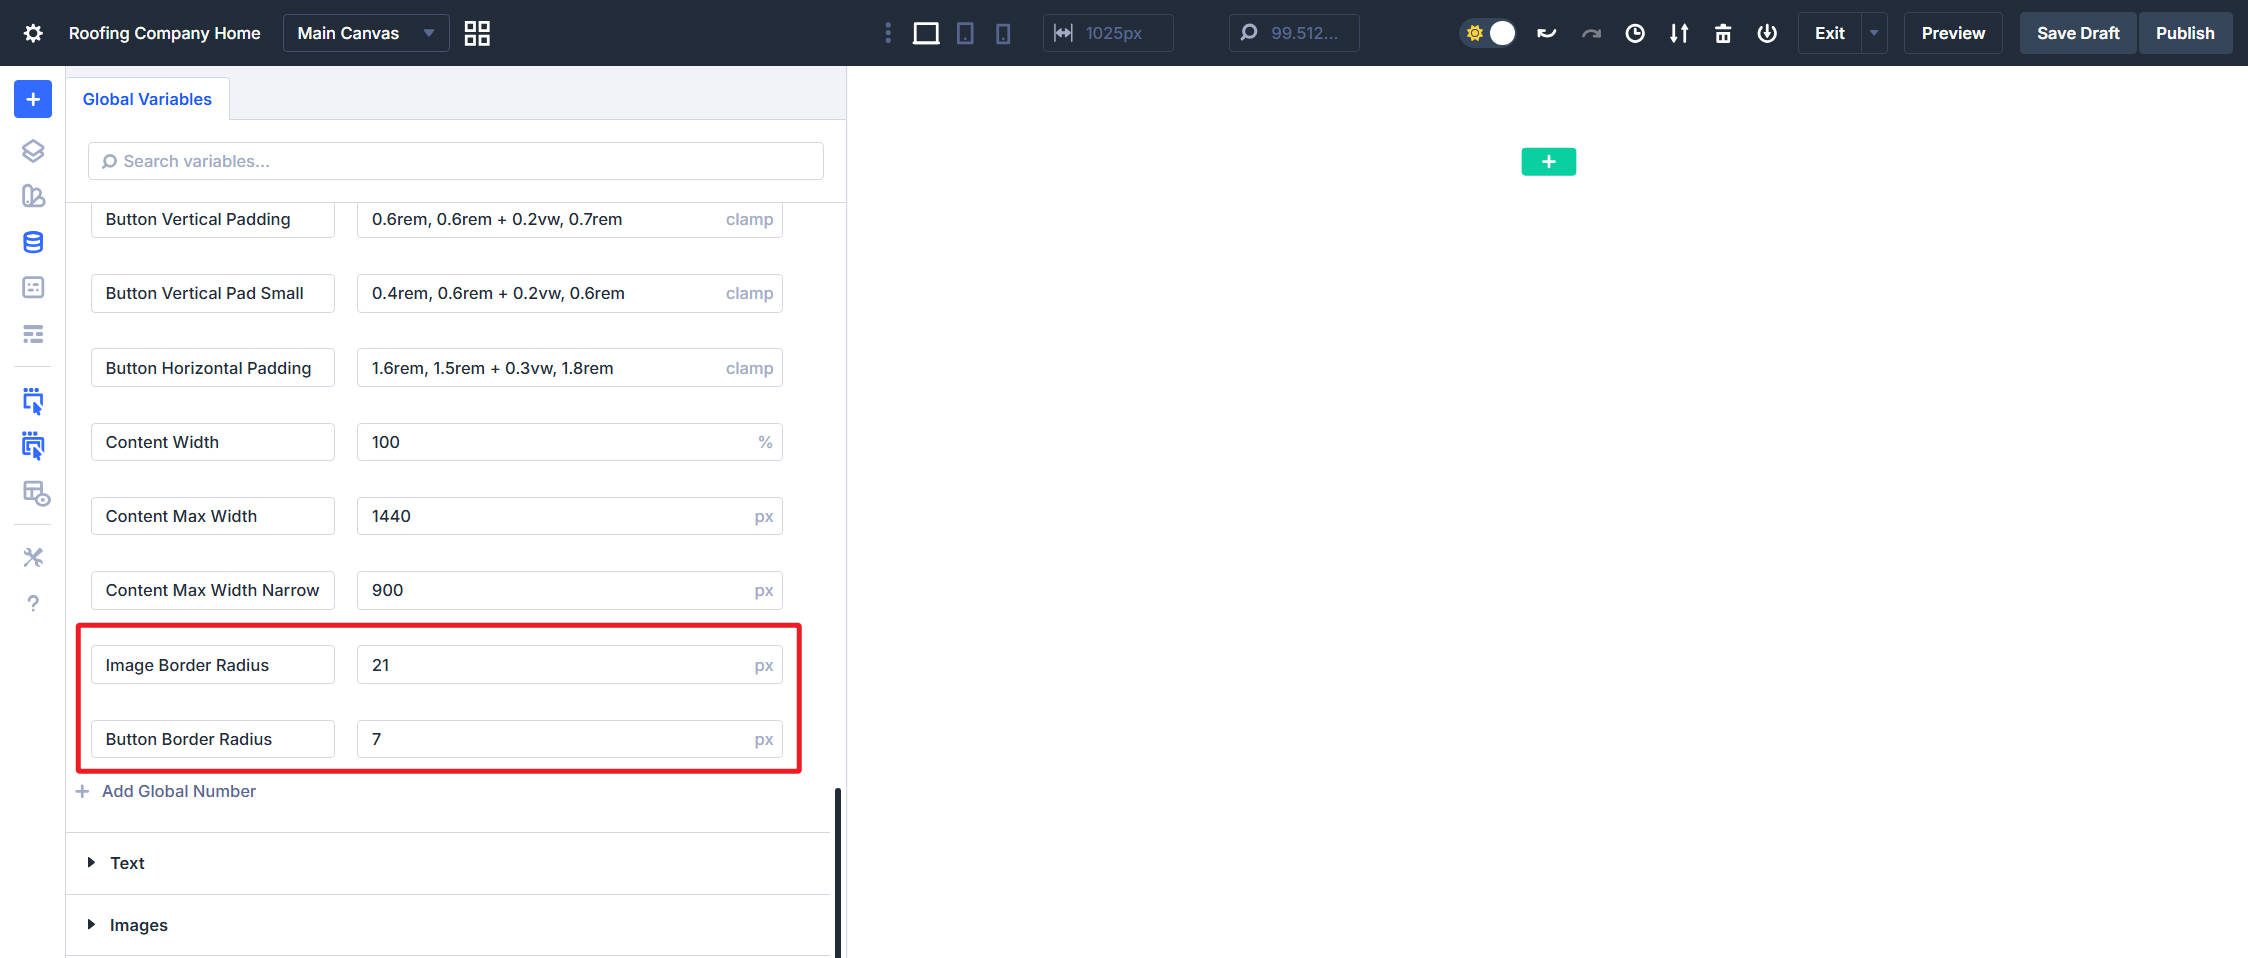
Border Radius Variables
This design will use two completely different border radius values. To maintain issues constant throughout the entire construct, I’ll set them up as Design Variables.
- Picture Border Radius makes use of 21px.
- Button Border Radius makes use of a easy 7px setting for barely rounded buttons.
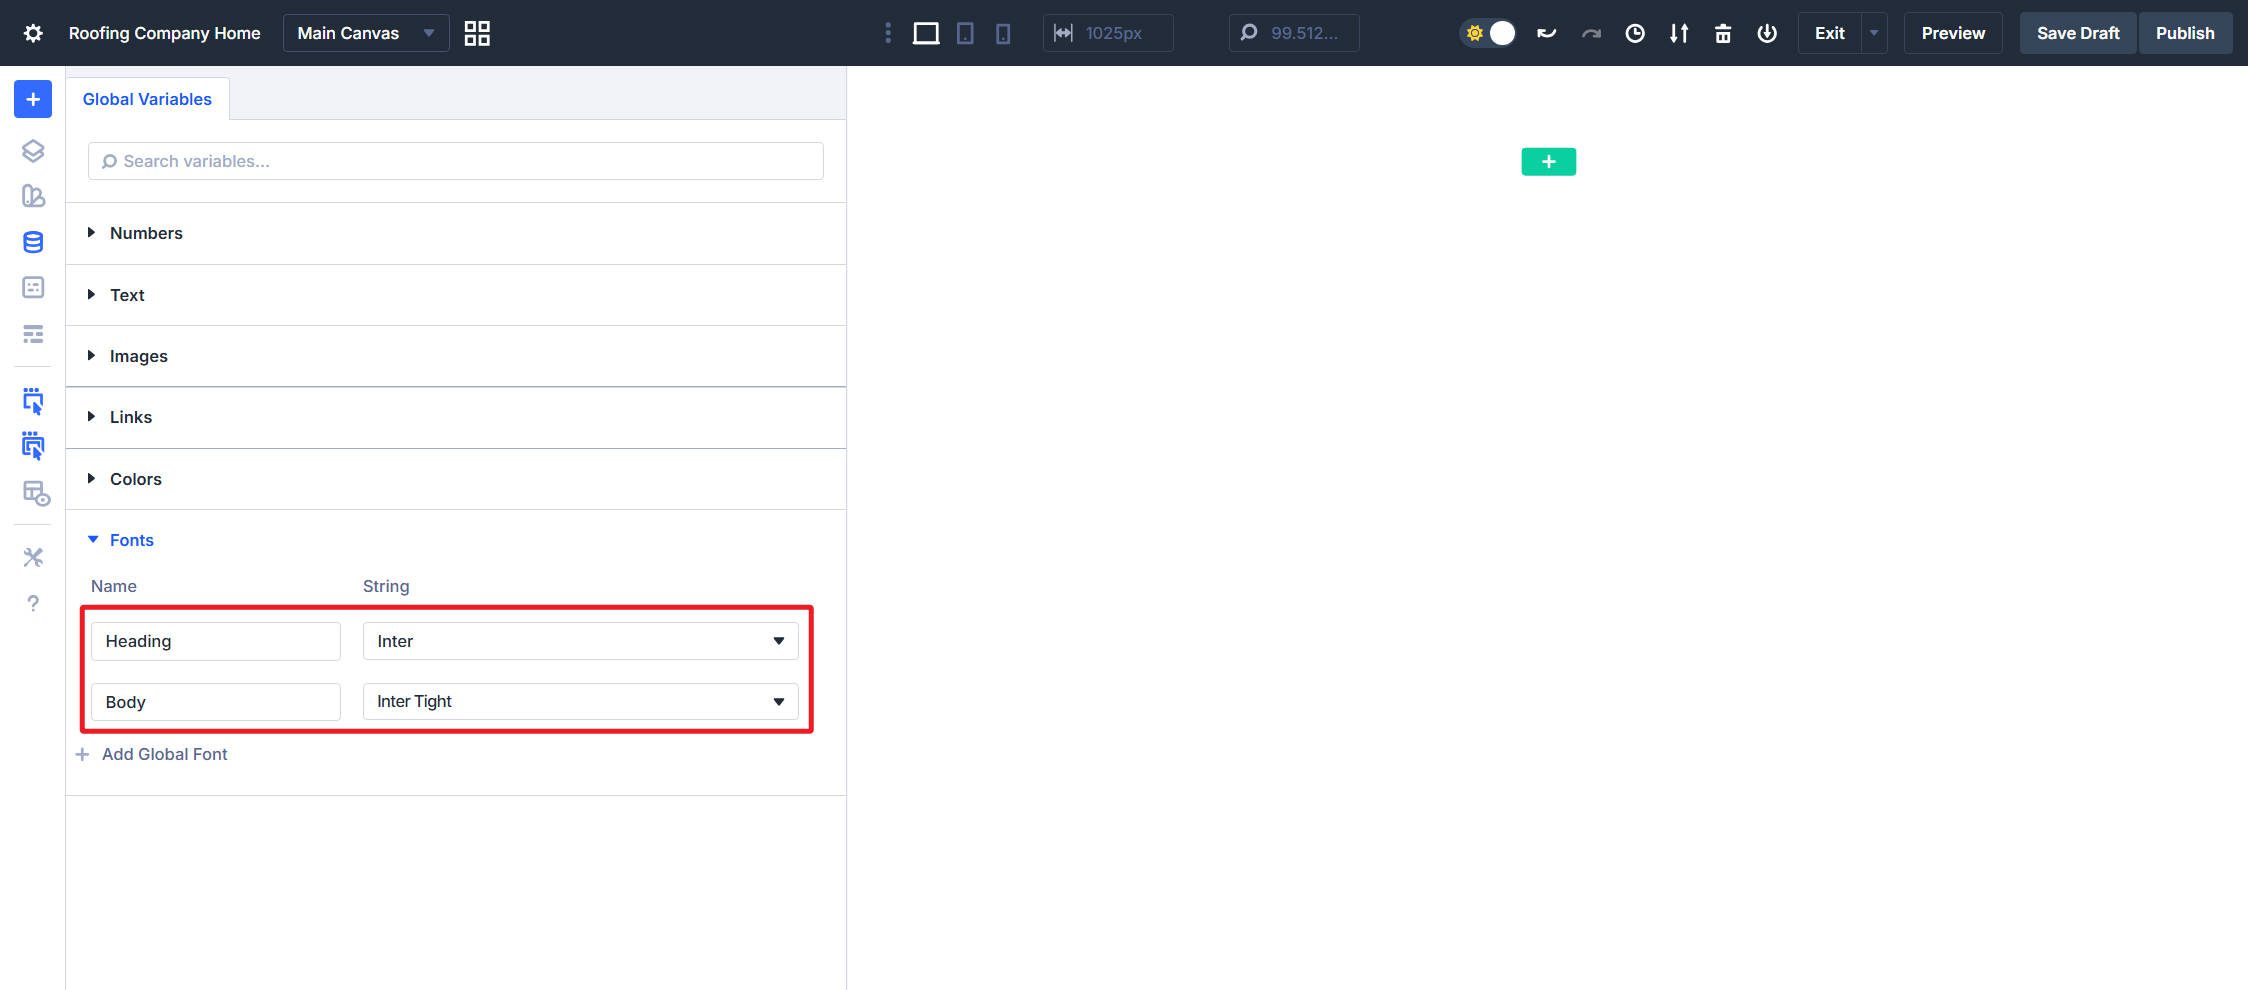
Default Font
Set your default Fonts to no matter you favor. I will likely be utilizing:
- Heading font set to Inter
- Physique font set to Inter Tight
One final reminder to save lots of your Design Variables
Half 2: Constructing Format Presets For Sections And Rows
Every thing you construct in Divi is inside Sections and Rows. Creating default presets for these, together with just a few variations, will add consistency and polish to your websites.
Part Format Presets
Sections are straightforward to arrange. A necessary facet of sections is making a web site “gutter.” That is your padding utilized to the left and proper sides of your display and is usually most necessary at smaller breakpoints. We may also configure flex settings so rows stack vertically fairly than horizontally.
Part Gutters
Create a Spacing Possibility Group Preset named Gutter. Set the Left/Proper Padding to Spacing – Fluid.
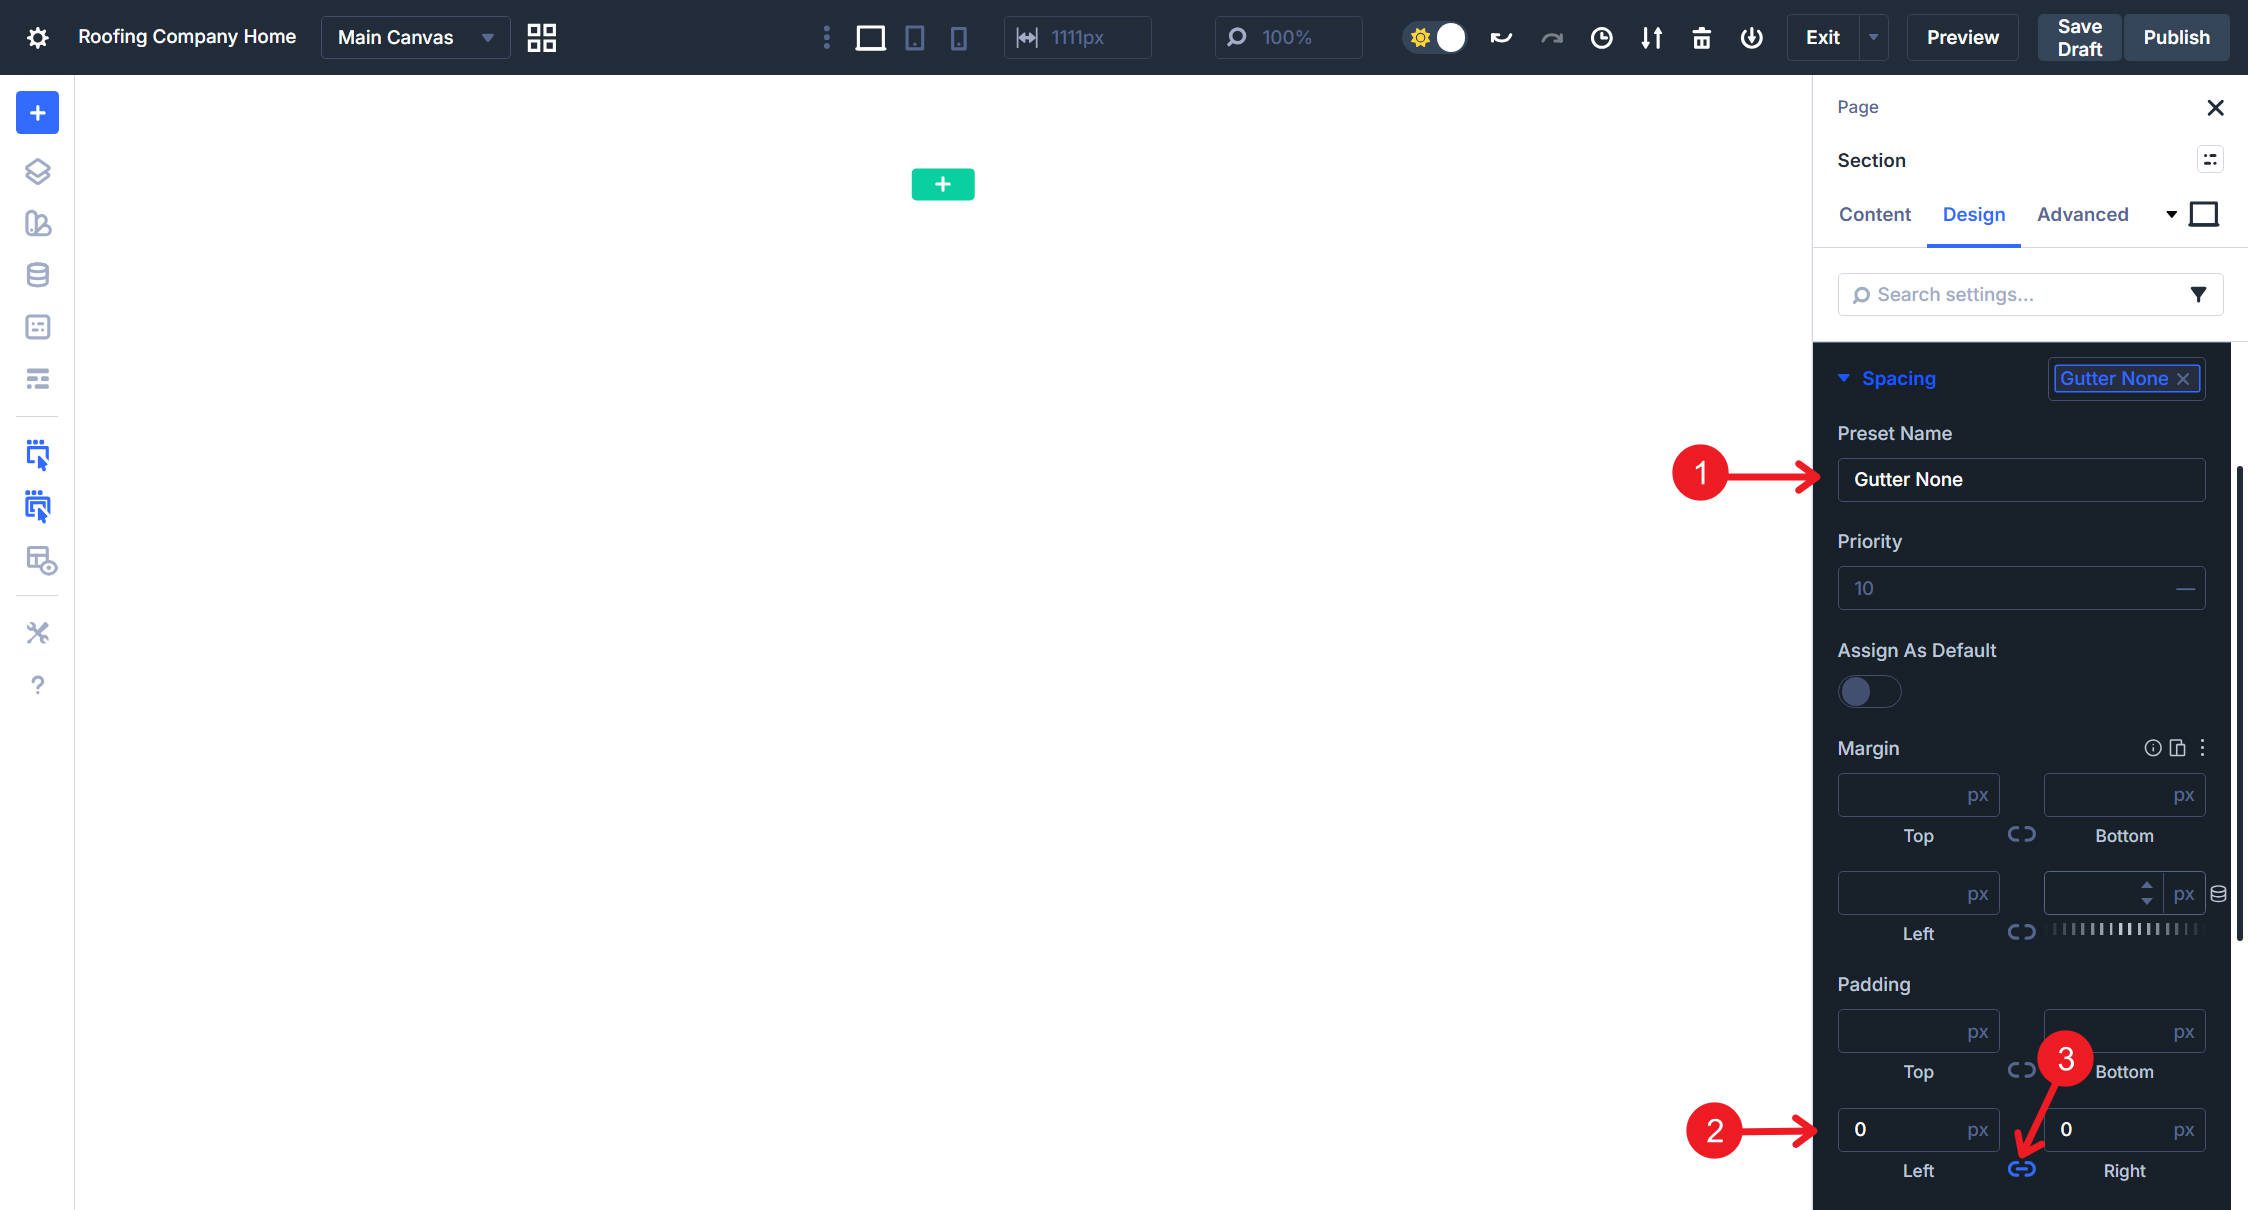
Make a second Spacing Possibility Group Preset and name it Gutter None or No Gutter. Set Left and Proper Padding set to 0px. Use this for full-bleed sections the place Row content material ought to lengthen to display edges.
Part Flex Settings
Sections stack Rows inside them vertically by default. Divi additionally assigns default hole, justify, and align values that we are able to customise for our web site.
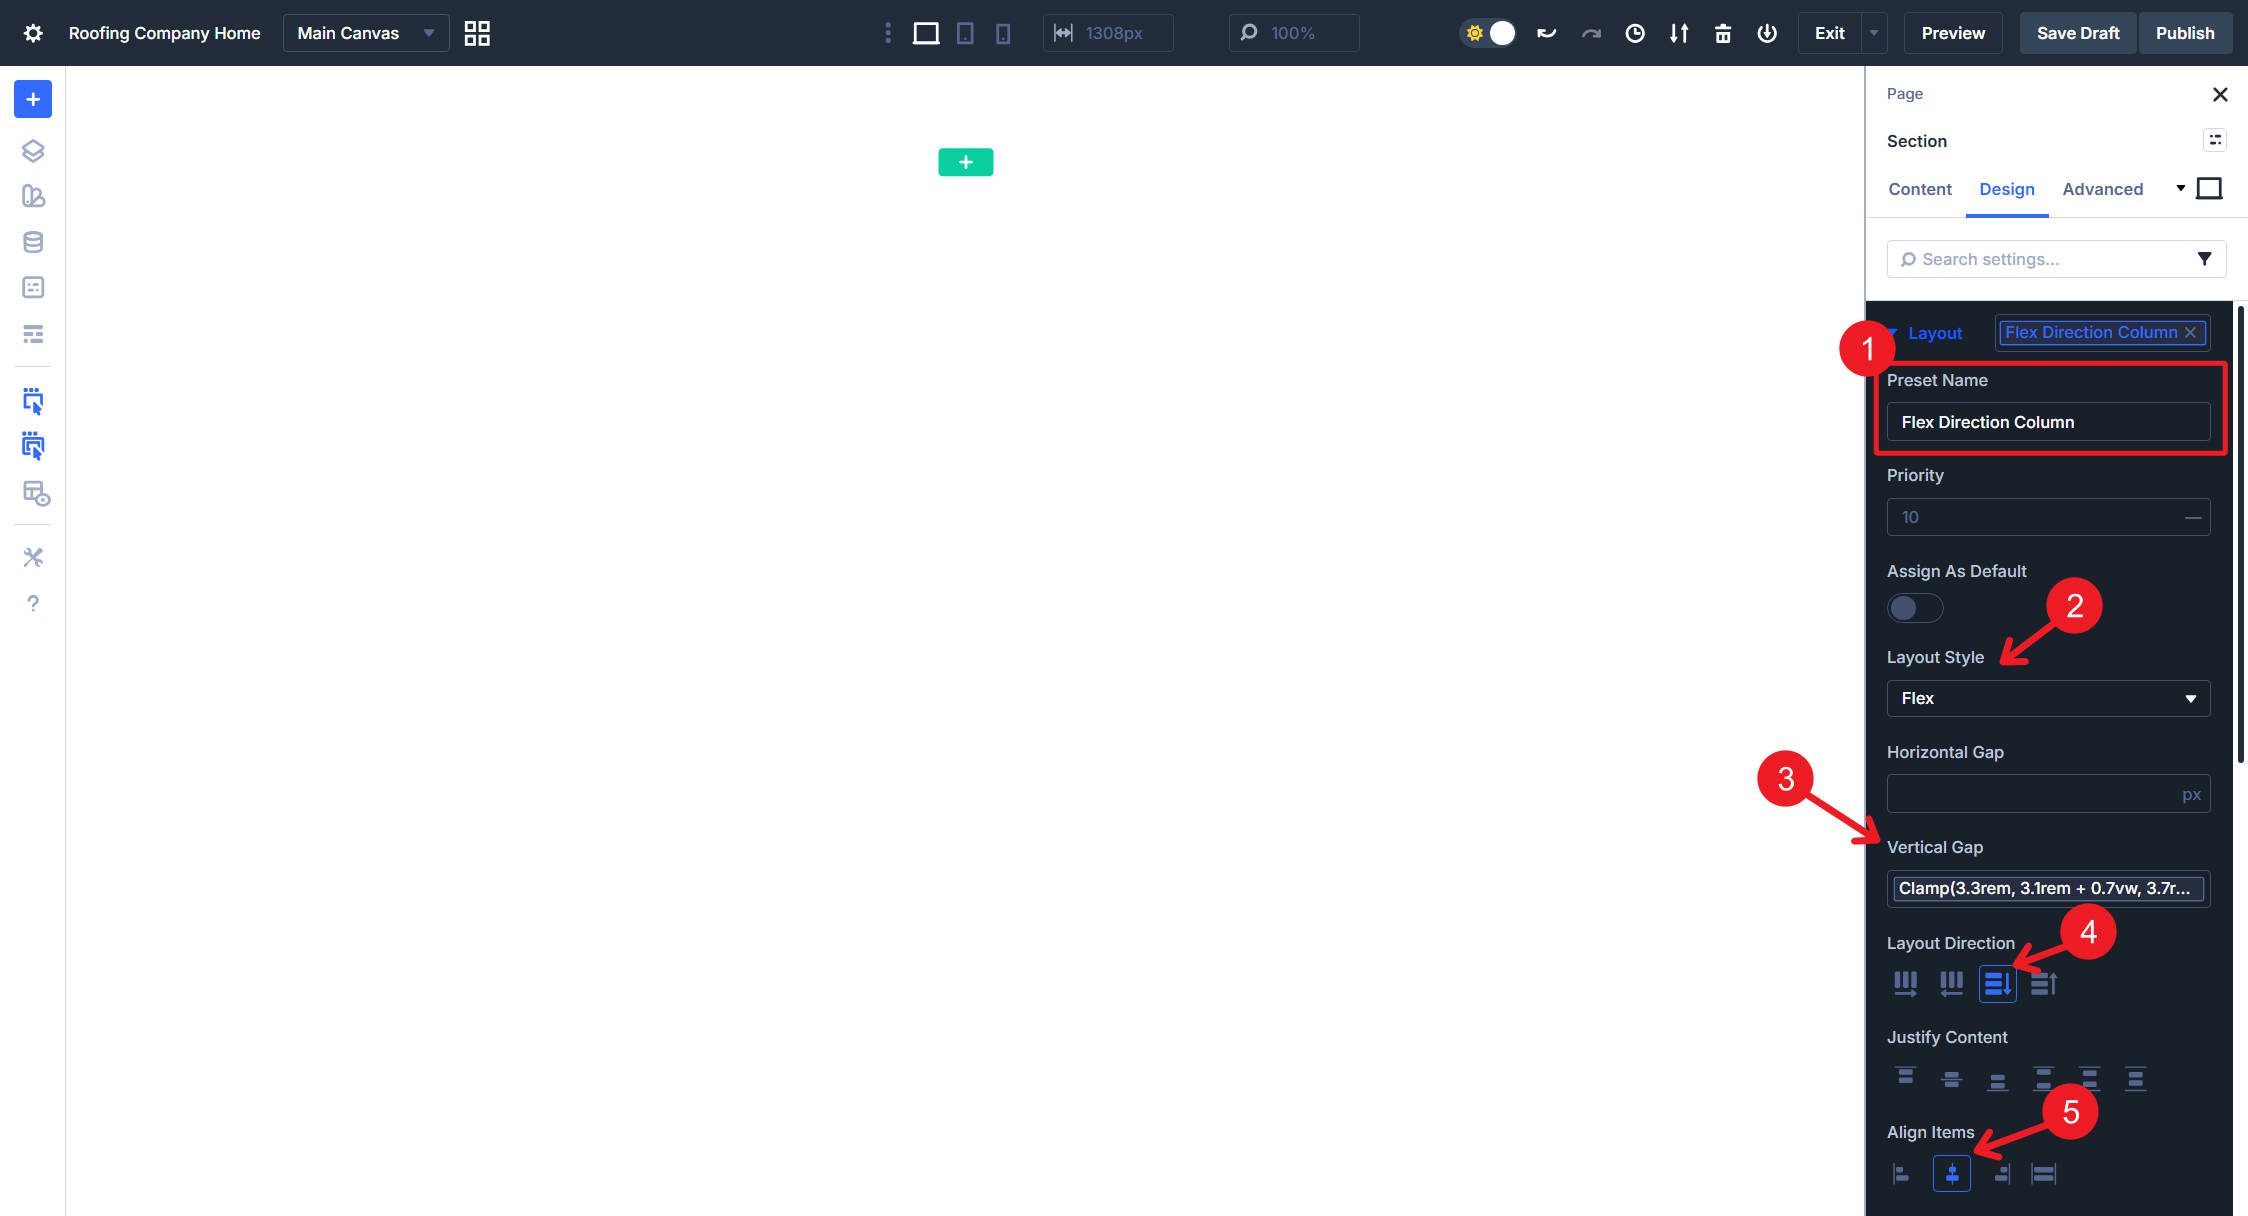
Contained in the Part, go to the Format choice group, and create an Possibility Group Preset referred to as Flex Course Column. Set the Show to Flex, Flex Course to Column, Align Objects to Middle, and Vertical Hole to Spacing – Common.
Part Background Presets
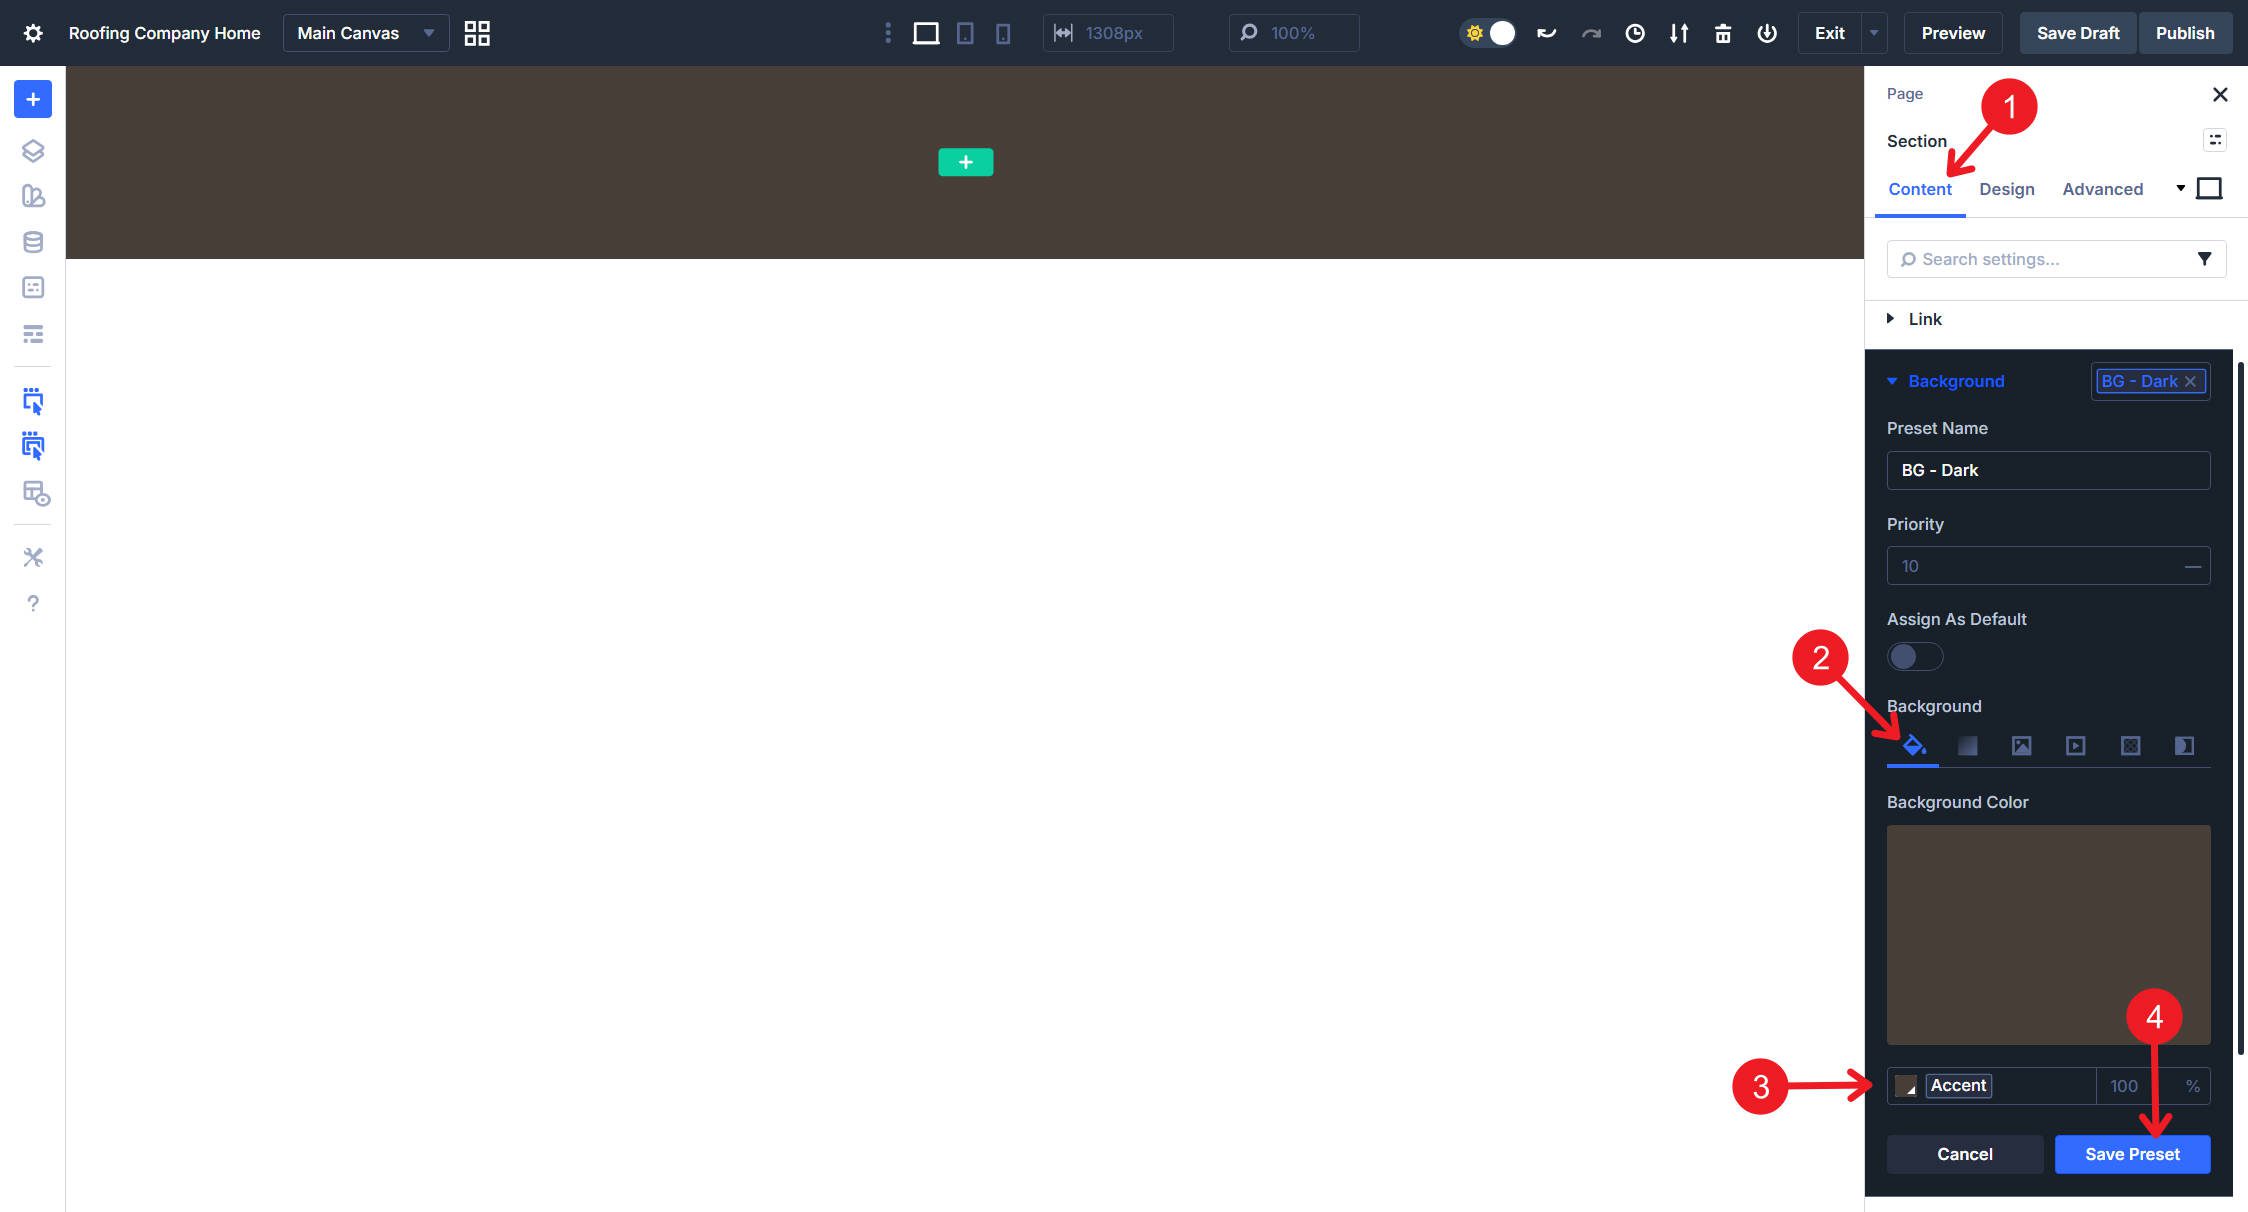
Background presets allow you to shortly swap between gentle and darkish part types. Within the Part’s Background choice group, create an Possibility Group Preset named BG – Darkish. Set the Background Shade to make use of the Accent Shade Variable.
Create BG – Mild with Background Shade set to white (#ffffff) or your most well-liked gentle background colour.
Create BG – Off-white with Background Shade set to a refined Off-white or gentle grey (#f5f5f5 works nicely). This supplies visible separation between sections with out the excessive distinction of darkish backgrounds.
Ensure you have a clean Background Possibility Group Preset set and set as your default.
Part Component Presets
Now that we now have all of the granular Possibility Group Presets created, we are able to mix them so they’re straightforward to deploy collectively. We are going to create variations for various background wants.
Edit the Default Part Preset. Add the Gutter preset from Spacing, the Flex Course Column preset from Format, and the BG – Mild preset from Background and save. You’ll be able to title it Part – Mild. This offers each new part correct gutters, vertical stacking, and a clear gentle background.
Do the identical for a brand new Part Component Preset named Part – Darkish. Add the Gutter preset from Spacing, Flex Course Column from Format, and BG – Darkish from Background.
After which once more for a brand new Part Component Preset named Part – Impartial, following the identical sample, however utilizing BG – Off-white for the background. This works nicely for alternating sections that want visible separation with out going totally darkish.
Create a brand new Part Component Preset named Part – Full Bleed (or No Gutter, Fullscreen—no matter title is sensible to you). Add No Gutter from Spacing, Flex Course Column from Format, and BG – Mild from Background. Use this when row content material ought to lengthen to display edges.
You now have 4 part variations. The default handles 70% of circumstances robotically, whereas Darkish, Impartial, and Full Bleed choices are prepared if you want them. In fact, you can create different variations, however it will at the least get you going.
Row Presets
Issues get a little bit extra attention-grabbing with Rows, as Rows constrain content material width inside sections.
Row Width Presets
With a Row, open its Default Row Component Preset and navigate to its Sizing choice group. Set the Width to 100% variable and Max Width to your Content material Max Width variable (1440px). Title the default preset Row – Normal Width.
Create one other Row Component Preset named Row – Slim with Width at 100% and Max Width set to your Content material Max Width – Slim variable (900px). This focuses consideration on text-heavy content material blocks and provides visible selection to your layouts.
Create Row – Fullwidth with Width set to 100% and Max Width set to none. This row expands to fill the out there house within the part which is beneficial for full-bleed photos or edge-to-edge content material.
You now have three row variations able to deploy. The Normal Width preset applies robotically to new rows, whereas Slim and Full choices are a click on away if you want them.
Row Layouts
Row structure presets management how Columns prepare themselves throughout the Row. You may simply create a half-dozen flex layouts and two or three grid layouts for a full web site design. Nevertheless, we’ll use a Divi superpower to make this even easier.
Construction Layouts are preconfigured Flex and Grid layouts. You’ll be able to consider them like presets since they’re sitting there ready so that you can use them. However as a substitute of needing to create them, we did that for you. There are two methods of setting these.
The primary approach is if you add a brand new Part to your web page, you can be requested to decide on a Construction Format. On the highest are completely different Flex layouts, and on the underside are preconfigured Grid layouts.
The second approach is if you click on a Row and see its settings panel on the suitable. Within the Content material tab, you’ll discover the Component choice group. Open that, and you will note a button labeled Apply Construction Template. Clicking that may allow you to change the construction to any of the out there choices.
These behave loads like presets, however they’re built-in construction templates fairly than user-created presets.
Column Presets
We gained’t spend an excessive amount of time right here, however there’s a lot that you can do. Click on on a Column on the web page to disclose its Settings panel. Go to Design > Format and create a brand new Possibility Group Preset. Title it Flex Course Row and ensure it’s set to Show Flex and Flex Row.
This could complement the Flex Course Column preset made above within the Sections half. Should you needed to do extra right here, you can create Possibility Group Presets for varied Hole sizes and Align-items (begin, heart, and finish).
Container Padding Presets
As you recall, we now have spacing variables able to go, however we haven’t added many presets with them. Since Spacing is a shared choice group, you’ll end up utilizing these loads.
Open a Row’s settings and navigate to the Spacing choice group beneath the Design tab. Create a brand new Possibility Group Preset named Container Padding. Set all 4 Padding values (Prime, Backside, Left, Proper) to your Spacing – Common variable.
Create one other Possibility Group Preset named Container Padding Giant. Set all 4 Padding values to your Spacing – Medium variable. This offers you a extra beneficiant choice for hero-style containers or content material areas that profit from further respiratory room. The method is similar to what you simply did, solely with a unique variable chosen. You’ll be able to repeat this for every of your Spacing Design Variables as you want.
Half 3: Constructing Typography Presets
Typography in Divi entails two main modules: the Textual content Module for physique content material and wealthy textual content headings, and the Heading Module for standalone headings. Every wants its personal preset technique.
My opinion is that typography is the place Divi’s Preset Design System actually begins to point out its energy and suppleness.
Heading Module
The Heading Module permits you to set types in a single Heading Possibility Group. Which means we don’t have to fret about physique textual content types but. So, we’ll put our varied heading sizes, heading colour choices, and CSS guidelines into Possibility Group Presets, after which collect our most-used mixtures into useful Component Presets.
Heading Measurement Presets
Add seven Heading modules to your web page and provides every some customized content material. Click on the primary one to disclose its settings, then navigate to the Heading Textual content choice group beneath the Design tab.
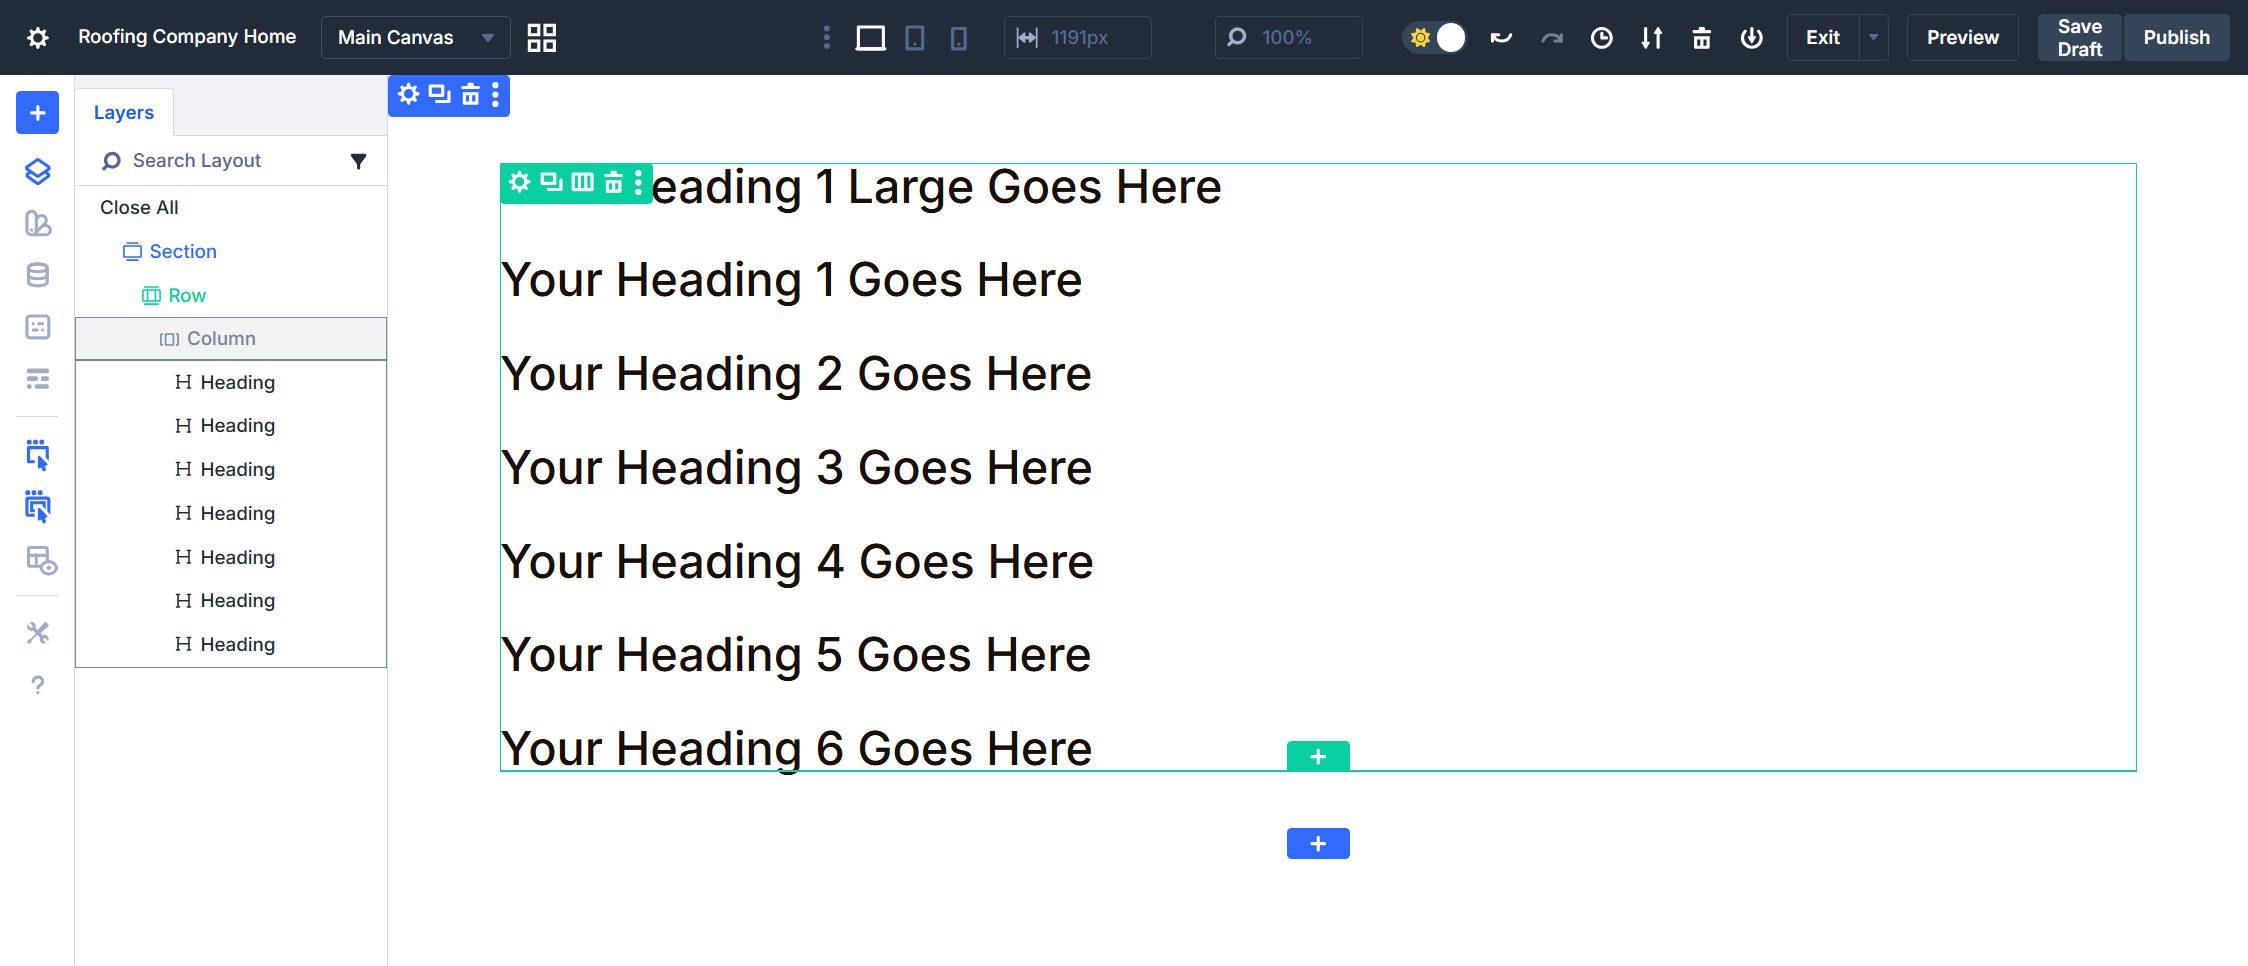
Click on the Possibility Group Preset chip within the Heading Textual content choice group, then create a brand new preset named H1 Giant Measurement. Set the Font Measurement to your H1 – Giant variable and Line Top to the 1.2 variable.
Create presets for the remaining heading ranges. Every makes use of its corresponding dimension and line top variables:
- H1 Measurement makes use of the H1 variable with the 1.2 line top variable.
- H2 Measurement makes use of the H2 variable with the 1.3 line top variable.
- H3 Measurement makes use of the H3 variable with the 1.3 line top variable.
- H4 Measurement makes use of the H4 variable with the 1.4 line top variable.
- H5 Measurement makes use of the H5 variable with the 1.4 line top variable.
- H6 Measurement makes use of the H6 variable with the 1.4 line top variable.
Heading Shade Presets
Nonetheless within the Heading Textual content choice group, create Heading Mild with Textual content Shade set to your Heading Textual content Mild variable. Use this when headings seem on darkish backgrounds.
The darkish heading colour was already set once we selected a darkish textual content colour for the Heading Textual content Design Variable. So, this Mild preset stacks along with your dimension presets to create straightforward variations. An H2 on a darkish part makes use of H2 Measurement + Heading Mild. The identical heading on a light-weight part solely makes use of H2 Measurement.
Heading CSS Preset
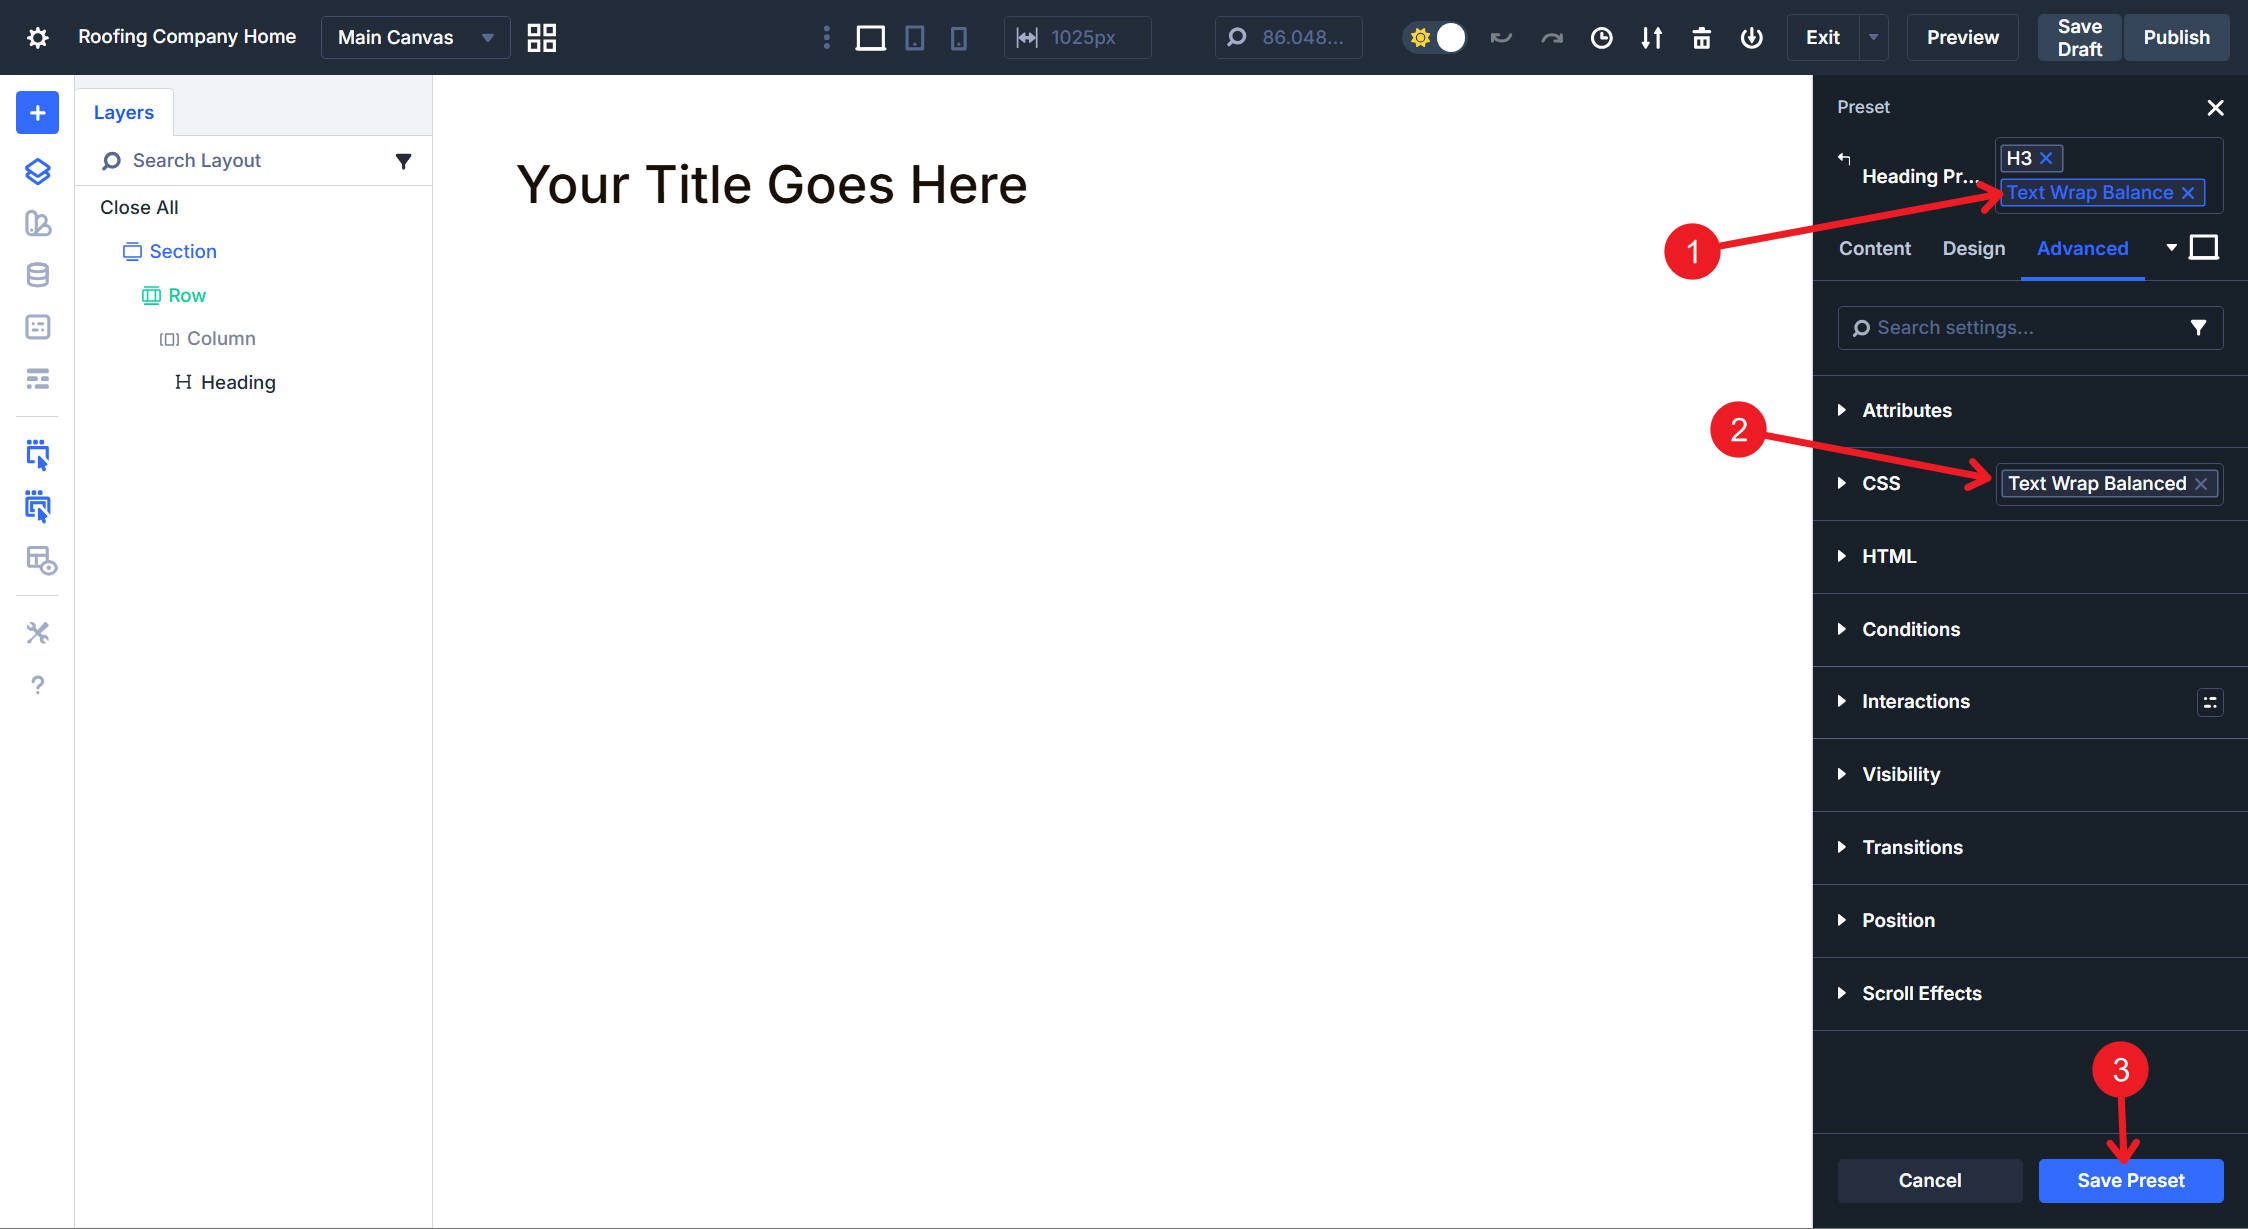
Create Textual content Wrap Steadiness with the CSS rule text-wrap: steadiness; within the Fundamental Component subject. Balanced wrapping works higher for headings and brief textual content blocks, distributing phrases extra evenly throughout traces.
Create Textual content Title Case with the CSS rule text-transform: capitalize; within the Fundamental Component subject. This capitalizes the primary letter of every phrase robotically.
Should you don’t assume you’ll like or want these CSS presets, that’s superb, you simply gained’t embrace them within the Component Presets under.
Creating Heading Component Presets
Component Presets bundle your most-used mixtures of Possibility Group Presets for fast deployment. Click on the Component Preset chip on the prime of the Heading module settings.
Create Component Presets for every of your heading sizes (‘H1 – Giant’ by way of ‘H6’). So, for H2, give it a reputation of H2 Measurement and assign the Possibility Group Preset for H2. Do this for every degree.
Create an Component Preset named Mild and Nest the Heading Mild Possibility Group Preset inside it.
Lastly, create two extra Component Presets for balanced textual content wrapping and capitalization. You’ll be able to title them the identical factor you probably did on the choice group degree.
Do that for each the Textual content Wrap Steadiness and Textual content Rework Capitalize Possibility Group Presets
Relying in your choice, chances are you’ll wish to reorder the presets as they’re offered within the Component Preset dropdown. To do this, we are able to use the Preset Supervisor to reorder them as you want.
Why Remake These as Component Presets?
I moved all of those to Component Presets, though they comprise nothing however our Possibility Group Presets, as a result of they’re simpler to entry. To make use of these presets, click on on the aspect you wish to type and stack the Component Presets. You should use the Possibility Group Presets, however that requires clicking a component, then opening the right tab, after which clicking the right Possibility Group Preset icon once more. That is only a shortcut and my choice.
Textual content Module
There will likely be a little bit overlap right here, for the reason that Textual content module may output headings, nevertheless it additionally brings just a few further styling wants.
Within the Textual content Module, we’ll create Possibility Group Presets for physique textual content dimension, physique textual content colour, physique textual content font weight, and a line of CSS. We are going to then create Component Presets that bundle dimension, colour, weight, and CSS enhancements collectively.
The Textual content Module additionally has heading types that pair with its Wealthy Textual content editor, which helps headings. We are going to create these Heading types in an identical, however barely simpler, approach than we did with the Heading Module.
Physique Textual content Possibility Group Presets
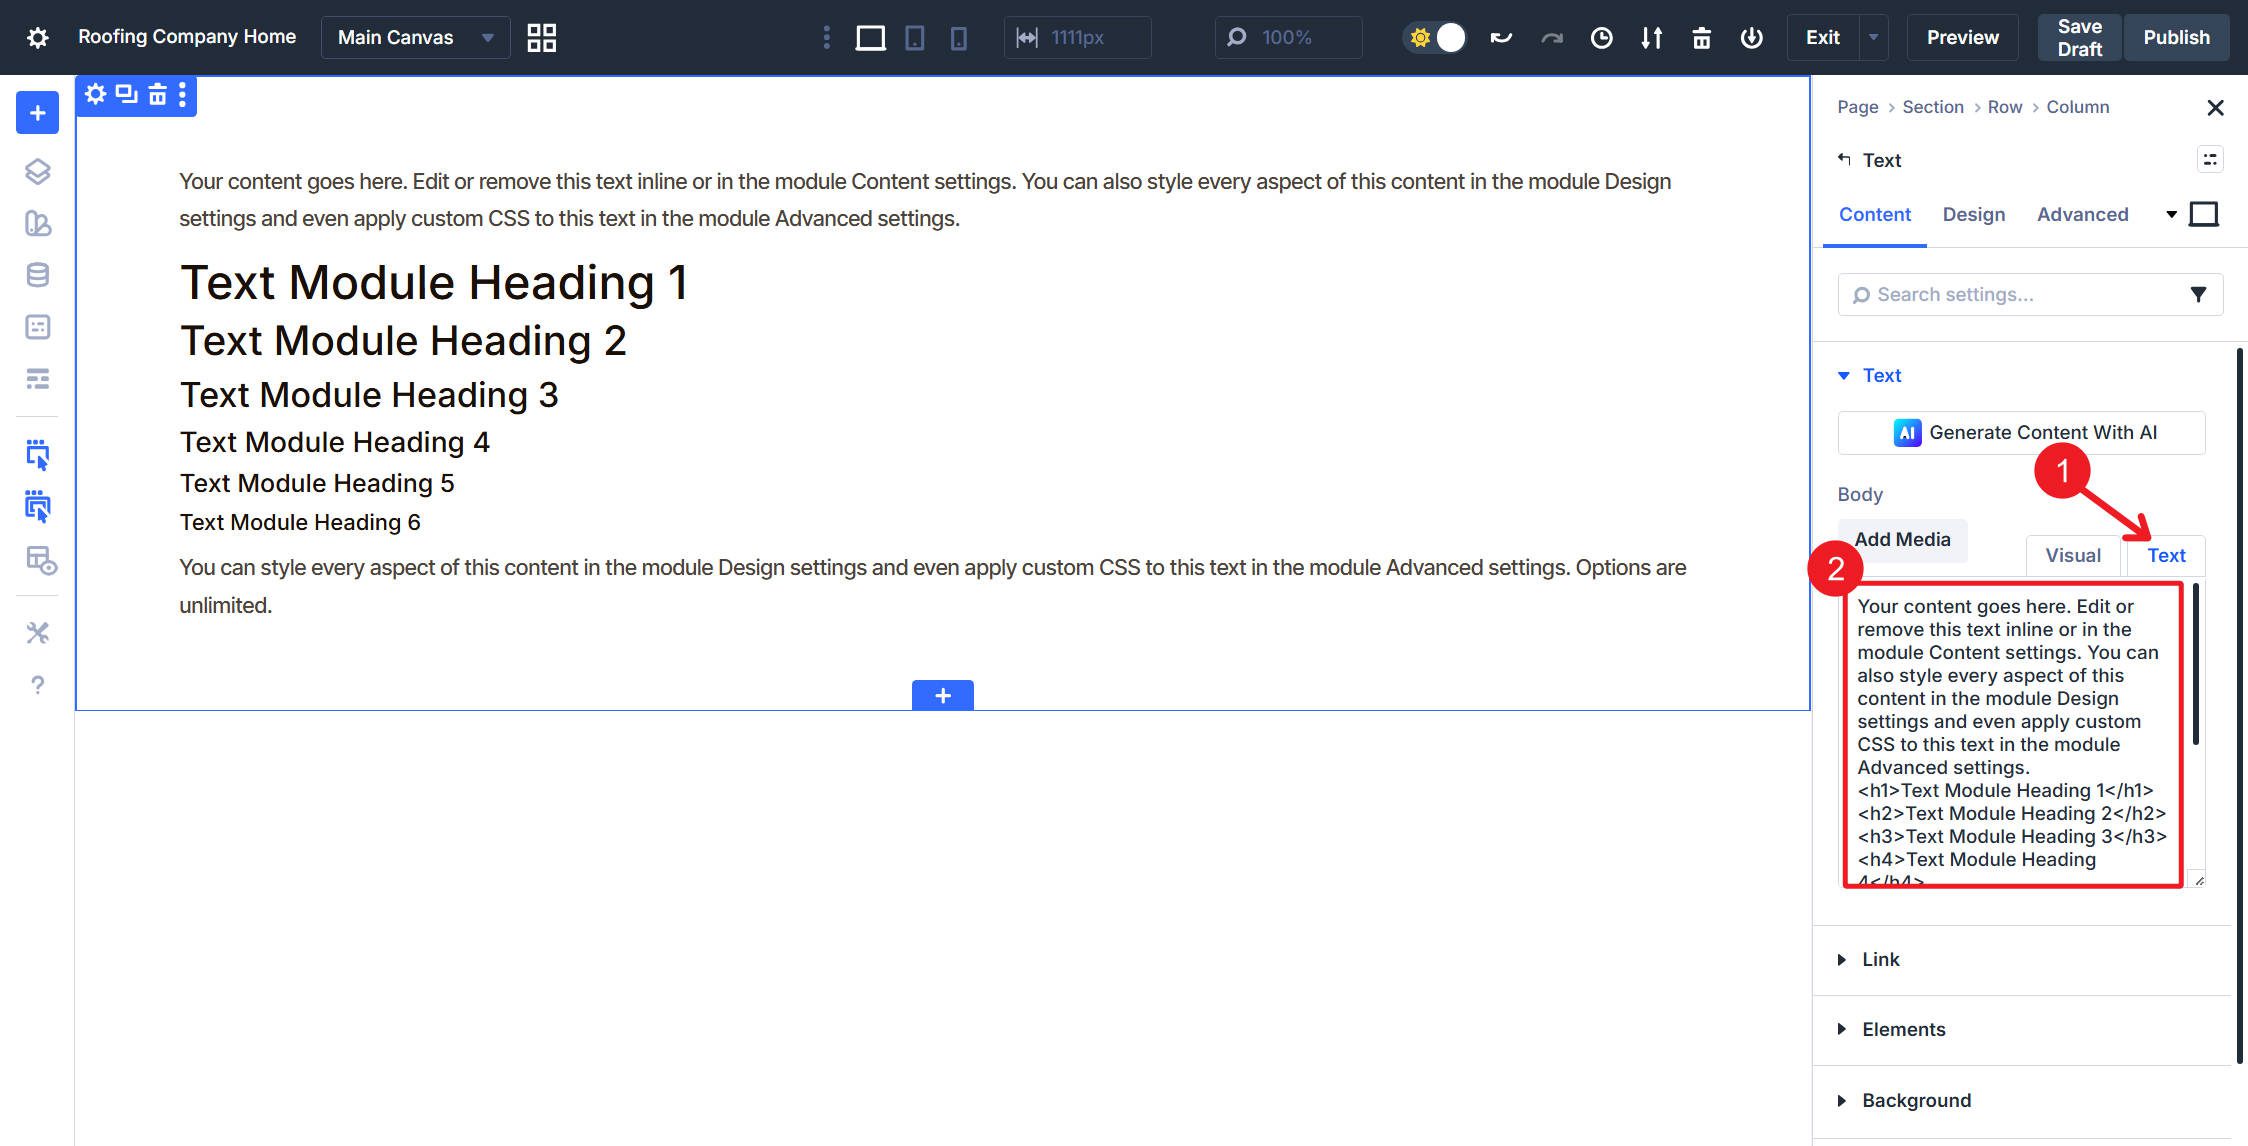
Earlier than constructing Component Presets, create the Possibility Group Presets that may nest inside them. Add a Textual content module to your web page and open its settings. Within the textual content tab of the Wealthy Textual content editor, embrace this placeholder textual content:
Your content material goes right here. Edit or take away this textual content inline or within the module Content material settings. It's also possible to type every aspect of this content material within the module Design settings and even apply customized CSS to this textual content within the module Superior settings.Textual content Module Heading 2
Textual content Module Heading 3
Textual content Module Heading 4
Textual content Module Heading 5
Textual content Module Heading 6
You'll be able to type each facet of this content material within the module Design settings and even apply customized CSS to this textual content within the module Superior settings. Choices are limitless. Once more, choices are:
And for those who like numbers:
- Then that is nice
- This too, clearly
And lastly, a quote to hold your hat on.
Creativity is seeing what others see and considering what nobody else ever thought. -Albert Einstein
Physique Measurement Presets
Within the Textual content choice group beneath the Design tab, create an Possibility Group Preset named Regular Textual content Measurement. Then set the Font Measurement to your Physique Textual content Design Variable and Line Top to your Line Top Physique variable set at 1.7 utilizing the Physique Textual content Line Top variable. Apply these identical settings for hyperlinks, unordered lists, ordered lists, and quotations.
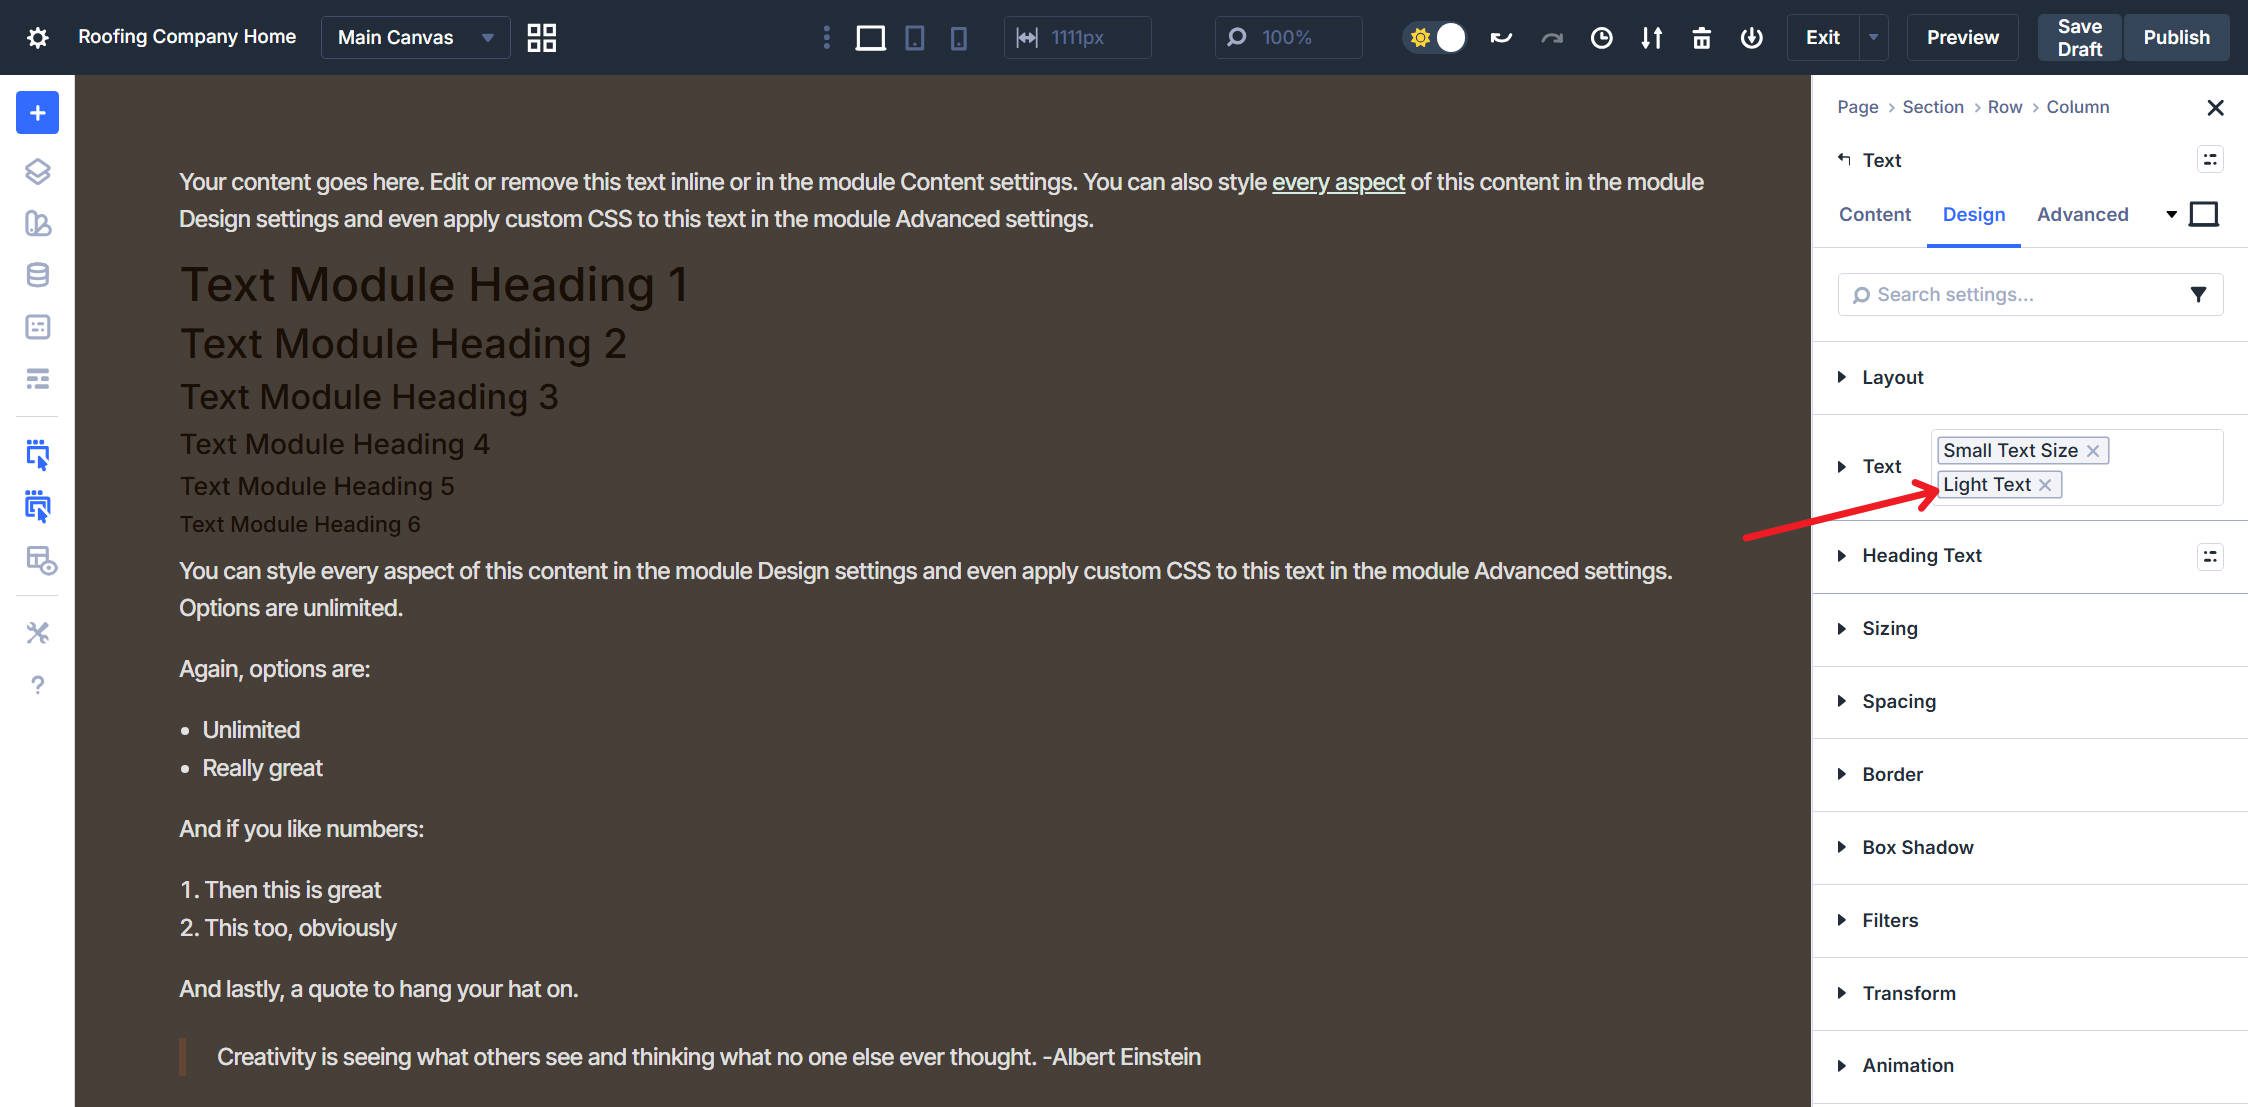
Do the identical factor once more, however this time create an Possibility Group Preset named Small Textual content Measurement. Set the Font Measurement to your Physique Textual content Small variable and Line Top to your 1.6 line top variable. Apply these identical settings for hyperlinks, unordered lists, ordered lists, and quotations.
Physique Shade Presets
Create a brand new Possibility Group Preset named Darkish Textual content and set the Line and Textual content Shade to your Physique Textual content Shade variable. Apply the identical colour for unordered lists, ordered lists, and quotations. Nevertheless, for hyperlinks, select your Secondary Mild colour variable and underline the textual content. Open the Hover state, and for the Hyperlink, change the Hyperlink Shade on Hover to Main Mild. Use this when textual content seems on gentle backgrounds.
Do the identical factor once more, however this time create a brand new Possibility Group Preset named Mild Textual content with Textual content Shade set to your Physique Textual content Mild variable. Apply the identical colour for unordered lists, ordered lists, and quotations. Nevertheless, for hyperlinks, select your Physique Textual content Mild Hyperlink variable and add an underline. Within the Hover state, use the Secondary Mild variable because the hyperlink colour. Use this when textual content seems on darkish backgrounds.
Physique Weight Preset
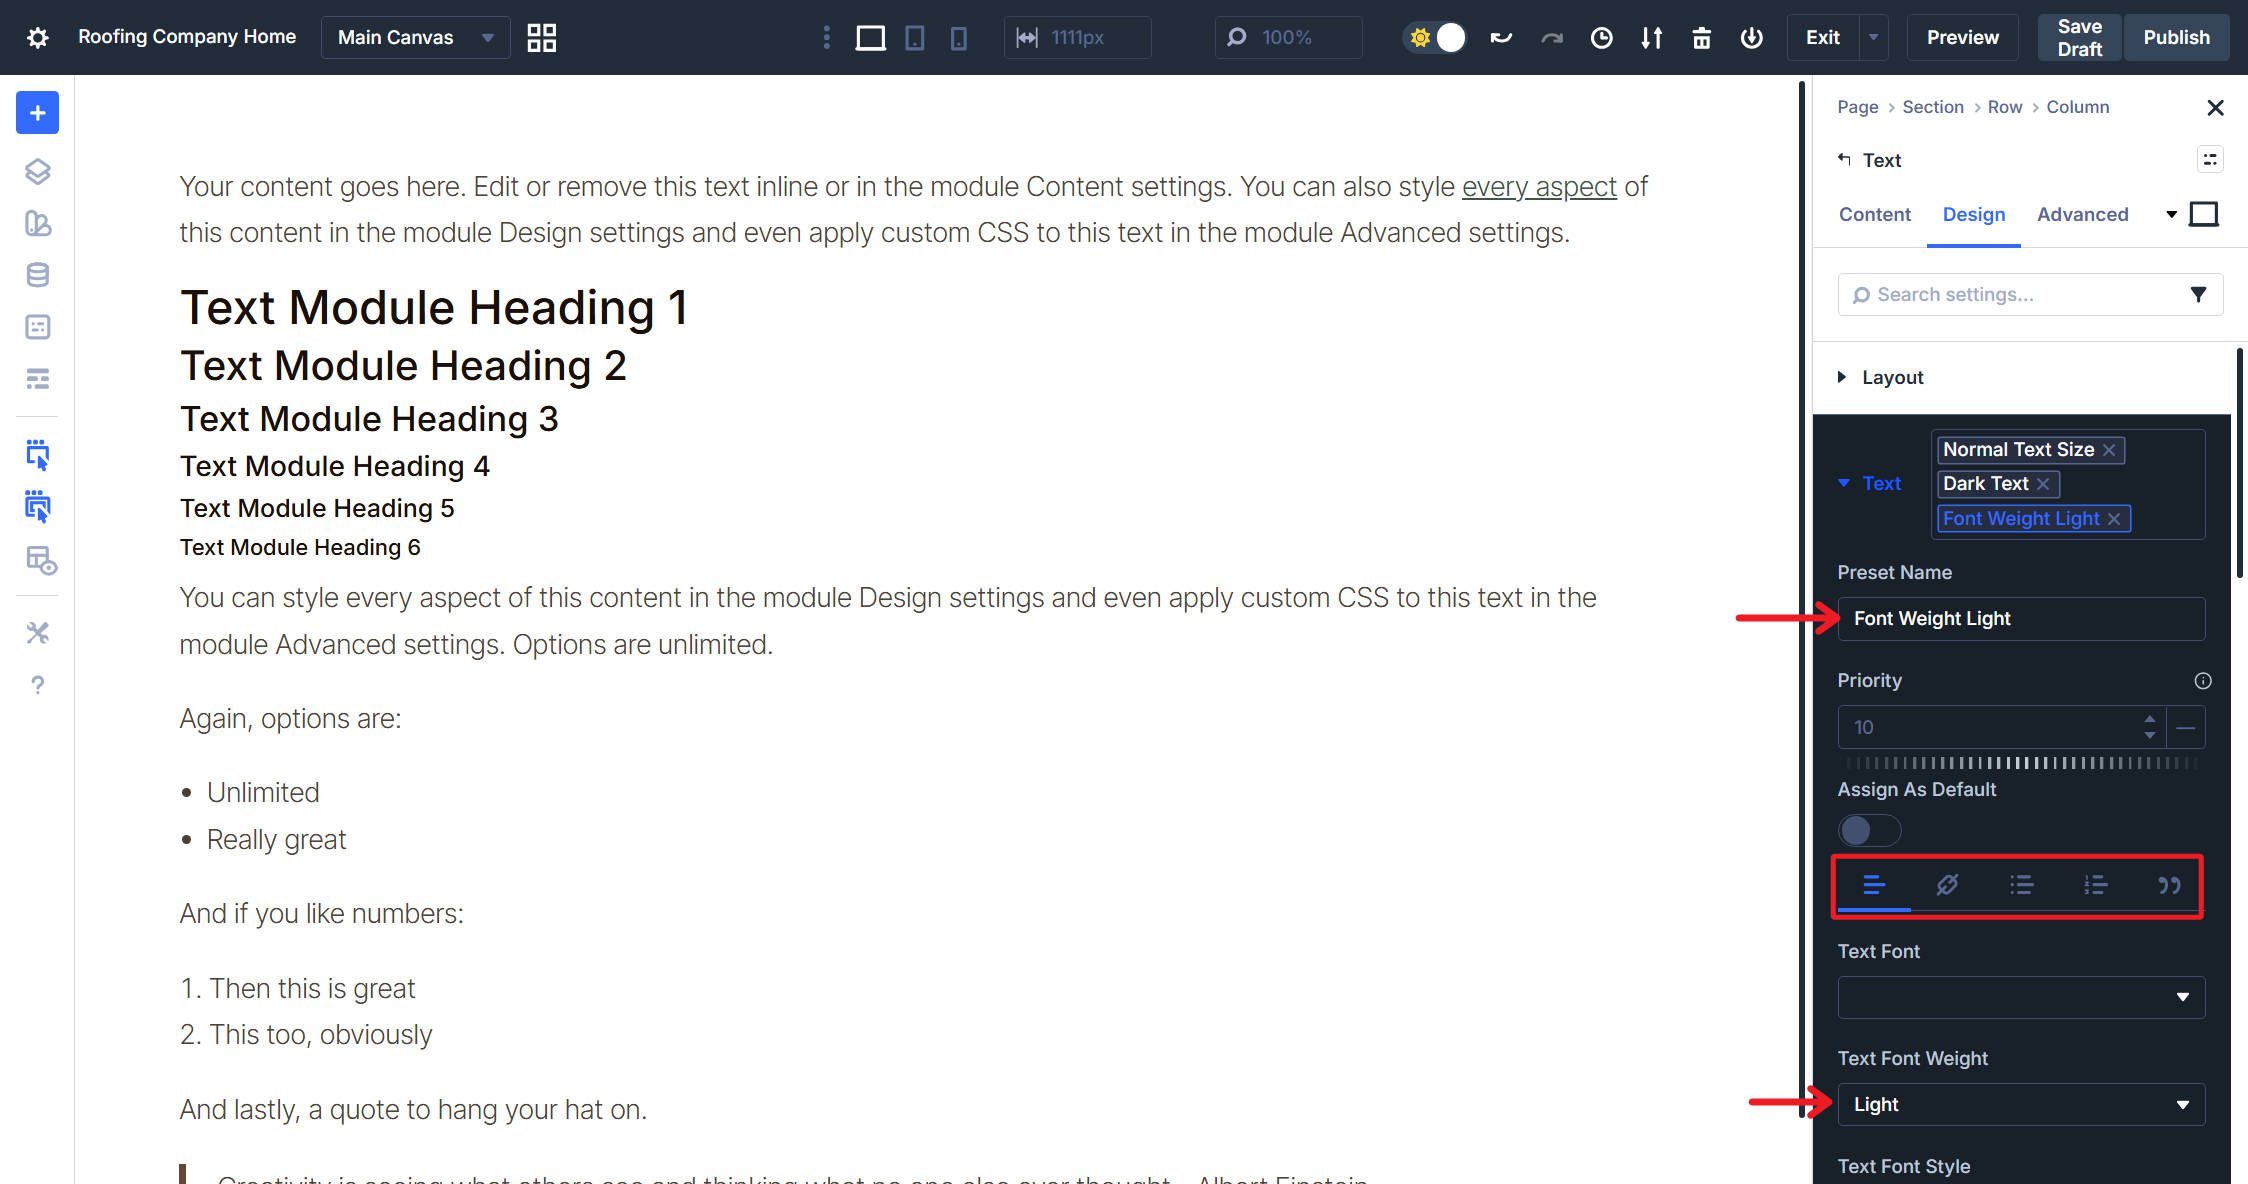
Set Font Weight to Mild and save the Possibility Group Preset with the title of Font Weight Mild. Add extra weight presets in case your design requires them, however for this instance, we’ll solely use one.
Physique CSS Presets
Identical to the headings, we are able to add a single-line CSS rule that may make issues look a little bit higher. Below Superior > CSS, create a brand new Possibility Group Preset. Title it Textual content Wrap Fairly and beneath Module Parts, find the Fundamental Component subject. Add the CSS rule text-wrap: fairly; and save the preset. This improves line breaks in physique textual content, avoiding orphaned phrases.
Heading Textual content Possibility Group Presets
The Textual content module has a separate Heading Textual content choice group for H1-H6 tags entered by way of the wealthy textual content editor. Earlier than creating Component Presets, we want Possibility Group Presets for heading sizes and colours.
Heading Sizes
Within the Heading Textual content choice group beneath Design, configure all six heading ranges utilizing your design variables. Set every degree’s Font Measurement and unitless Line Top:
- H1 makes use of your H1 dimension variable with the 1.2 Line Top (H1) variable.
- H2 makes use of your H2 dimension variable with the 1.3 Line Top (H2-H3) variable.
- H3 makes use of your H3 dimension variable with the 1.3 Line Top (H2-H3) variable.
- H4 makes use of your H4 dimension variable with the 1.4 Line Top (H4-H6) variable.
- H5 makes use of your H5 dimension variable with the 1.4 Line Top (H4-H6) variable.
- H6 makes use of your H6 dimension variable with the 1.4 Line Top (H4-H6) variable.
Save all of those in a single Heading Possibility Group Preset with the title Textual content Heading Sizes. This single Possibility Group Preset handles all heading ranges inside Textual content Modules. The video reveals the method, however just for H1 and H2; it is best to do all of them.
Heading Colours
Nonetheless within the Heading Textual content choice group, set Textual content Shade and Line Shade for all heading ranges to your Heading Textual content colour variable. Save with the title Heading Shade Darkish.
Do the identical and create an Possibility Group Preset named Heading Shade Mild with Textual content Shade and Line Shade set to your Heading Textual content Mild variable for all heading ranges.
Textual content Module Component Presets
Now, mix your physique textual content and heading textual content Possibility Group Presets into unified Component Presets. Since Textual content modules can comprise each paragraph content material and headings, bundling every thing collectively means one-click utility as a substitute of stacking a number of presets.
Click on the Component Preset chip on the prime of the Textual content module settings panel.
Create Darkish Textual content and nest the next Possibility Group Presets:
- Regular Textual content Measurement from the Textual content choice group
- Darkish Textual content for physique colour
- Font Weight Mild for weight
- Textual content Wrap Fairly from CSS
- Textual content Heading Sizes from Heading Textual content
- Heading Shade Darkish from Heading Textual content
Create a Mild Textual content Component Preset utilizing the identical construction, however swap Mild Textual content for physique colour and Heading Shade Mild for headings.
At this level, the sample must be clear so we gained’t present separate video for every of those remaining Component Presets. Then, create the following Component Preset named Darkish Textual content Small, nesting Small Textual content Measurement, Darkish Textual content, Font Weight Mild, Textual content Wrap Fairly, Textual content Heading Sizes, and Heading Shade Darkish.
And lastly, create one other Component Preset named Mild Textual content Small. Construct it with the identical construction because the earlier one, solely utilizing the sunshine colour variants.
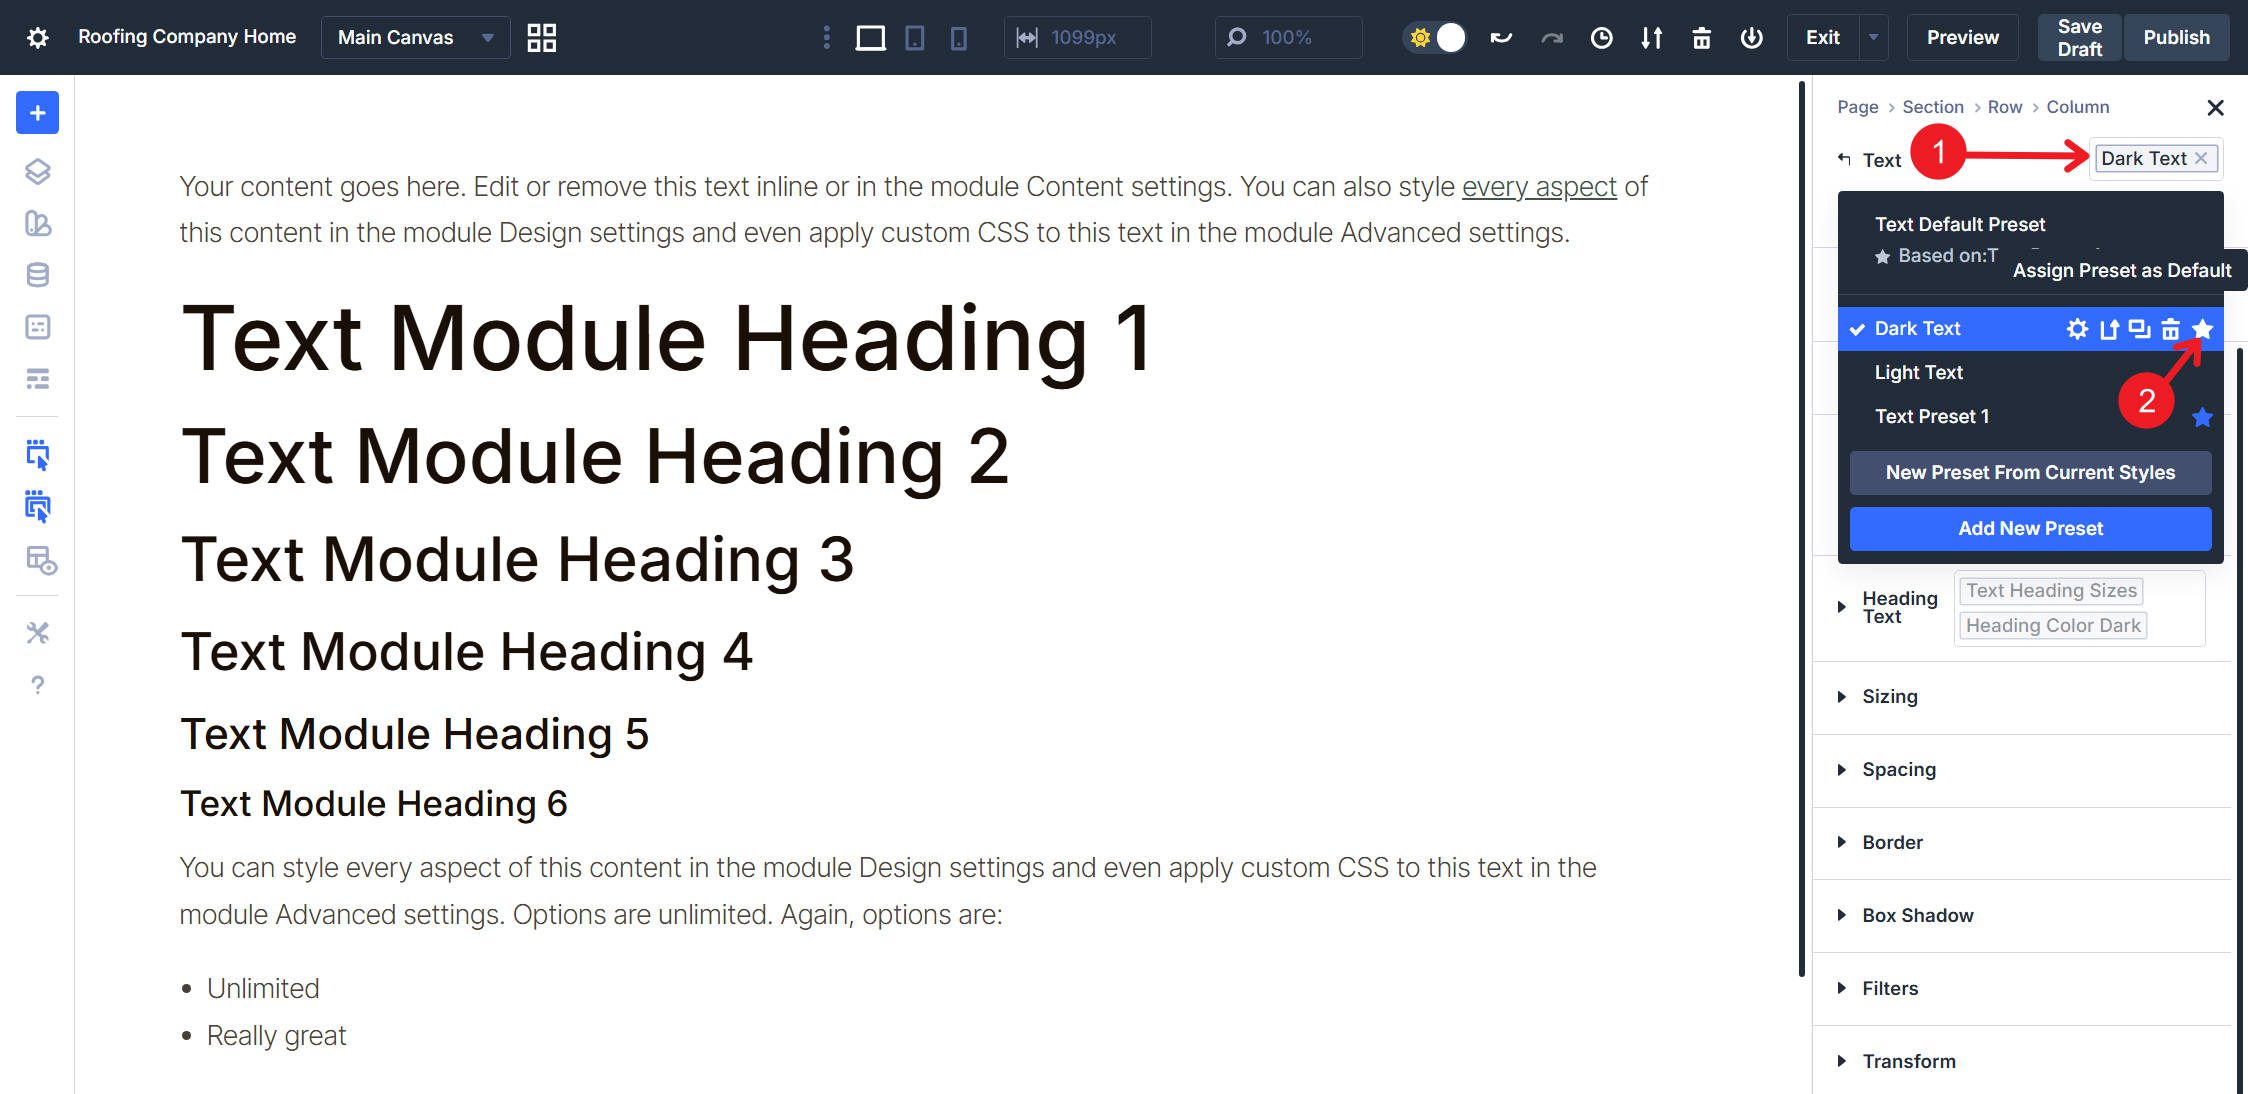
Set Darkish Textual content because the default. While you add a brand new Textual content module, you now get correctly styled physique textual content and headings with none extra configuration.
All of the Possibility Group Presets you made will turn out to be useful as you broaden your web site. Each of the Textual content choice teams and the standalone Heading choice group preset might be reused by different modules. When these choice teams are utilized in different modules, you might have your self a head begin.
You may broaden this technique additional, however this can be a robust baseline for typography types. Subsequent, we’ll transfer on to one thing rather less tedious — buttons!
Buttons additionally profit from a layered setup that makes use of a number of ranges of presets. Shade, sizes, and Semantic HTML settings can be utilized in distinctive mixtures.
Creating separate Possibility Group Presets for every concern permits you to combine and match with out duplication. We’ll begin with the fundamentals, however you’ll be able to add different type choices, equivalent to No Icon/Icon Possibility Group Presets, if you want.
Button Shade Presets
Add a Button module and open its settings. Navigate to the Button choice group beneath the Design tab. We are going to create a number of Possibility Group Presets for the Button choice group. For now, we’ll deal with background colour, textual content colour, and sizing fairly than borders or icons.
First, create a Main Button (Brown) Possibility Group Preset, set the Button Background Shade to your Main colour variable, and set the Button Textual content Shade to Off-white. Click on the Hover icon and set the Button Background Shade on hover to your Main Darkish colour variable. Be sure the Textual content Shade works on hover, then return to Desktop view and Save.
Create Secondary Button (Inexperienced) Possibility Group Preset following the identical method. Set Button Background Shade to your Secondary colour variable, Button Textual content Shade to a readable colour (ideally as a colour variable), and set the hover state Background Shade to Secondary Darkish. You’ll be able to optionally change the border colour, however in later steps I’ll cover the button border.
Lastly, create an Off-white Button colour Possibility Group Preset utilizing the Off-white variable for the background. Set the Button Textual content Shade to be your Mild or regular Physique Textual content colour. On Hover state, set Background Shade to Off-white with a refined HSL filter of -5% Lightness.
That offers us three button colour variations with hover states.

Button Measurement Presets
Button sizing entails three common Possibility Group Presets: border width, spacing (padding), and textual content dimension.
Border Width and Radius
Create an Possibility Group Preset named Button Corners. Set the Border Radius to your Button Border Radius variable (7px). Additionally, set the Border Width to 0px.
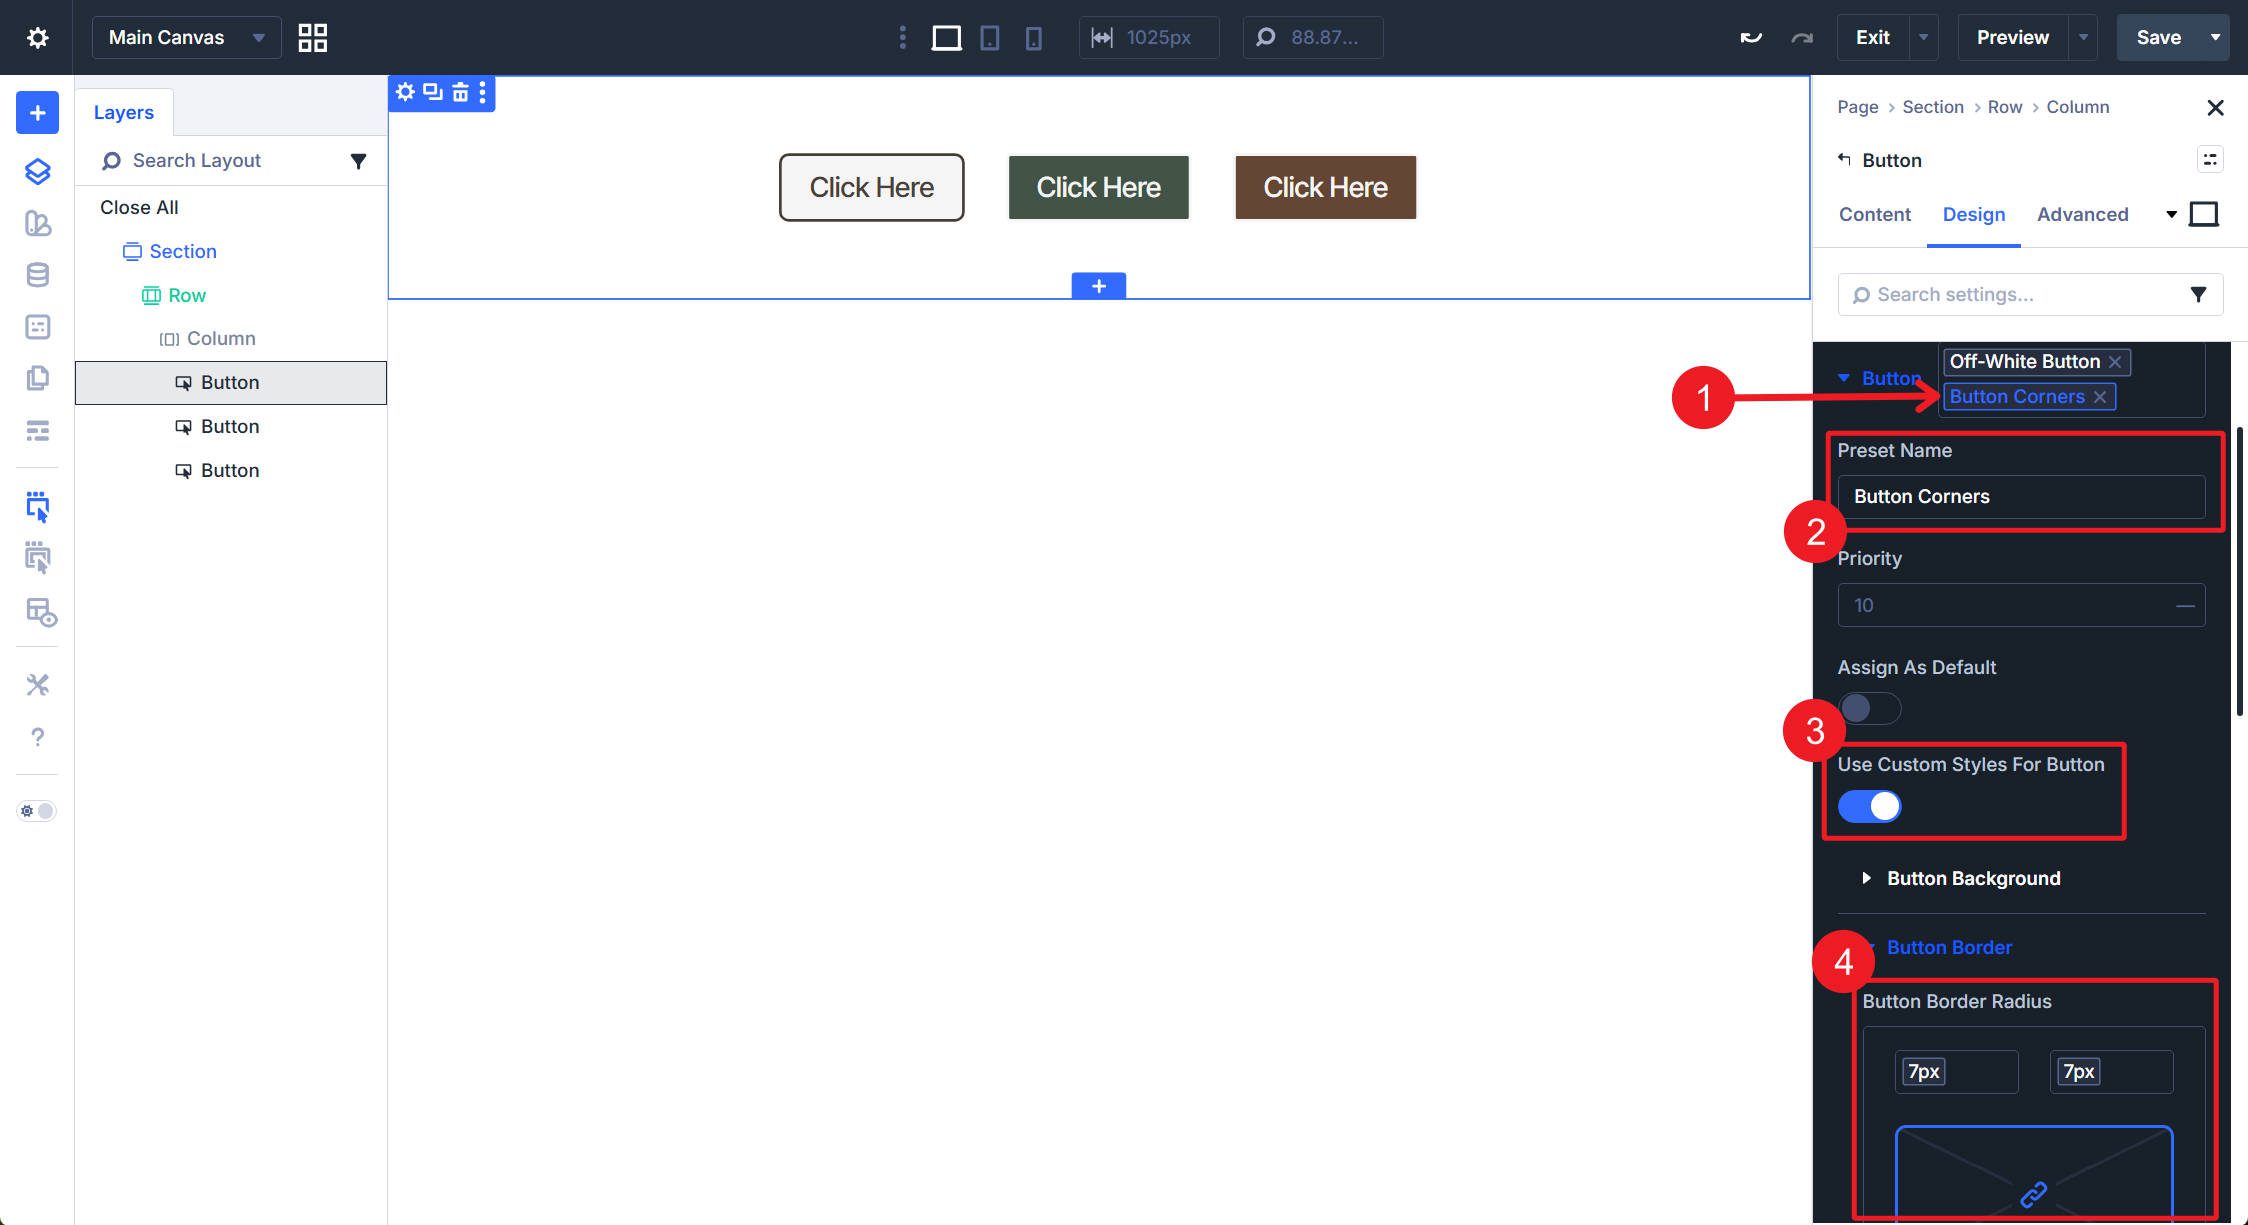
Not proven: Border Width set to 0, and the save button
Padding
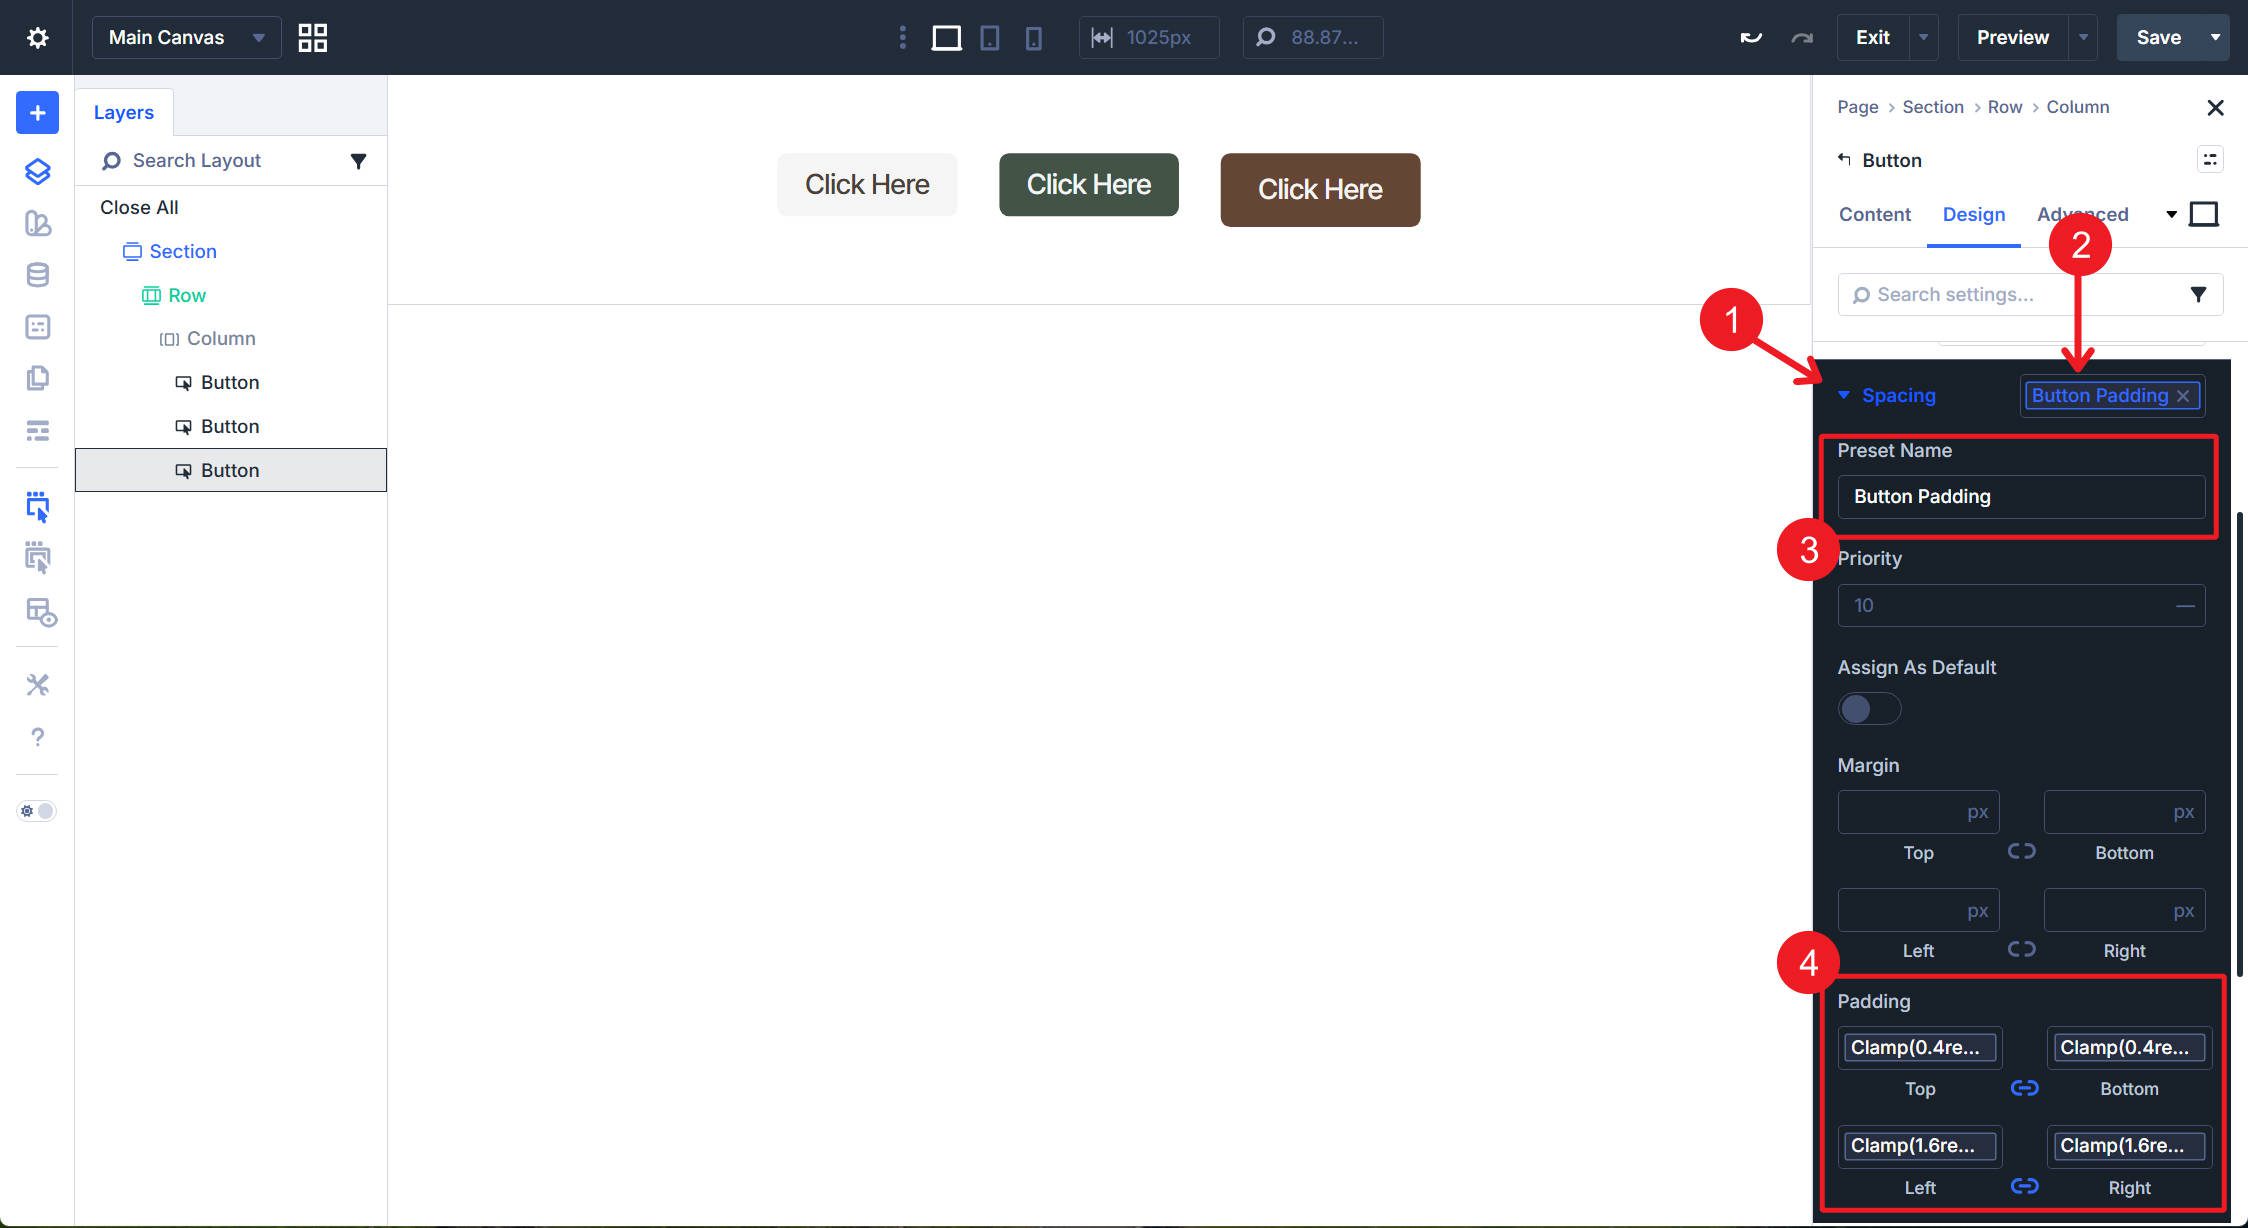
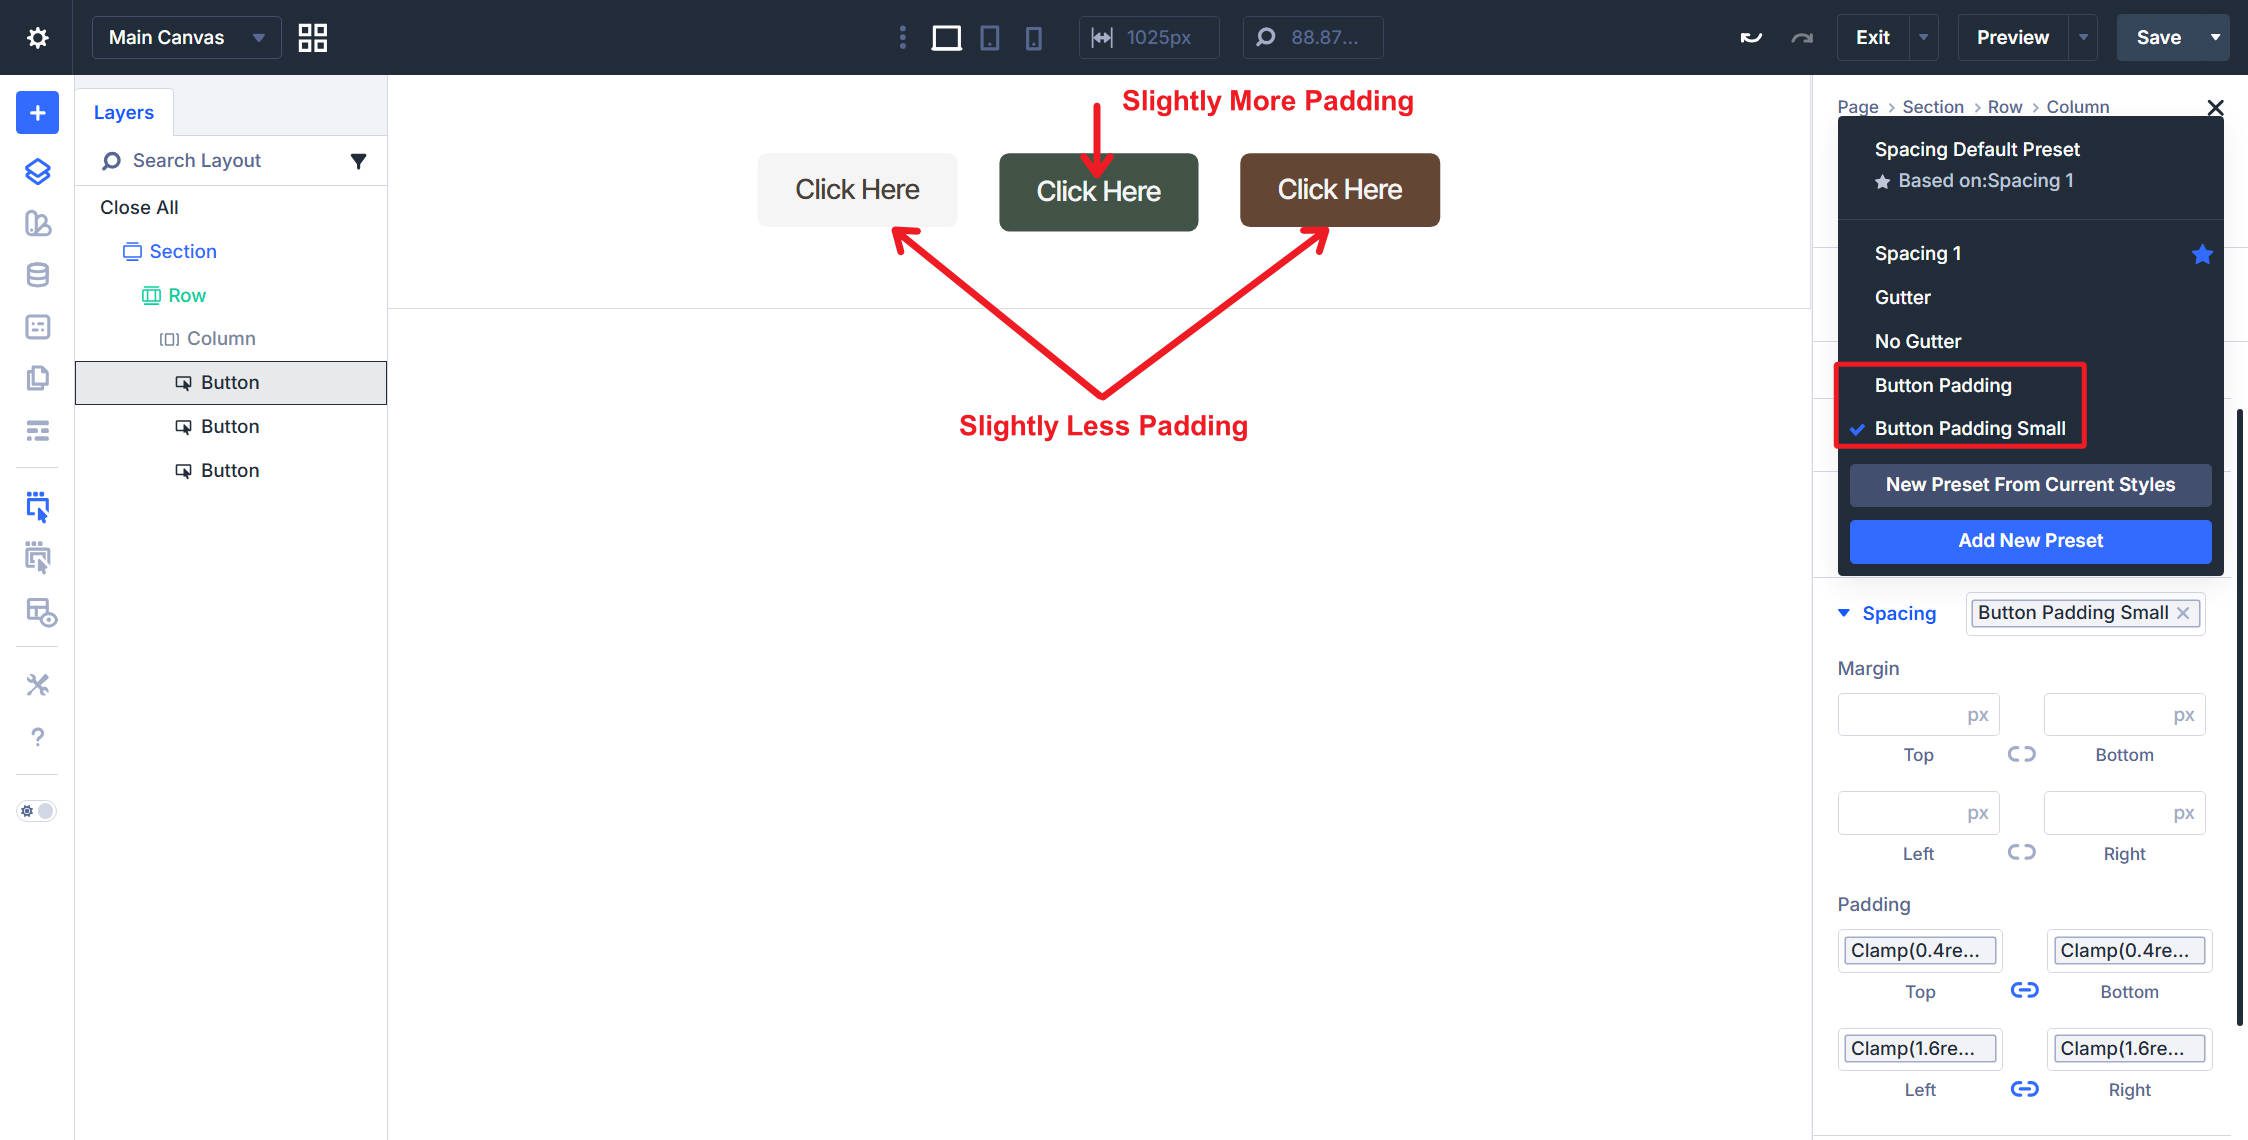
Below Design > Spacing, create an Possibility Group Preset named Button Padding. Set the Prime and Backside Padding to your Button Vertical Padding variable. Set the Left and Proper Padding to your Button Horizontal Padding variable.
Create Button Padding Small utilizing your Button Vertical Padding Small variable for Prime and Backside Padding. Preserve the Left and Proper Padding set to Button Horizontal Padding (or cut back barely if most well-liked).
Textual content Measurement
Below Design > Button, create an Possibility Group Preset named Button Textual content Measurement. Set the Font Measurement to your Physique Textual content variable.
Create Button Textual content Measurement Small with Font Measurement set to your Physique Textual content Small variable. You’ll be able to duplicate your earlier Possibility Group Preset if that’s quicker for you. You now must preconfigure sizing choices as nicely.
Button Semantic HTML Preset
When a button is used to retailer a URL (so clicking the button takes the person to a different web page), it is best to preserve the button as an aspect ( which means a typical hyperlink).
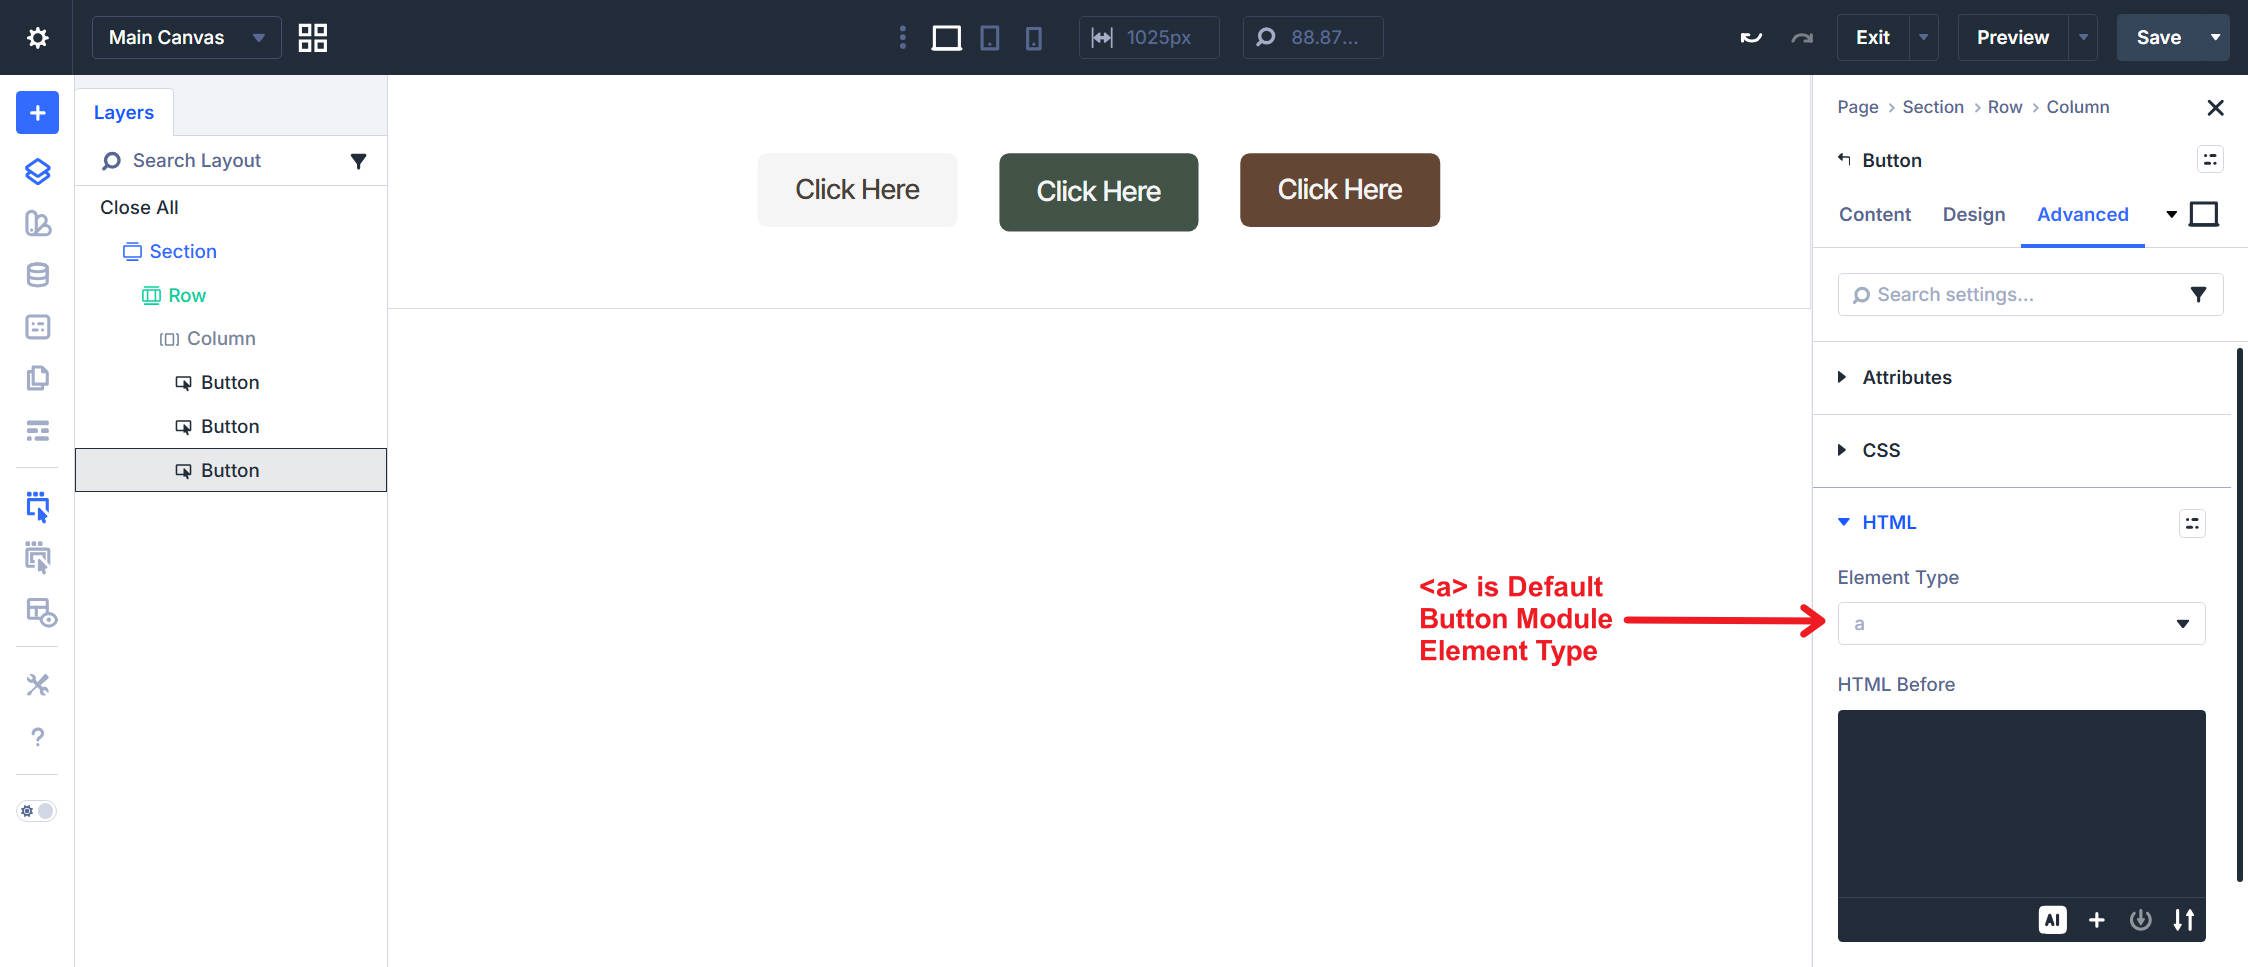
Nevertheless, for those who connect JavaScript to a button, use it in a contact kind, or set off an Interplay from a button click on, it is best to use a unique semantic HTML aspect. In these circumstances, it is best to set your Button Module to undertake the
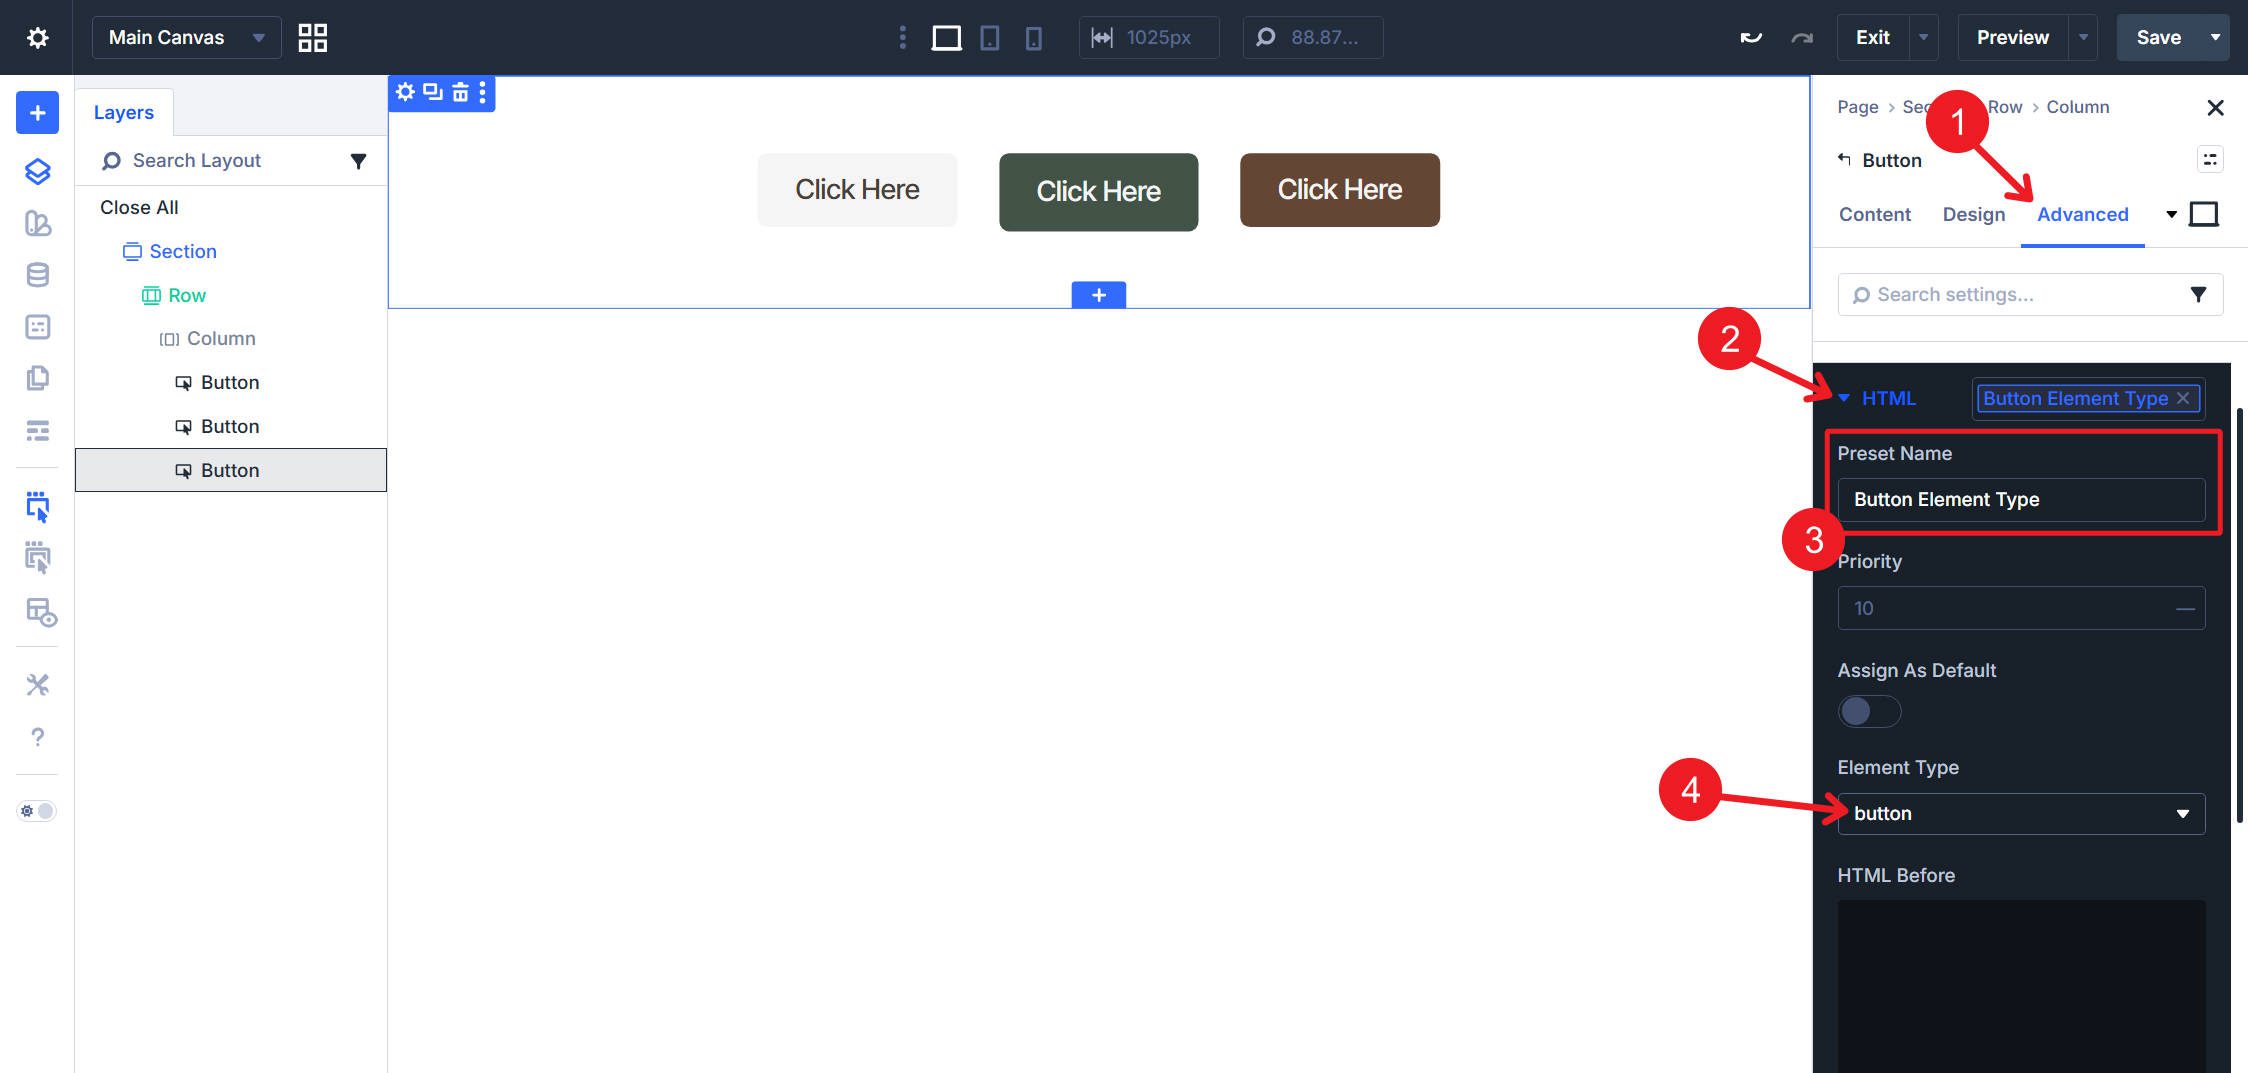
Go to the Superior tab > HTML and create an Possibility Group Preset named Button Component Kind. Contained in the Preset, select from the dropdown of accessible semantic HTML tags.
There’s an necessary motive we constructed all these presets on the choice group degree. If we constructed them solely as Button Component Presets, we might not be capable to apply the identical Possibility Group Presets to modules just like the Contact Kind Module.
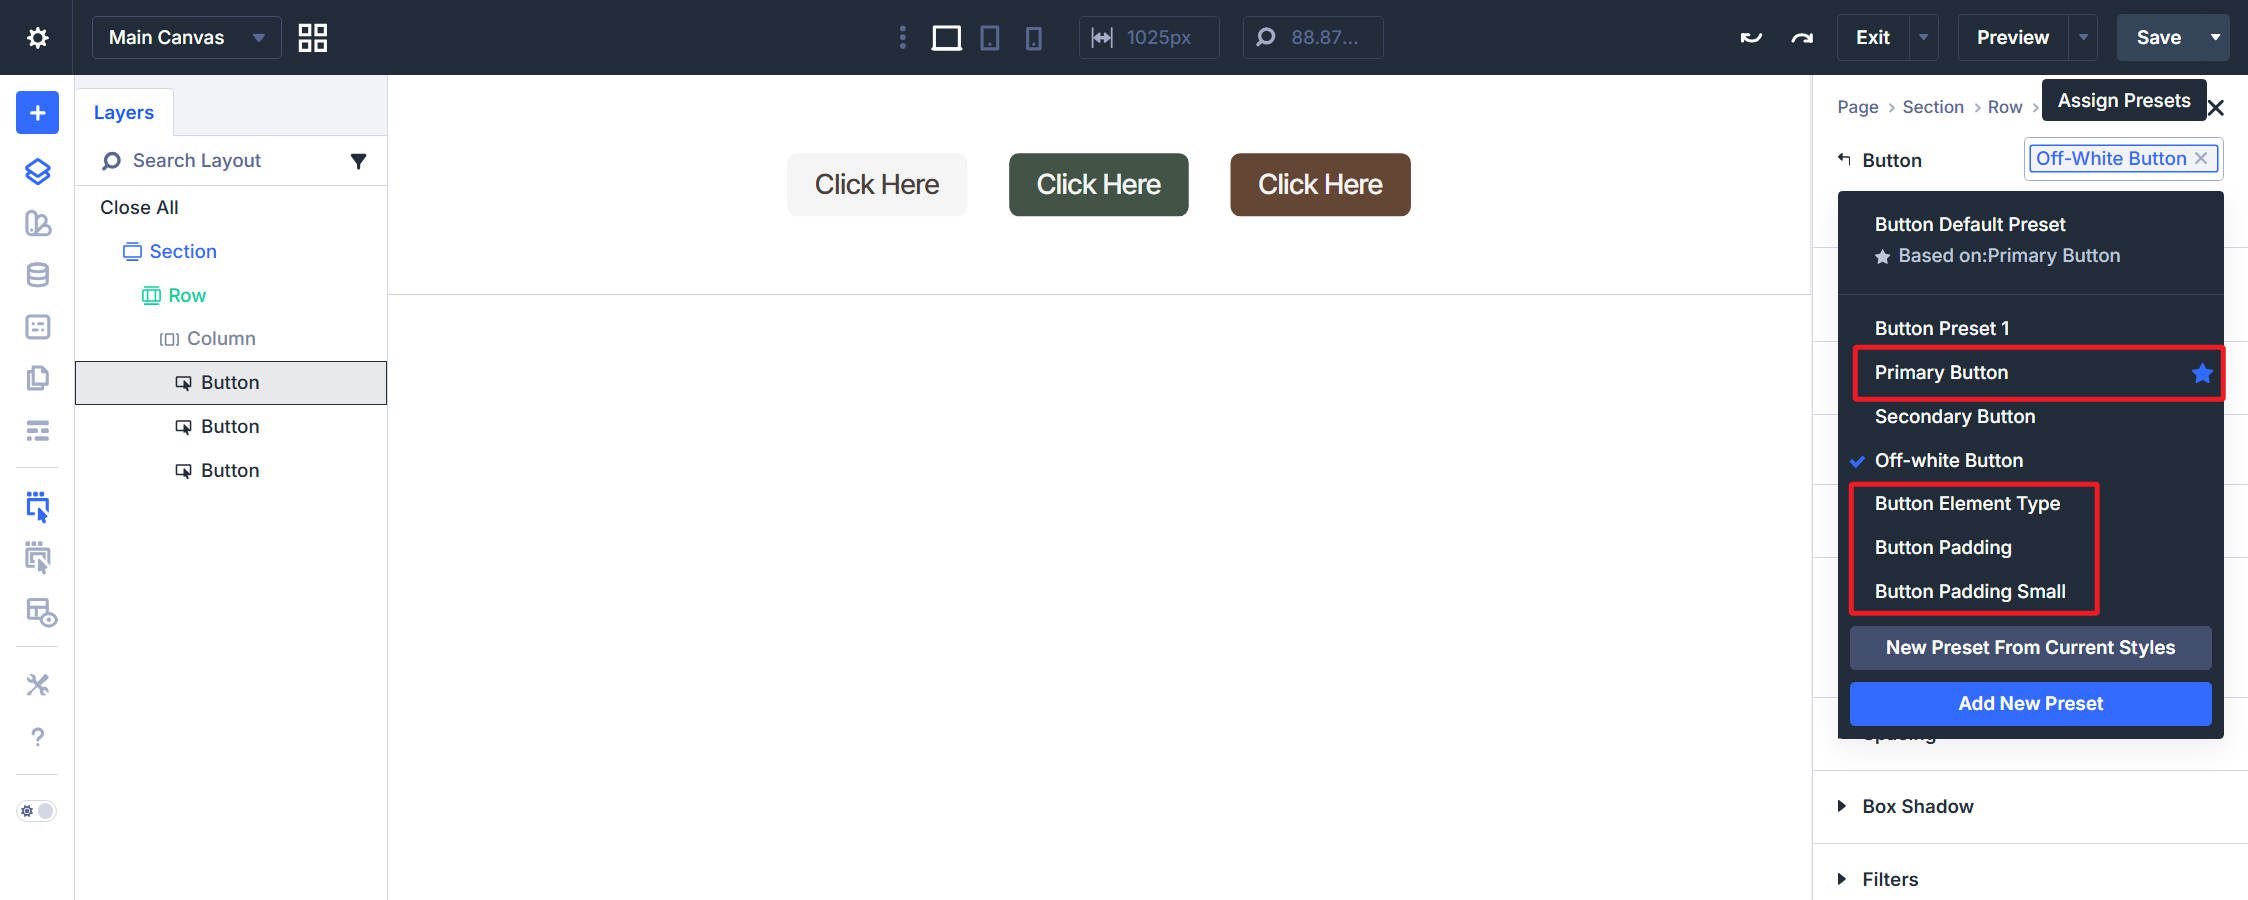
However Component Presets have a spot, and we’ll use them to mix our Possibility Group Presets into ready-to-use button configurations. I’d filter any Possibility Group Presets on present Button Modules, delete them, and add new ones so you’ll be able to see precisely what you’re including to the Component Preset.
Click on the Component Preset chip on the prime of the Button module settings and click on Add New Preset. Create Main Button and nest the next Possibility Group Presets: Main Button (Brown) from the Button choice group for colours, Button Textual content Measurement from Button, and Button Corners from Border.
Following the identical steps, create Secondary Button nesting Secondary Button (Inexperienced), Button Textual content Measurement, and Button Corners. After which once more, create Off-white Button by nesting Off-white Button, Button Textual content Measurement, and Button Corners.
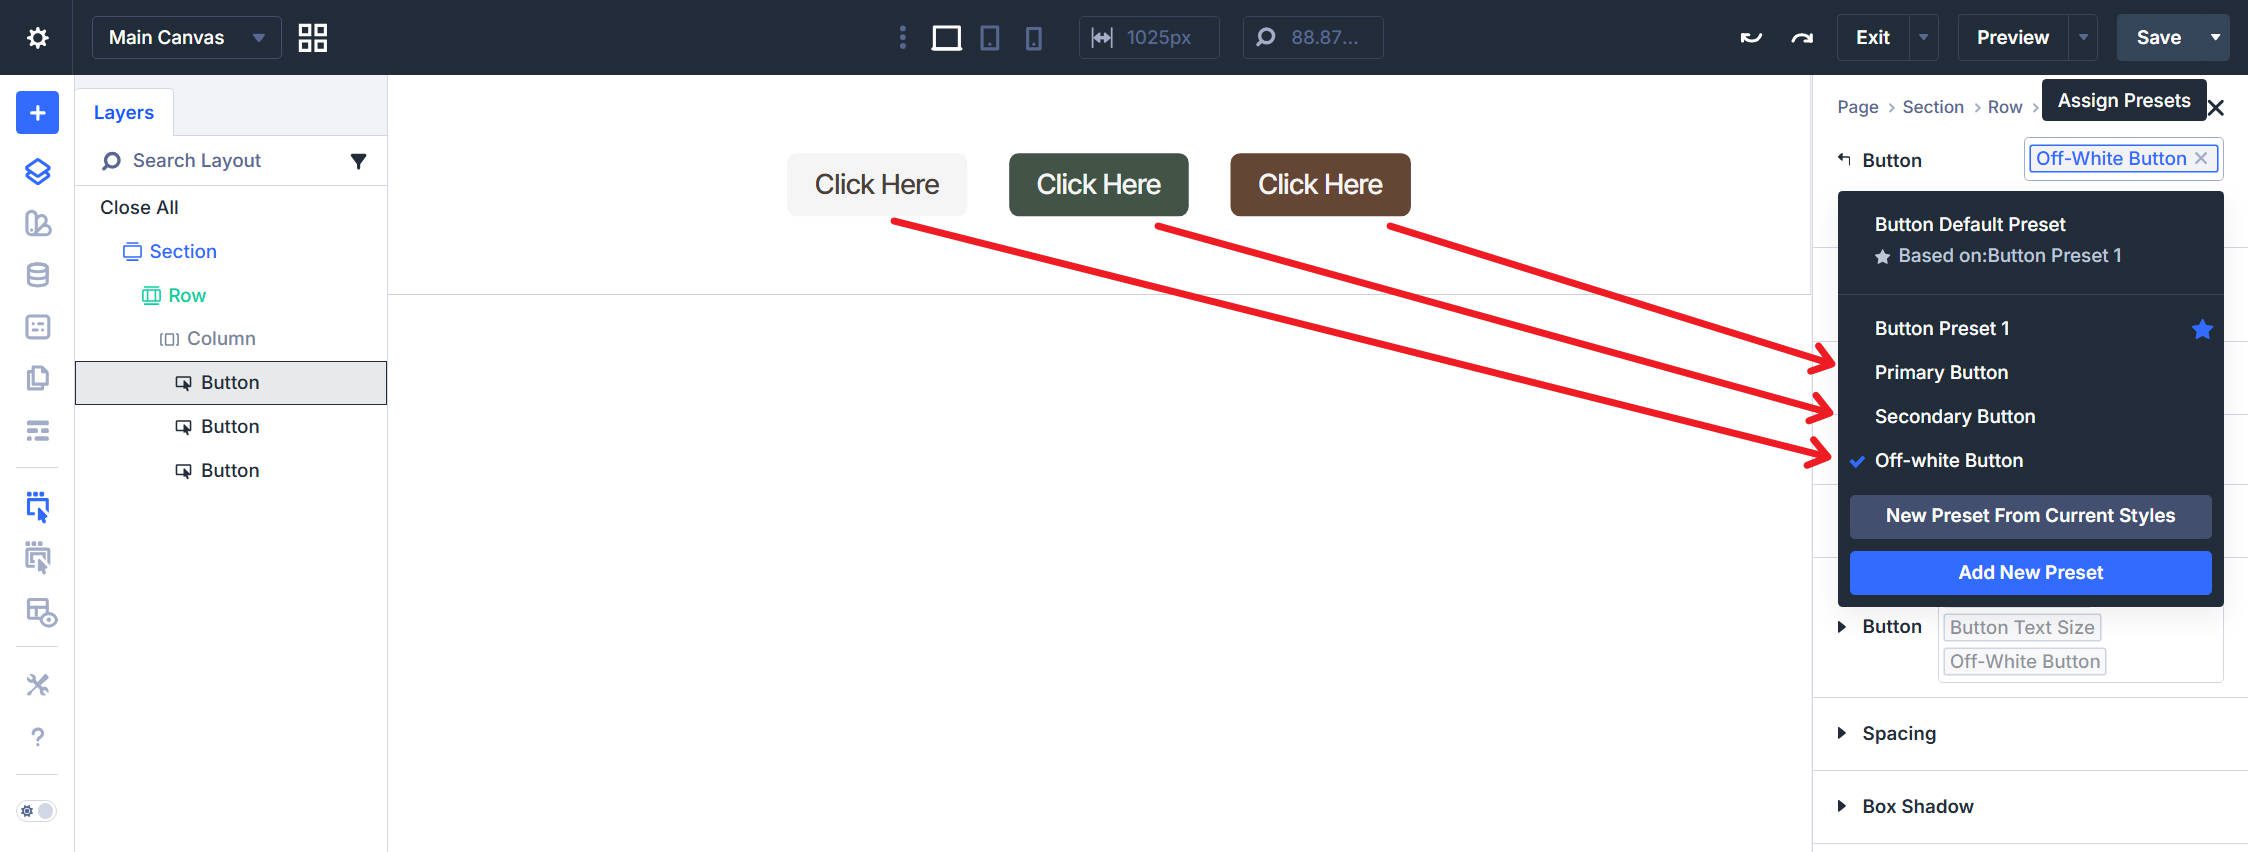
Set the Main Button because the default if most buttons in your web site will likely be main CTAs.
At this level, we are able to additionally shortly create Component Presets named Button Padding, Button Padding Small, and Button Component Kind. In every of those, assign the one Possibility Group Preset to the Button Component Preset with the matching title.
Regardless of which tab you’re on, you’ll be able to shortly assign completely different padding and aspect varieties on the Preset degree. This can be a good time-saver that permits you to keep away from clicking into a particular tab to make an project.
Lastly, we are able to create a Small Button Component Preset that handles dimension overrides. Nest Button Padding Small and Button Textual content Measurement Small. Don’t embrace any colour presets.
To create a small main button, apply Main Button first, then stack Small Button and Button Padding Small after it. As a result of they’re utilized final, any overlapping types within the presets will default to these with a better precedence quantity (within the Preset settings) or these which might be on the backside of the Lively Preset checklist.
Half 5: Odds And Ends
We are going to arrange a fast Picture Component Preset. Add an Picture Module to your web page. Create a brand new Component Preset and title it Picture Corners. Go to Design > Border and set the Border Radius to your Picture Border Radius variable.
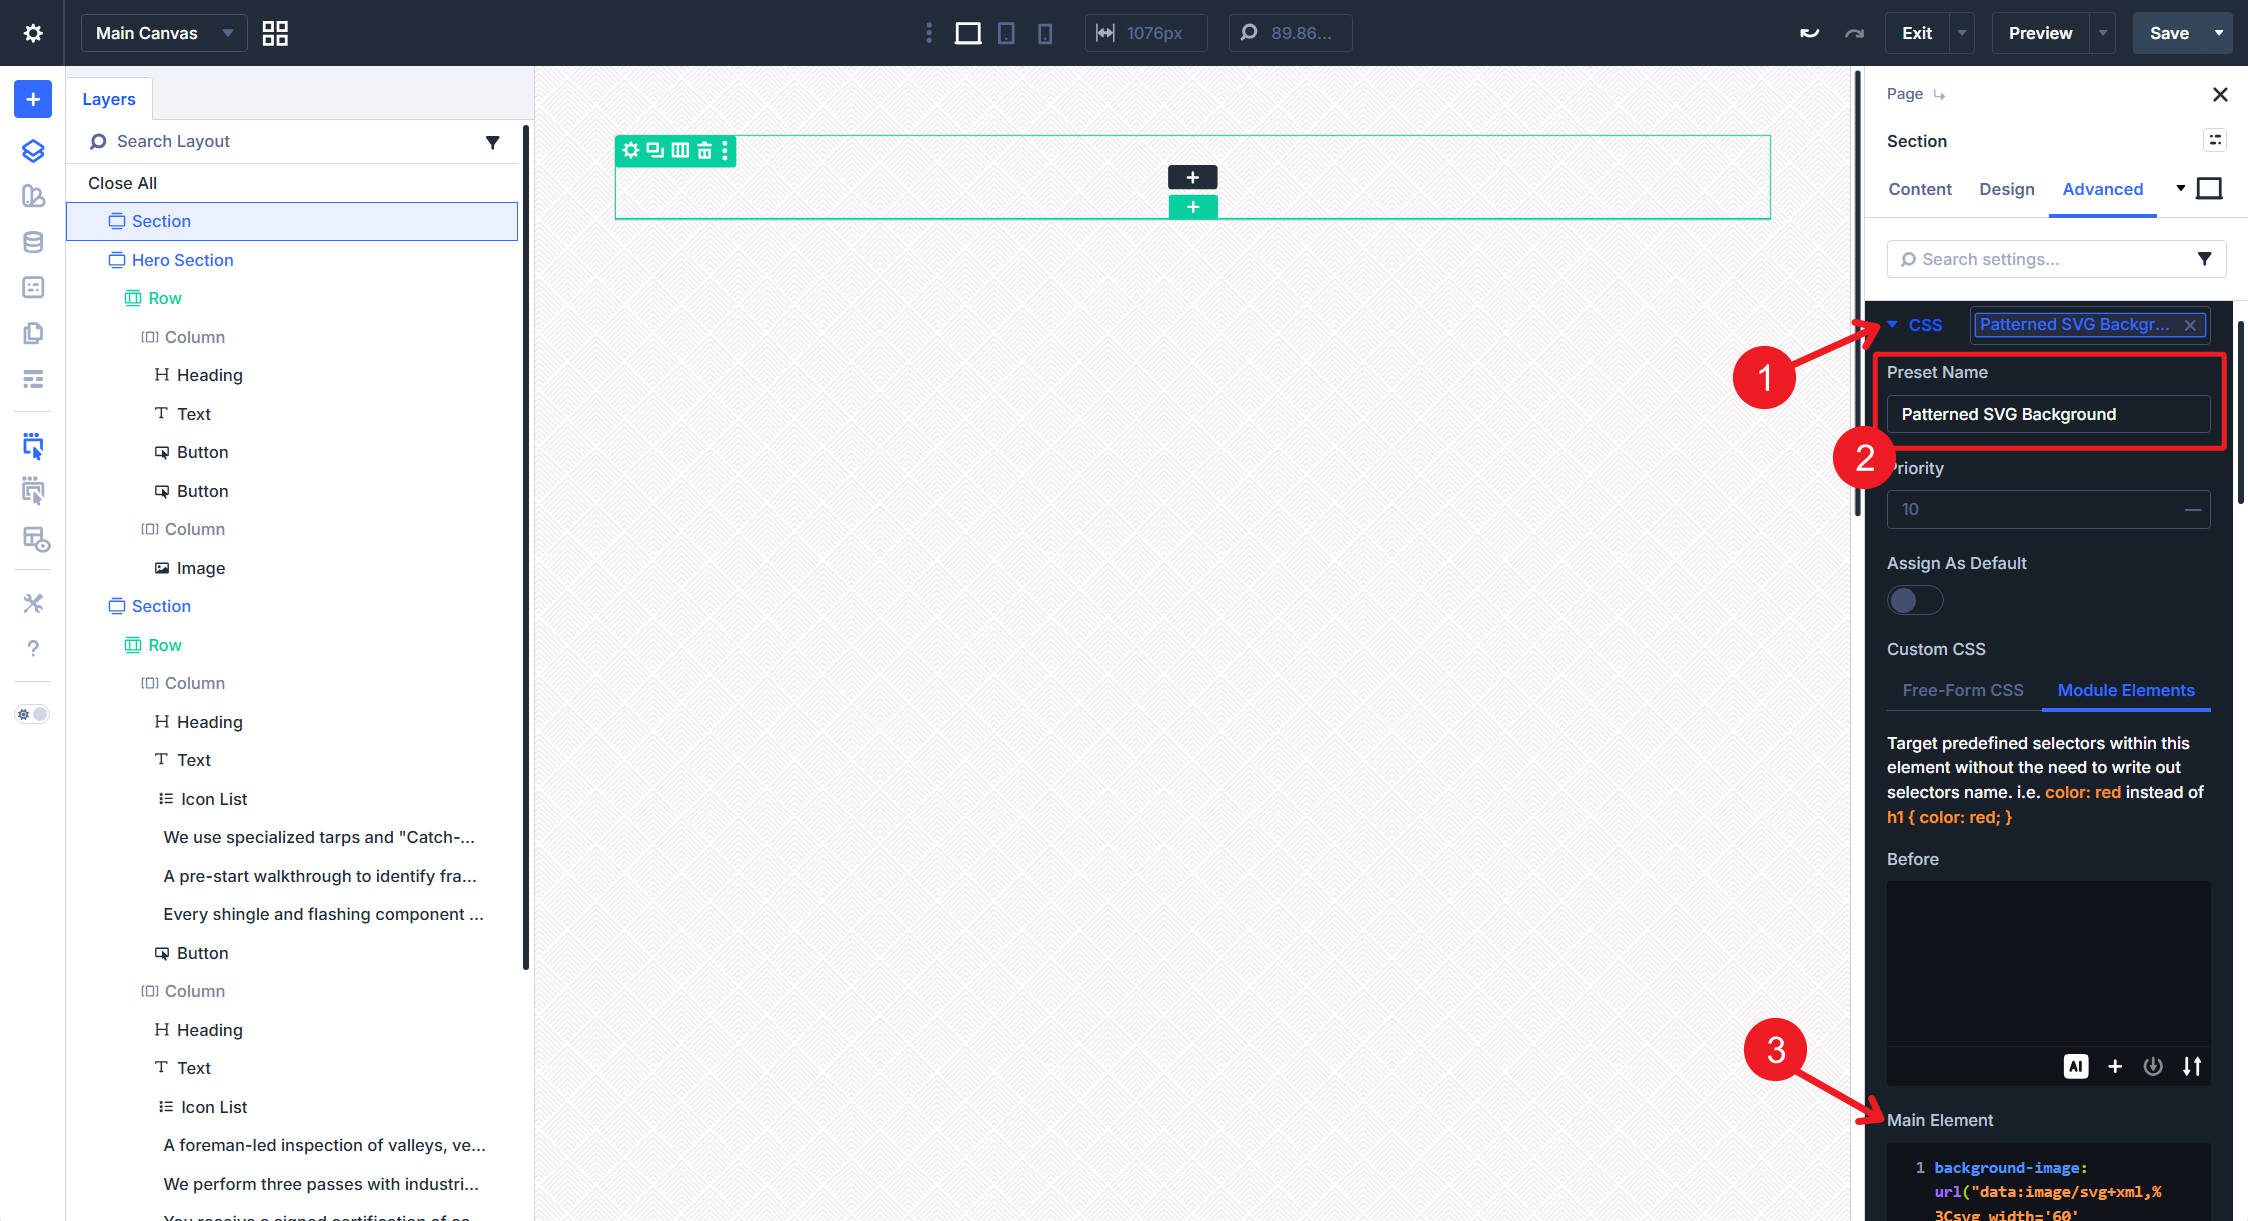
After that, let’s arrange a fast SVG background-image preset within the CSS choice group. Title it Patterned SVG Background and add this CSS to the Module Parts > Fundamental Parts subject. I’ll use this SVG, nevertheless it has some hardcoded colours — you will discover any such factor on-line.
background-image: url("knowledge:picture/svg+xml,%3Csvg width="60" top="60" viewBox='0 0 60 60' xmlns="http://www.w3.org/2000/svg"%3Epercent3Cpath d='M54.627 0l.83.828-1.415 1.415L51.8 0h2.827zM5.373 0l-.83.828L5.96 2.243 8.2 0H5.374zM48.97 0l3.657 3.657-1.414 1.414L46.143 0h2.828zM11.03 0L7.372 3.657 8.787 5.07 13.857 0H11.03zm32.284 0L49.8 6.485 48.384 7.9l-7.9-7.9h2.83zM16.686 0L10.2 6.485 11.616 7.9l7.9-7.9h-2.83zm20.97 0l9.315 9.314-1.414 1.414L34.828 0h2.83zM22.344 0L13.03 9.314l1.414 1.414L25.172 0h-2.83zM32 0l12.142 12.142-1.414 1.414L30 .828 17.272 13.556l-1.414-1.414L28 0h4zM.284 0l28 28-1.414 1.414L0 2.544V0h.284zM0 5.373l25.456 25.455-1.414 1.415L0 8.2V5.374zm0 5.656l22.627 22.627-1.414 1.414L0 13.86v-2.83zm0 5.656l19.8 19.8-1.415 1.413L0 19.514v-2.83zm0 5.657l16.97 16.97-1.414 1.415L0 25.172v-2.83zM0 28l14.142 14.142-1.414 1.414L0 30.828V28zm0 5.657L11.314 44.97 9.9 46.386l-9.9-9.9v-2.828zm0 5.657L8.485 47.8 7.07 49.212 0 42.143v-2.83zm0 5.657l5.657 5.657-1.414 1.415L0 47.8v-2.83zm0 5.657l2.828 2.83-1.414 1.413L0 53.456v-2.83zM54.627 60L30 35.373 5.373 60H8.2L30 38.2 51.8 60h2.827zm-5.656 0L30 41.03 11.03 60h2.828L30 43.858 46.142 60h2.83zm-5.656 0L30 46.686 16.686 60h2.83L30 49.515 40.485 60h2.83zm-5.657 0L30 52.343 22.343 60h2.83L30 55.172 34.828 60h2.83zM32 60l-2-2-2 2h4zM59.716 0l-28 28 1.414 1.414L60 2.544V0h-.284zM60 5.373L34.544 30.828l1.414 1.415L60 8.2V5.374zm0 5.656L37.373 33.656l1.414 1.414L60 13.86v-2.83zm0 5.656l-19.8 19.8 1.415 1.413L60 19.514v-2.83zm0 5.657l-16.97 16.97 1.414 1.415L60 25.172v-2.83zM60 28L45.858 42.142l1.414 1.414L60 30.828V28zm0 5.657L48.686 44.97l1.415 1.415 9.9-9.9v-2.828zm0 5.657L51.515 47.8l1.414 1.413 7.07-7.07v-2.83zm0 5.657l-5.657 5.657 1.414 1.415L60 47.8v-2.83zm0 5.657l-2.828 2.83 1.414 1.413L60 53.456v-2.83zM39.9 16.385l1.414-1.414L30 3.658 18.686 14.97l1.415 1.415 9.9-9.9 9.9 9.9zm-2.83 2.828l1.415-1.414L30 9.313 21.515 17.8l1.414 1.413 7.07-7.07 7.07 7.07zm-2.827 2.83l1.414-1.416L30 14.97l-5.657 5.657 1.414 1.415L30 17.8l4.243 4.242zm-2.83 2.827l1.415-1.414L30 20.626l-2.828 2.83 1.414 1.414L30 23.456l1.414 1.414zM56.87 59.414L58.284 58 30 29.716 1.716 58l1.414 1.414L30 32.544l26.87 26.87z' fill="%23644634" fill-opacity='0.09' fill-rule="evenodd"/%3Epercent3C/svgpercent3E");
background-repeat: repeat;
background-size: 46px 46px;
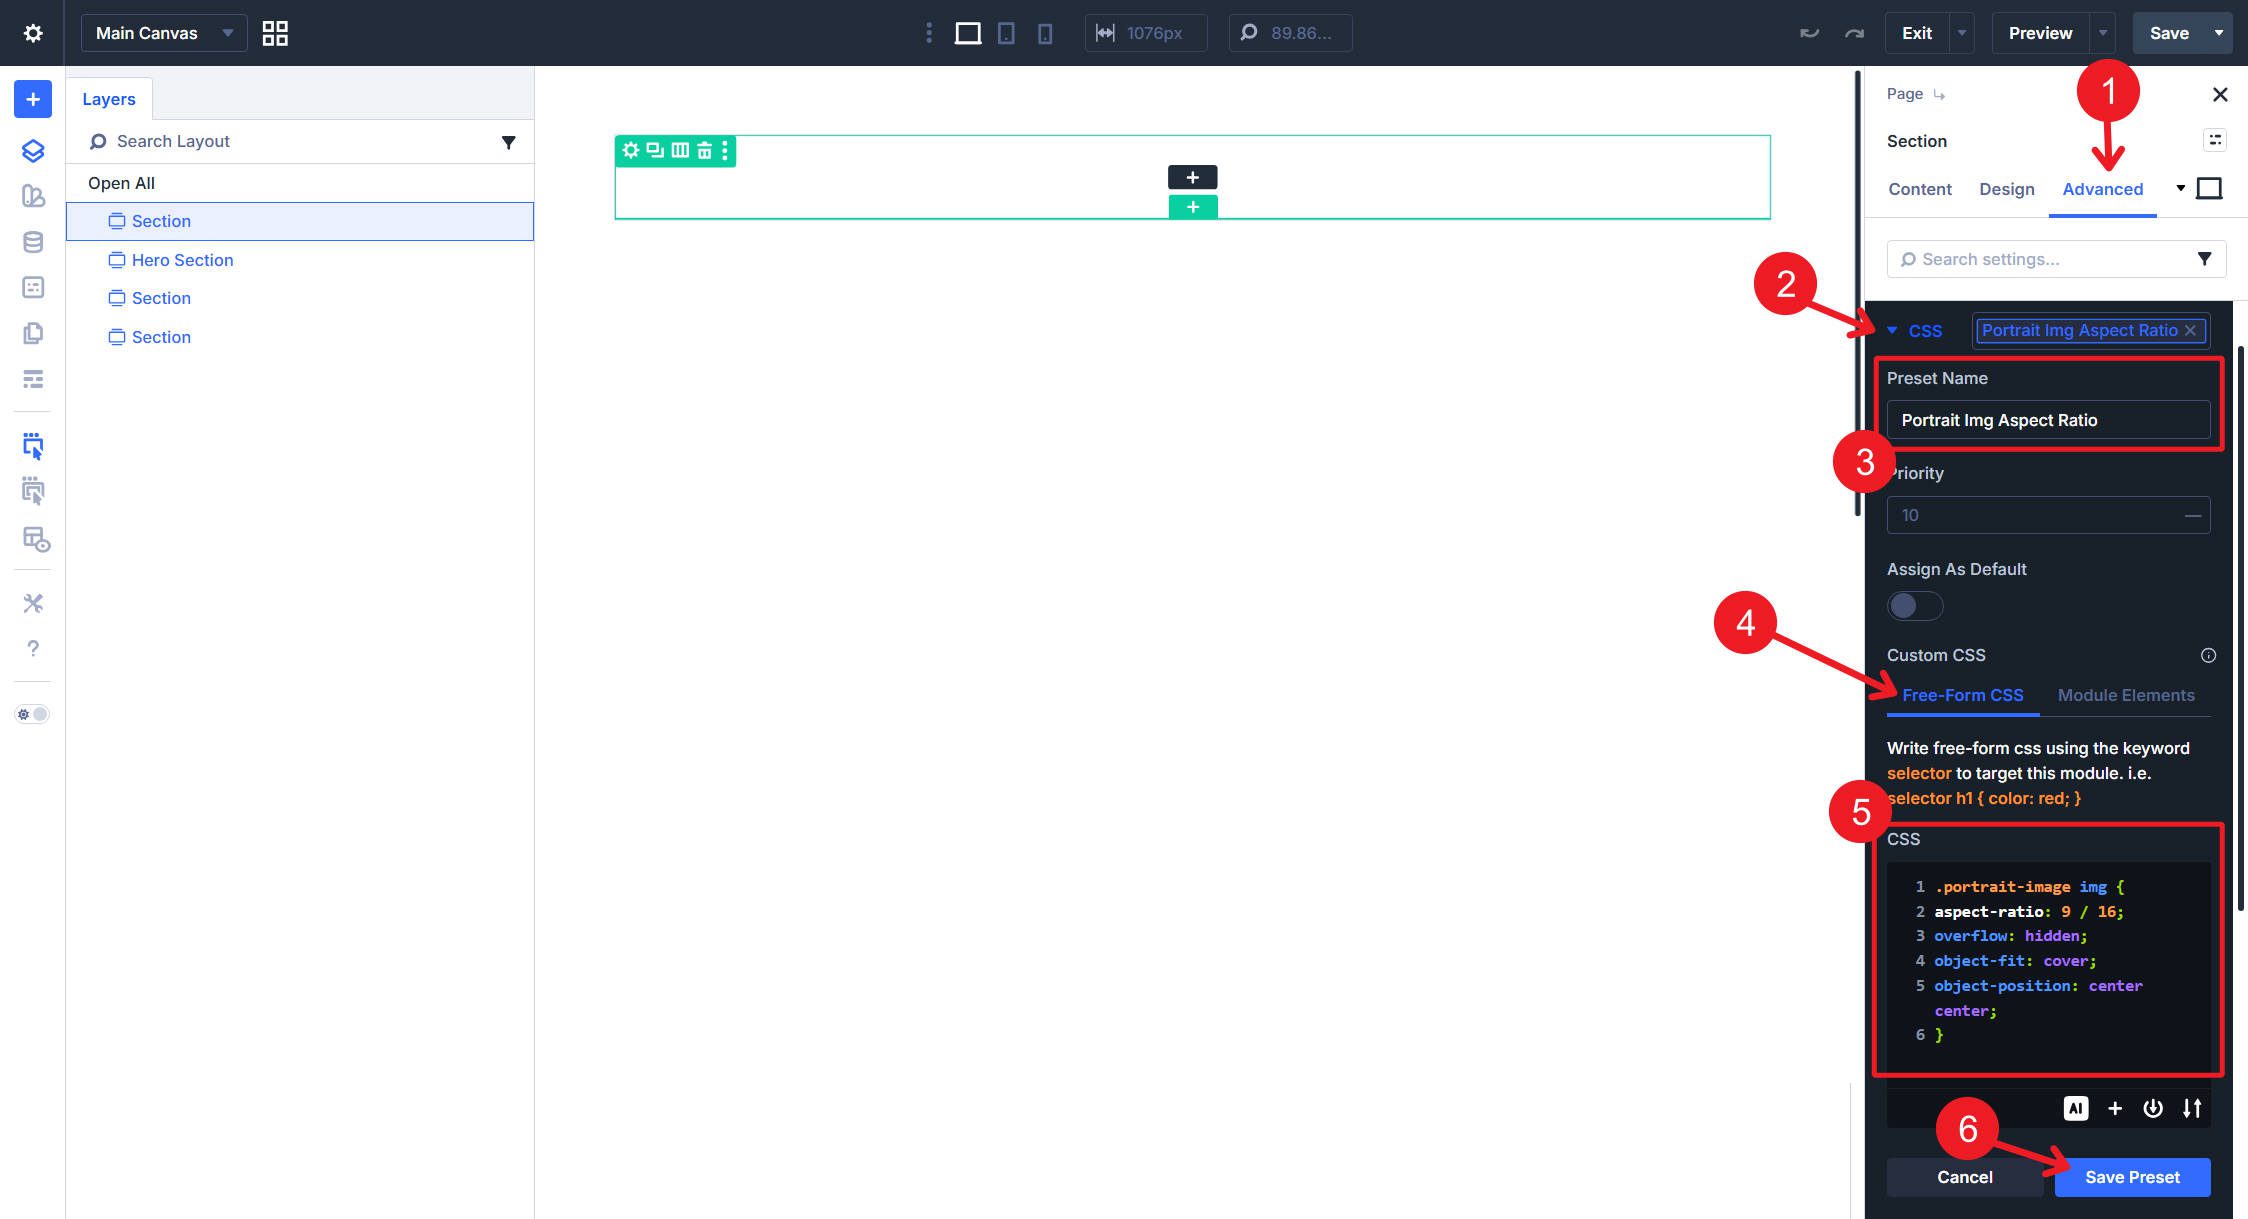
Lastly, I wish to add a CSS Preset that shows panorama photos in portrait orientation utilizing the aspect-ratio property. It will entail making a Free-Kind CSS preset and an Attributes preset to assign the picture class (each have for use collectively). While you use this, you would possibly must set the Module’s width to 100%.
.portrait-image img {
aspect-ratio: 9 / 16;
overflow: hidden;
object-fit: cowl;
object-position: heart heart;
}
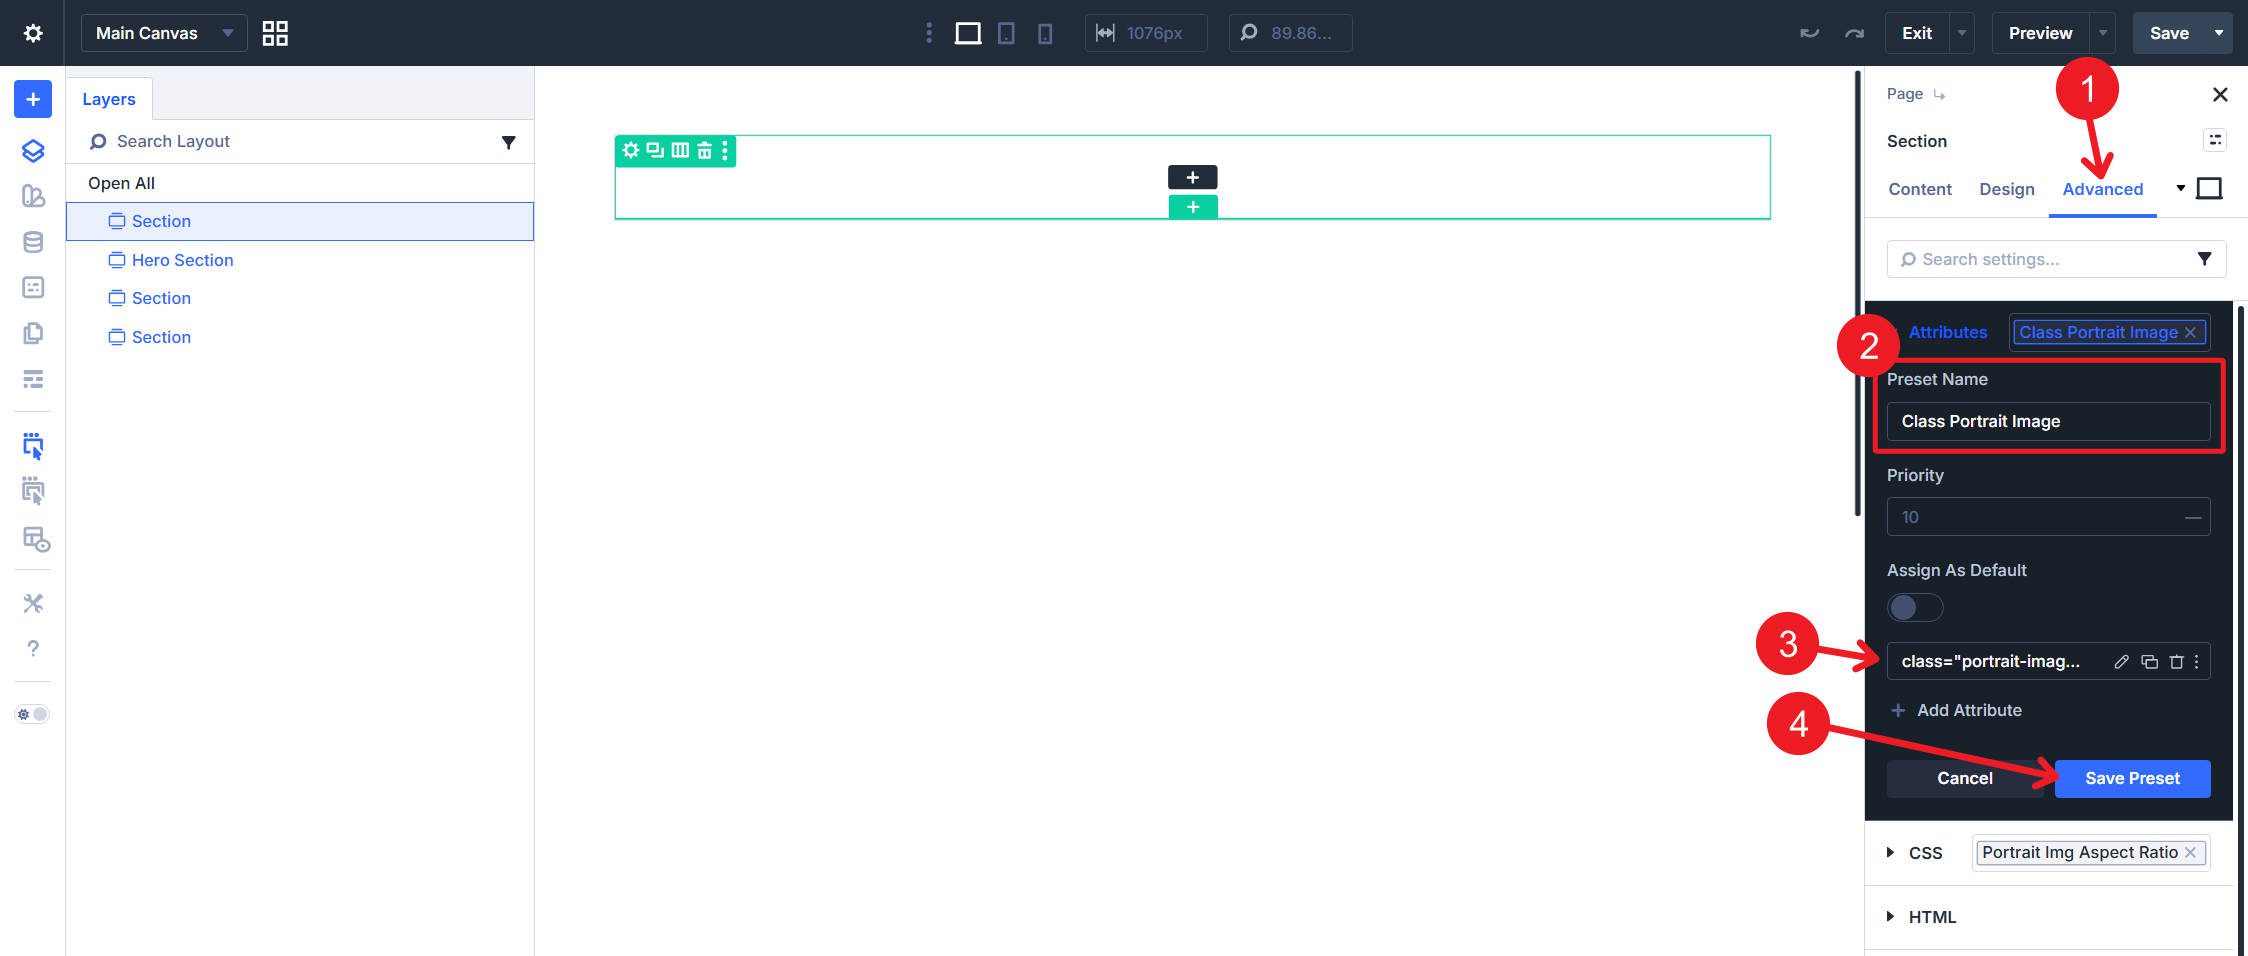
To make this CSS simpler to use, create an Attribute Preset that provides a category to an Picture Module.
Half 6: Constructing The Homepage
That is the payoff half. We’ve round 40 Design Variables and dozens of presets able to deploy. Now we add construction, drop in content material, and magnificence every thing utilizing the system we constructed. You’ll discover a dramatic distinction in pace—most modules want simply two or three preset assignments, and they’re carried out.
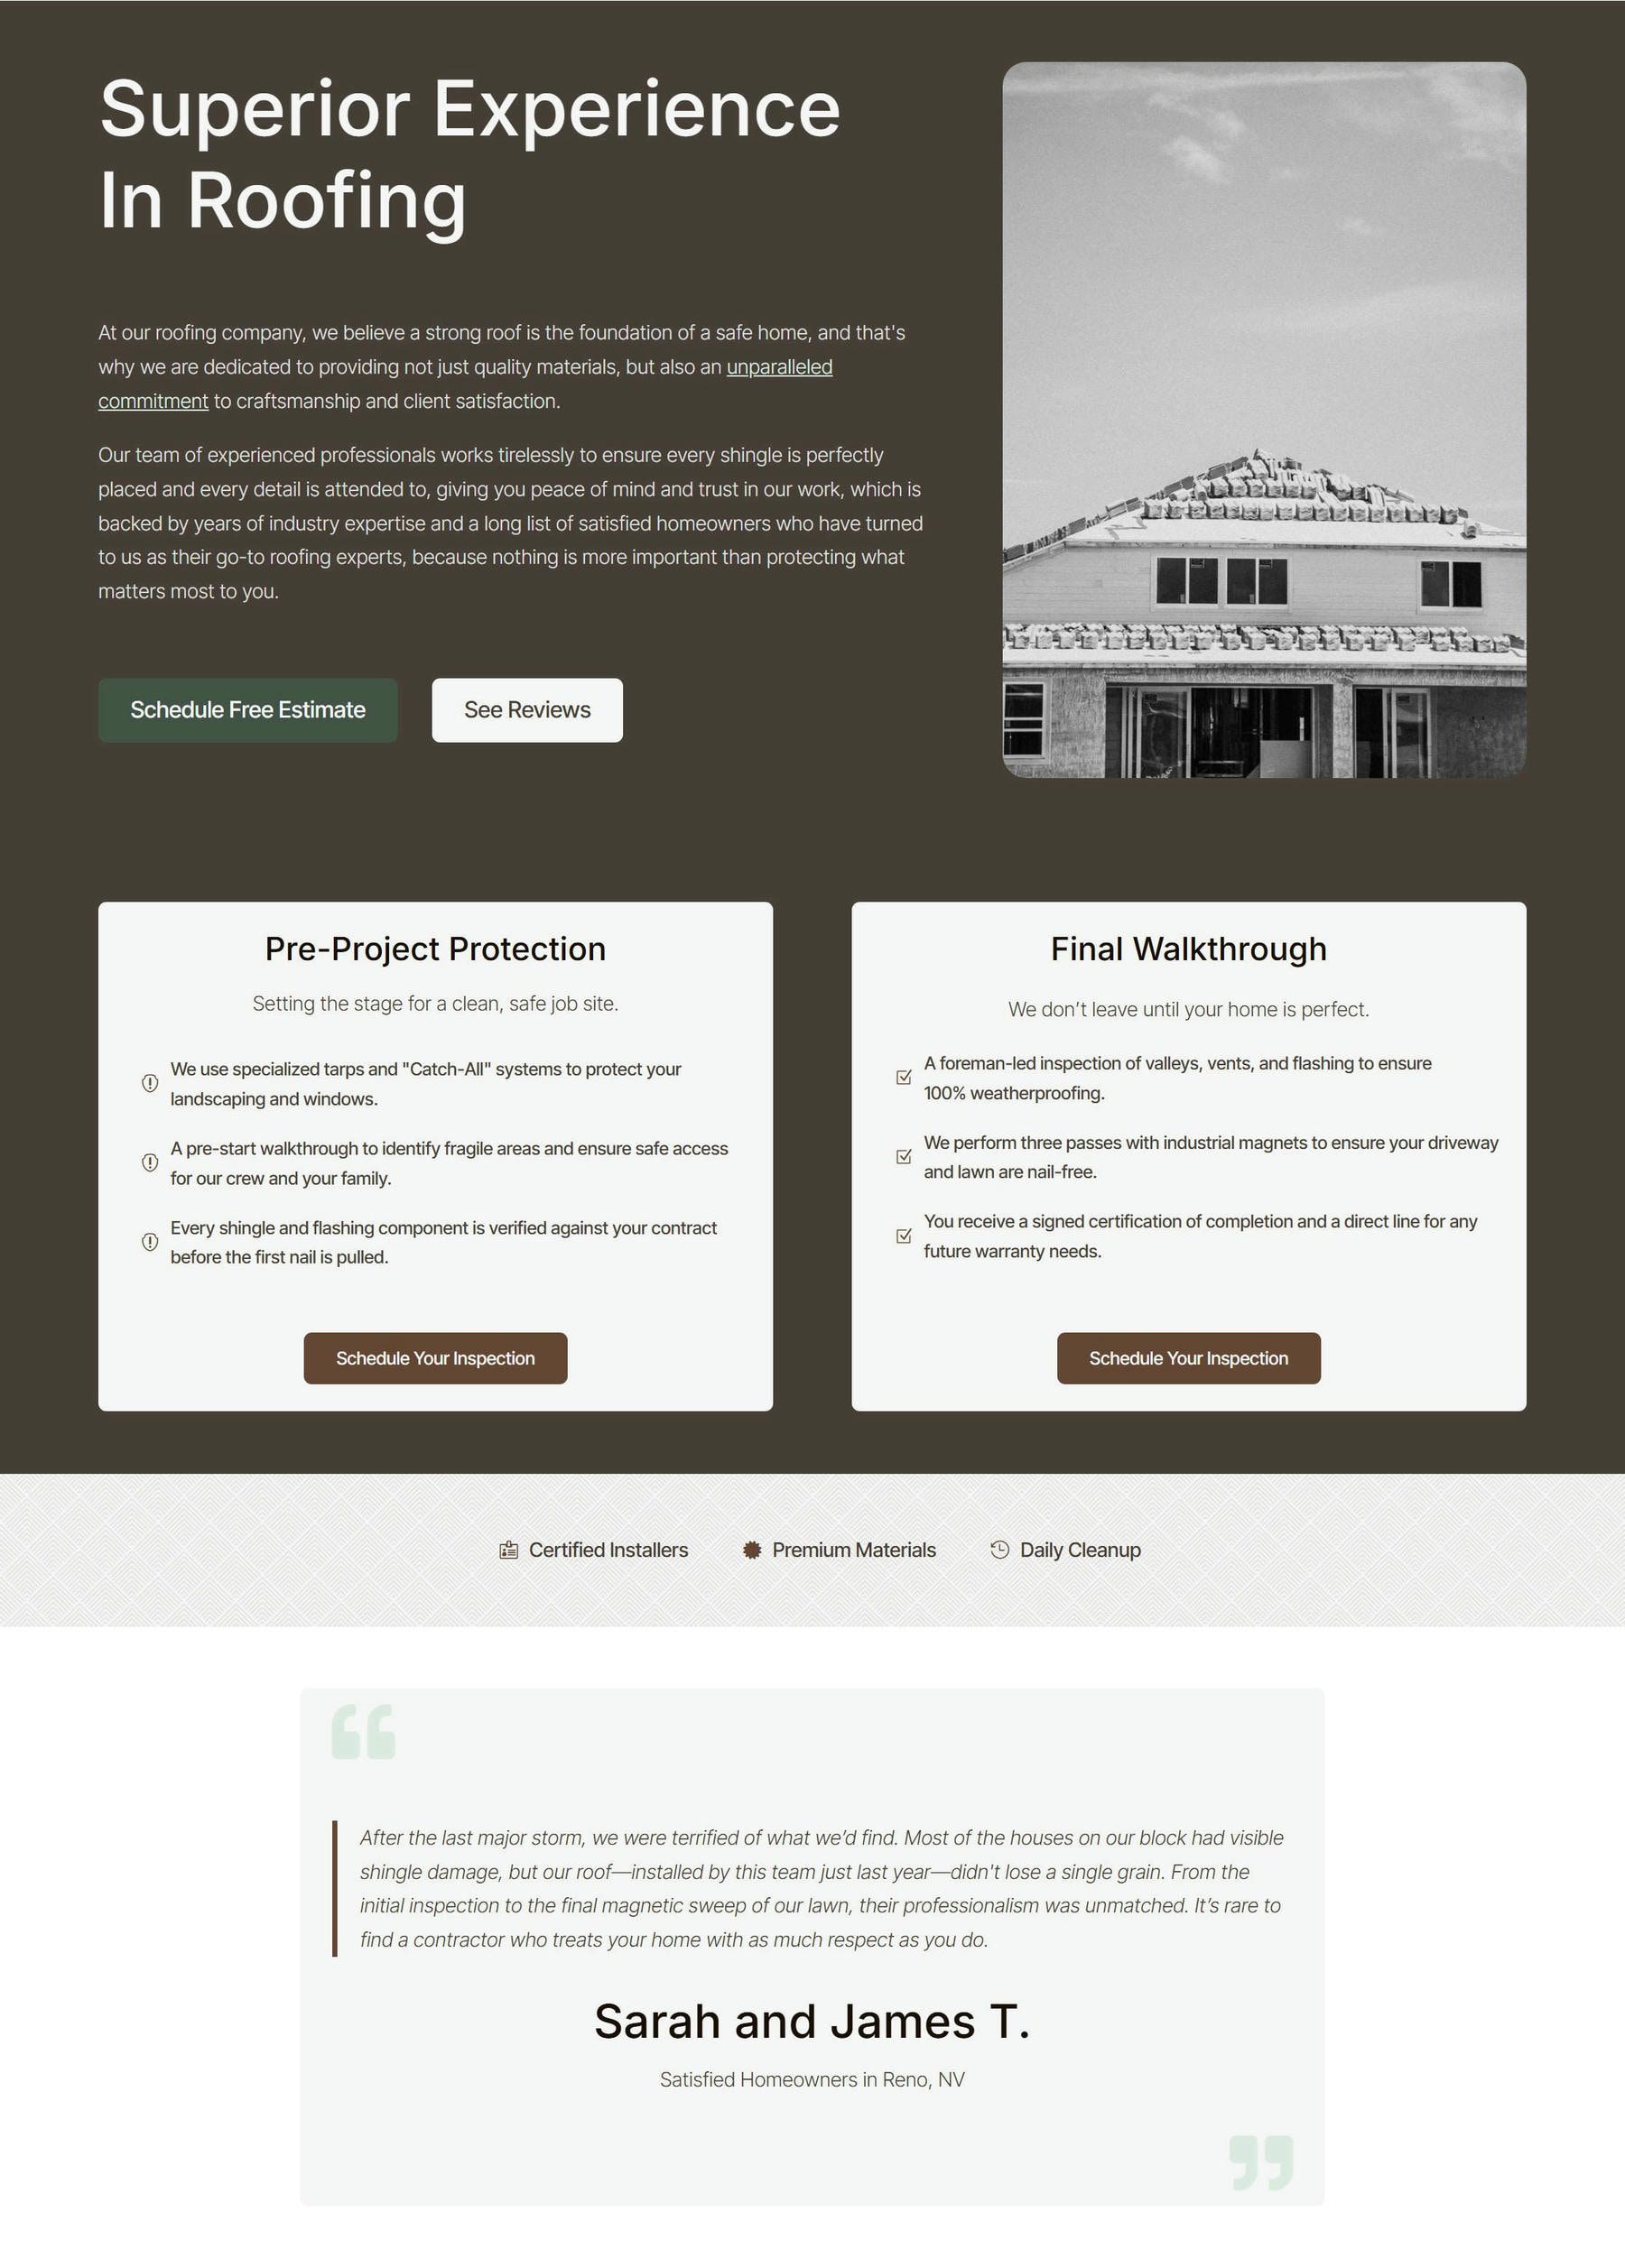
We are going to construct 4 sections: a Hero, a Course of part, a Badge part, and a Testimonial part. For every part, we’ll lay out the construction first, then type it.
Hero Part
Add a brand new Part to the web page. When prompted to decide on a construction, choose the 3/5 + 2/5 unequal column Flex structure. This offers you a Row with two Columns—a wider left column on your content material and a narrower proper column for a hero picture. Set the HTML Component Kind (within the Superior Tab) to part.
Within the first Column, add a Heading module, a Textual content module, and two Button modules. Set Column 1 to have Flex Course: Row and Flex Wrap: Wrap. Within the second Column, add an Picture module. Your Layers panel ought to now match the construction within the screenshot under.
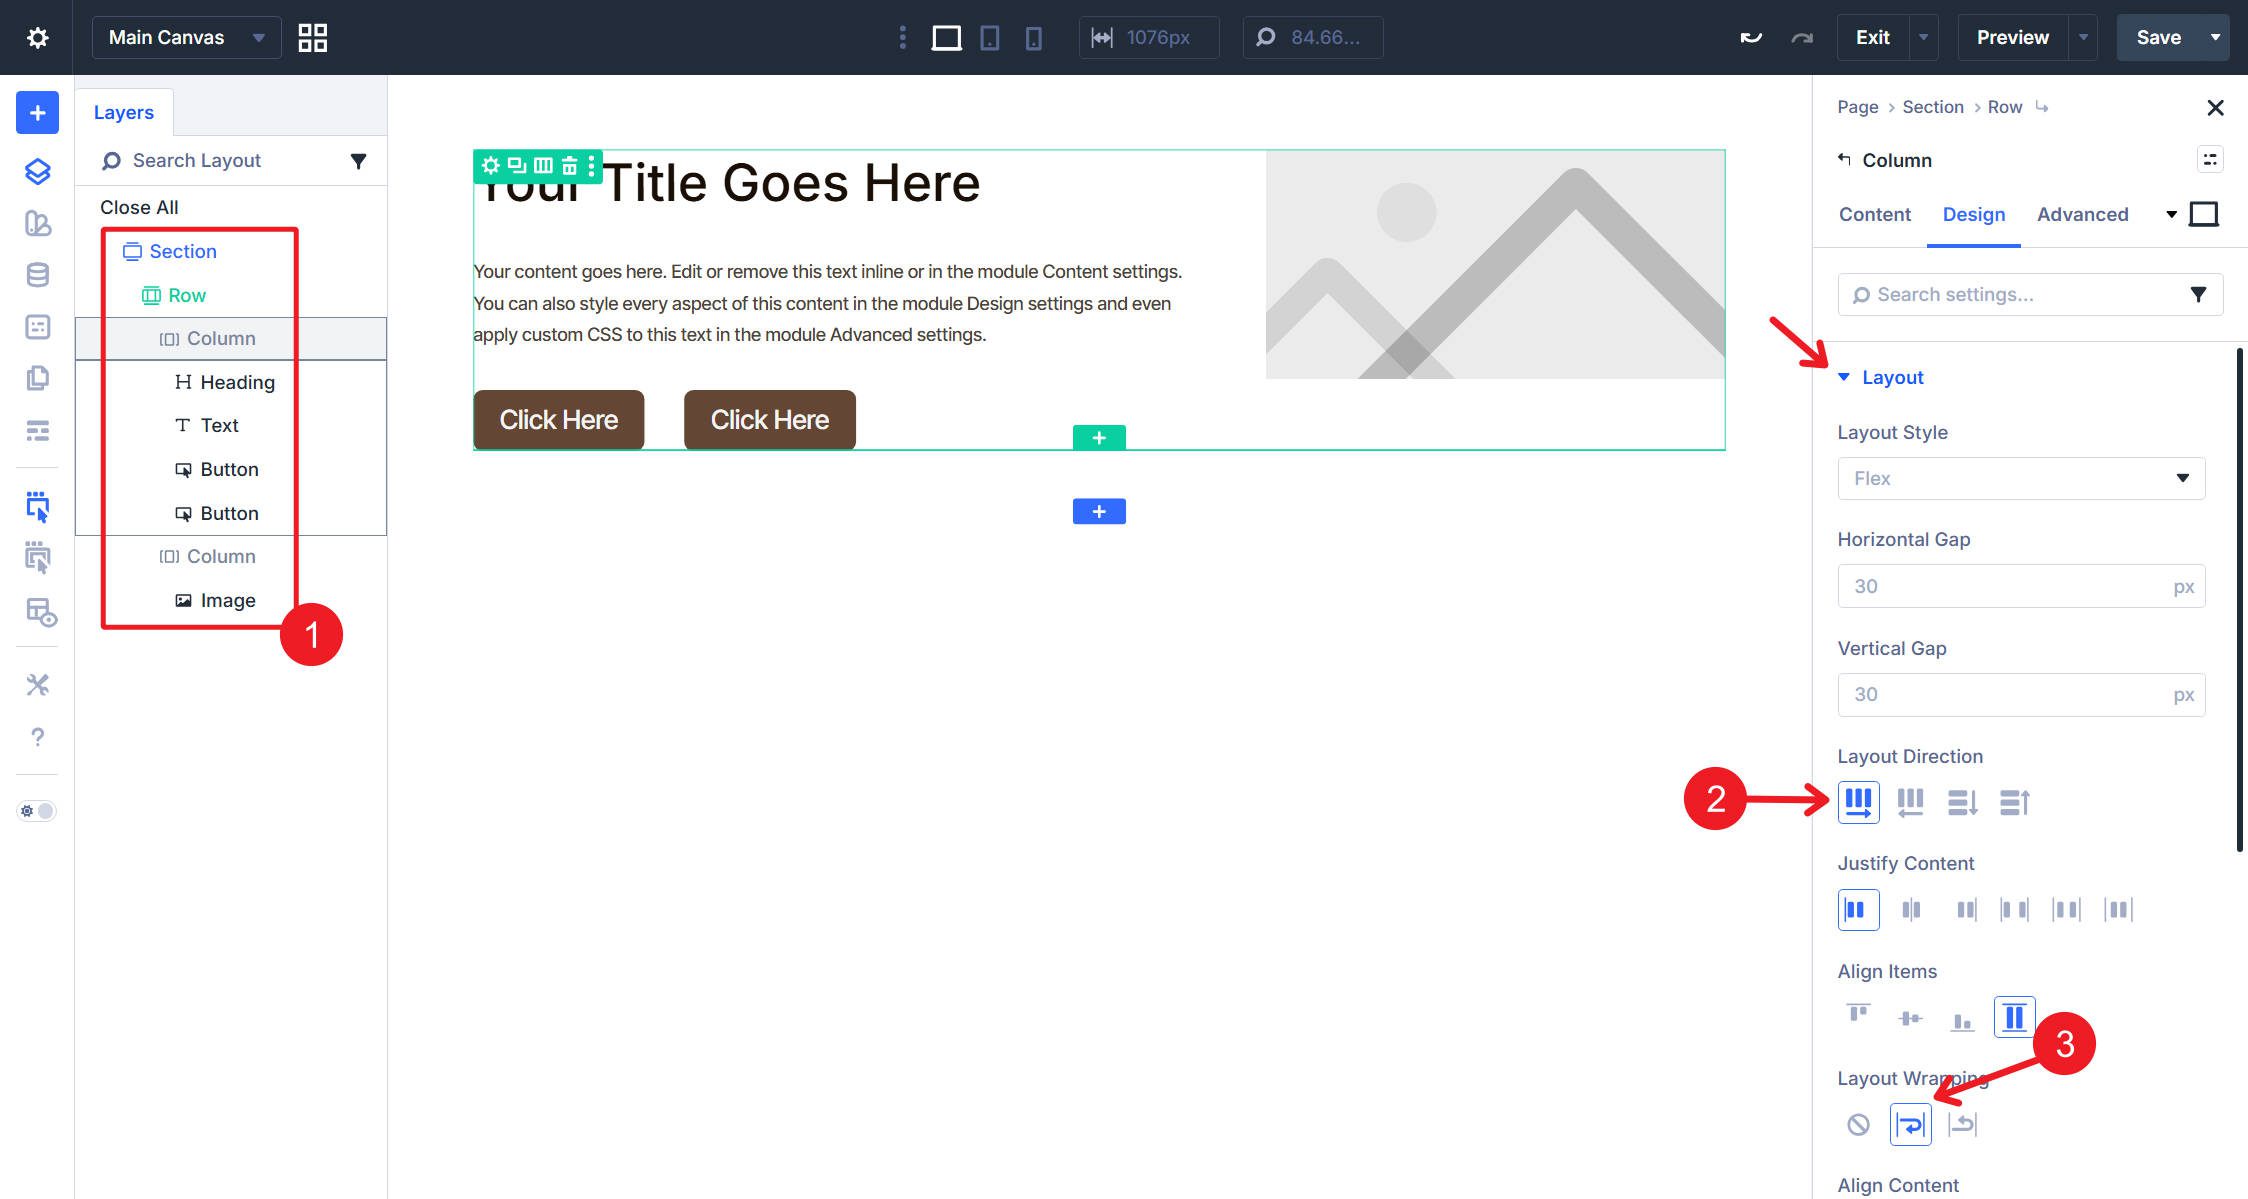
At this level, add your content material to every module. For me, it seems like this.
Styling
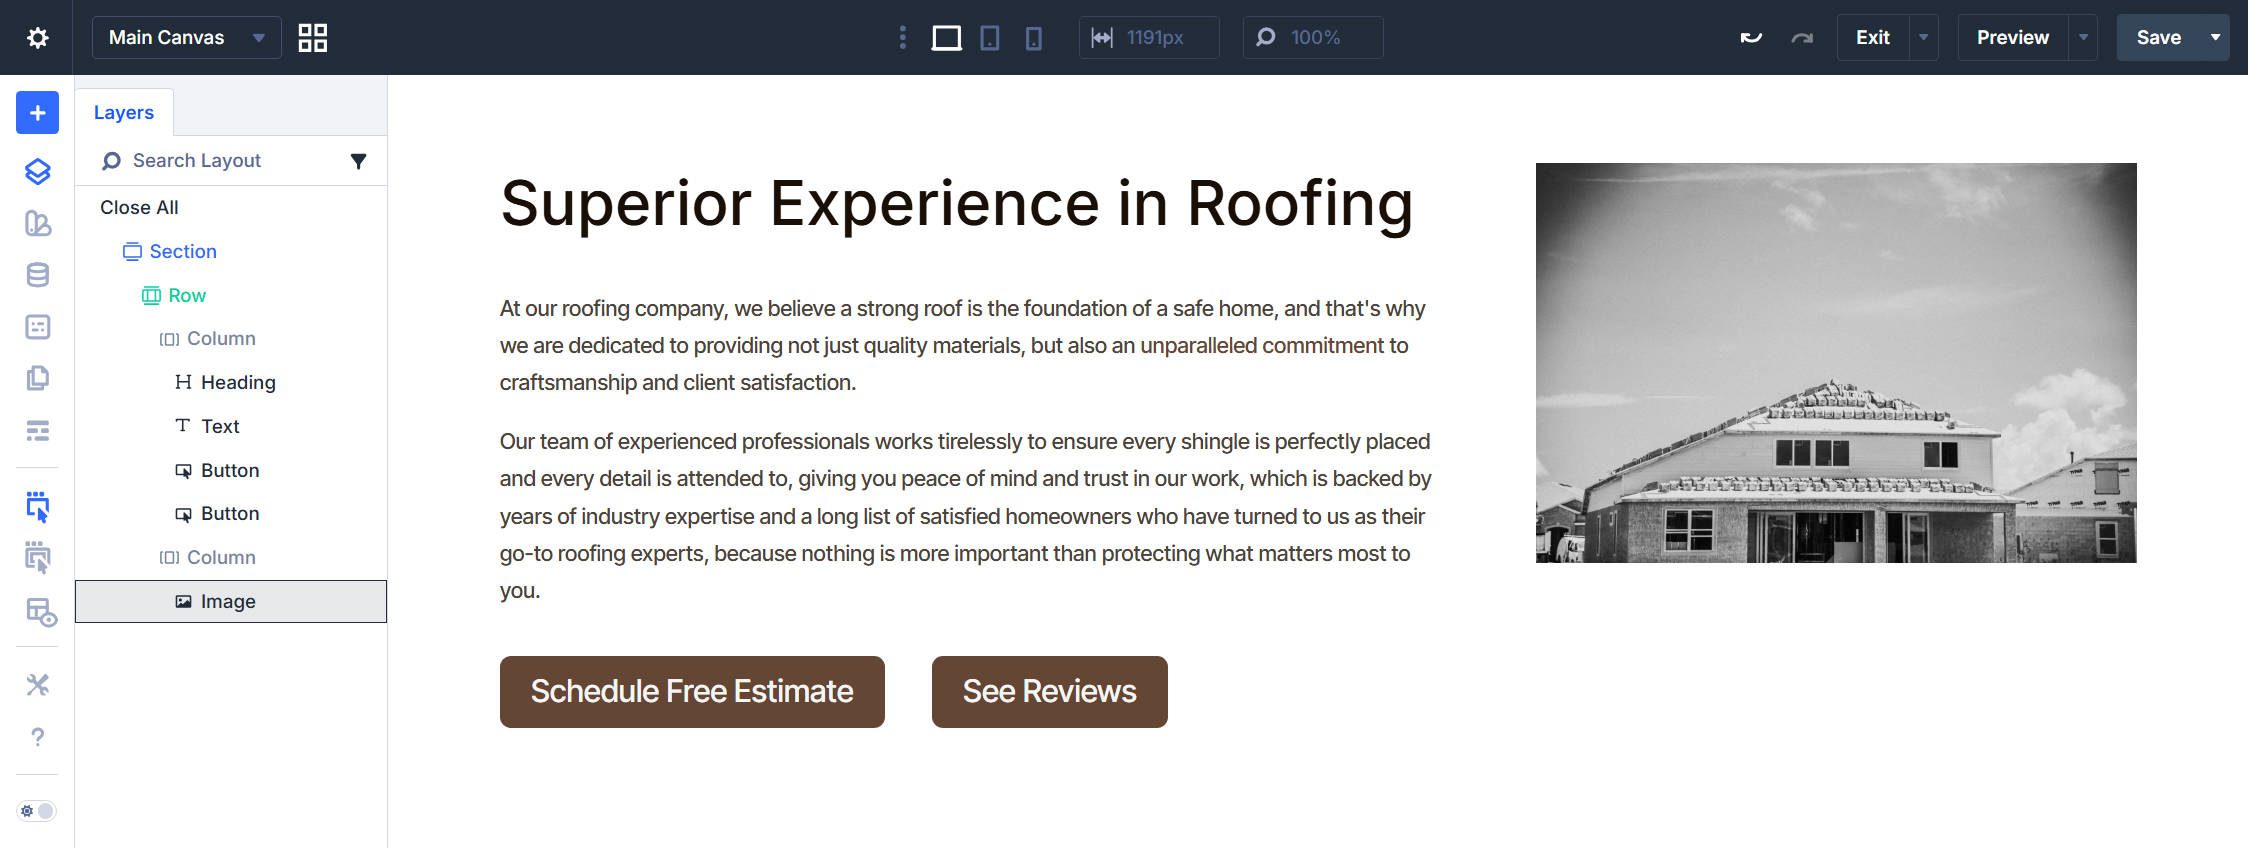
Click on the Part and assign the Part – Darkish Component Preset. This is applicable your darkish background, gutters, and flex-column structure in a single click on. Click on the Row. The Row – Normal Width default preset ought to already be lively. No adjustments wanted.
Click on the Heading module and stack the next Component Presets: H1 Giant, Textual content Wrap Steadiness, Mild, and Textual content Title Case. Set the Heading Degree on the Module itself to “H1.” Click on the Textual content module and assign the Mild Textual content Component Preset.
Click on the primary Button, and stack the Secondary Button and Button Padding Component Presets. Click on the second Button and stack Off-white Button and Button Padding. Click on the Picture module and assign the Picture Corners Component Preset. Below Design > Sizing, set the Max Top to 80vh and the Width to 100% (or, higher on this state of affairs, use the “Pressure Fullwidth” toggle). Then assign the Portrait Img Facet Ratio CSS Possibility Group Preset and the Class Portrait Picture Attributes Possibility Group Preset.
That completes the hero part. Each module was styled by choosing presets with just a few minor on-module settings utilized all through.
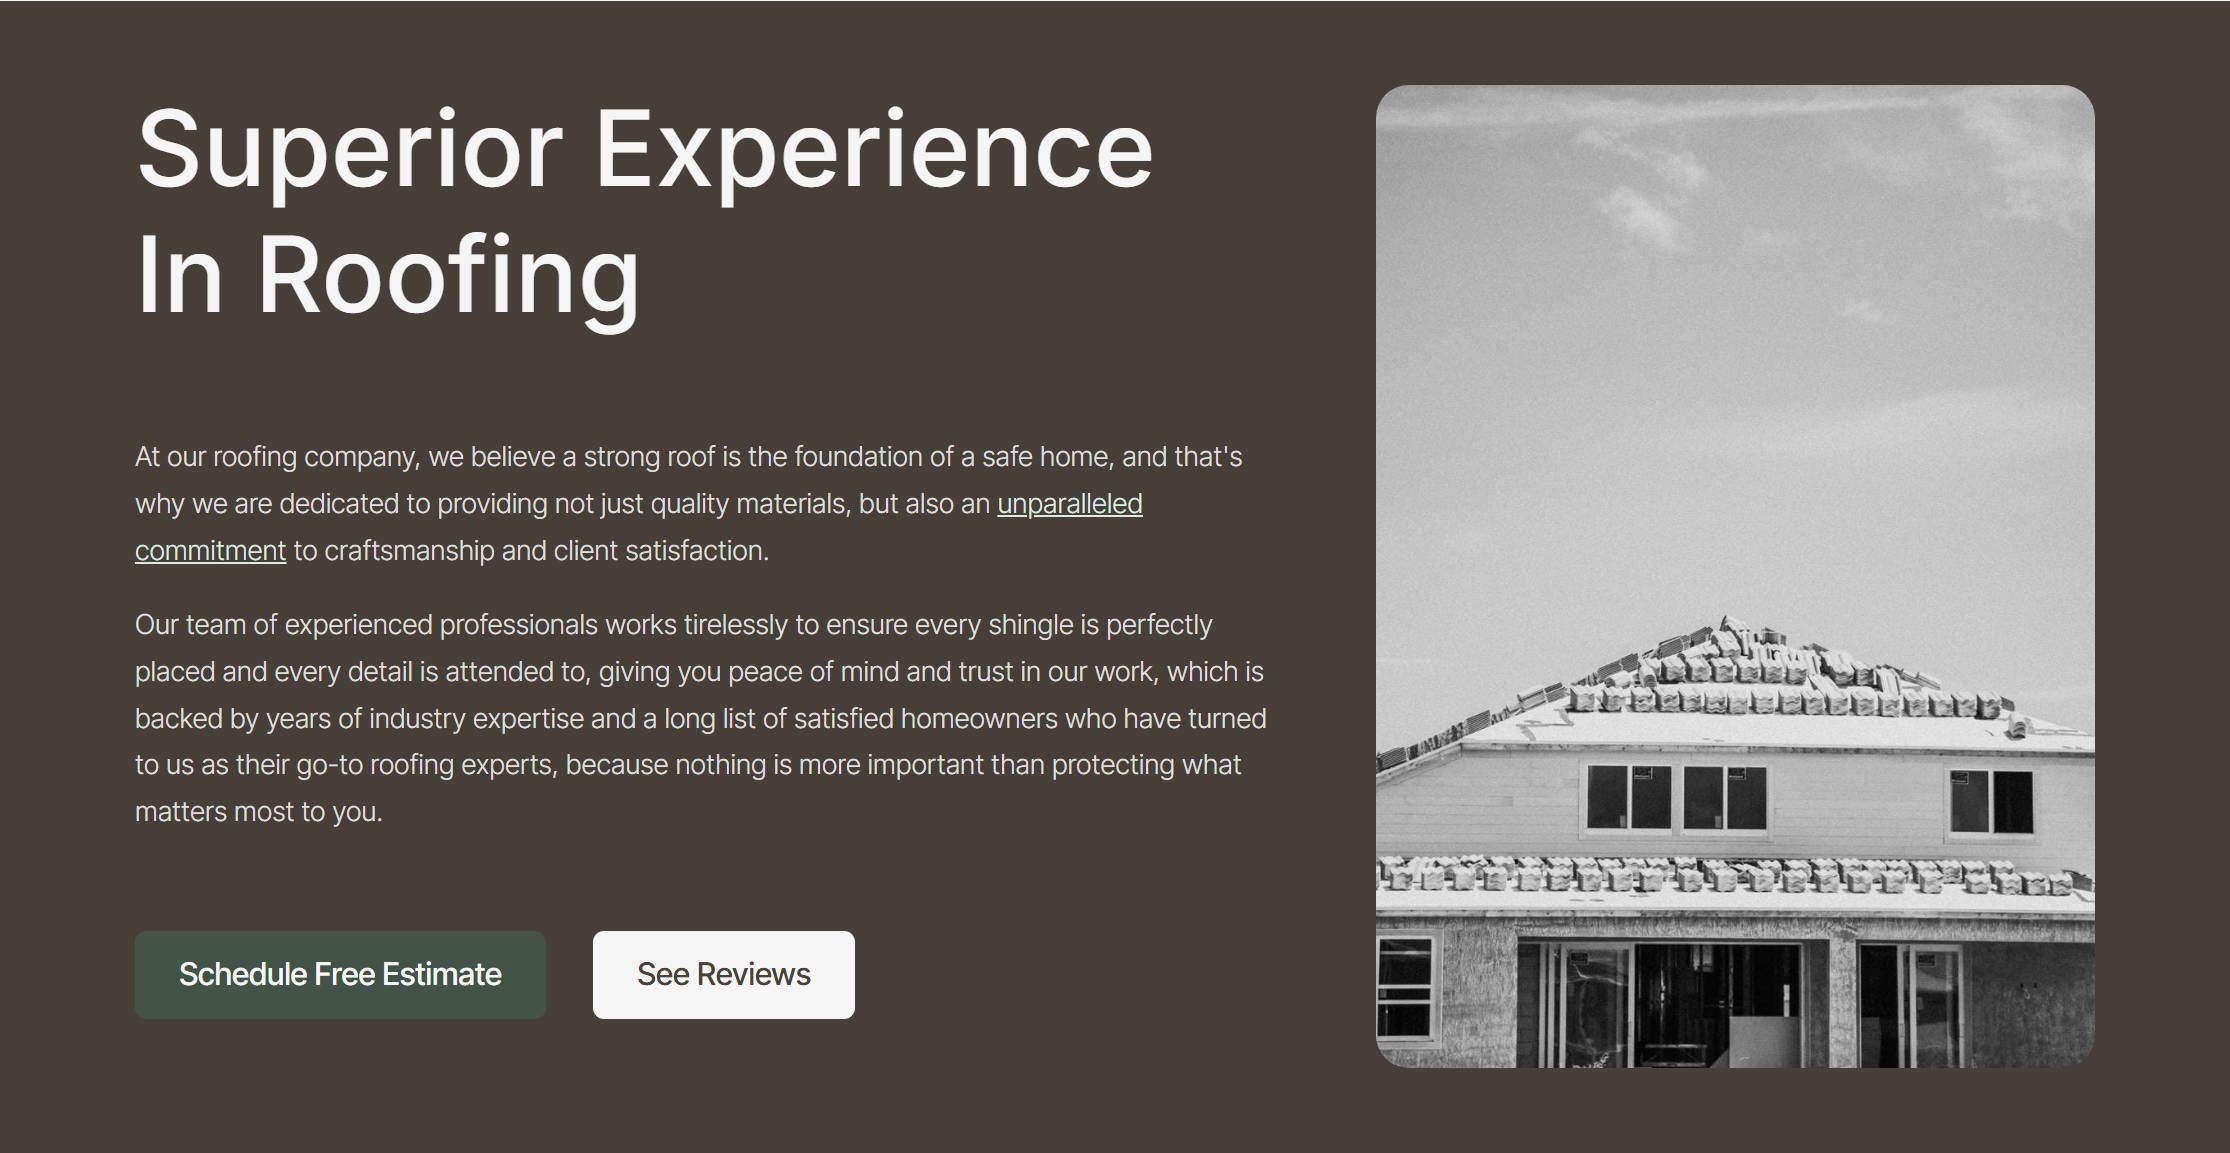
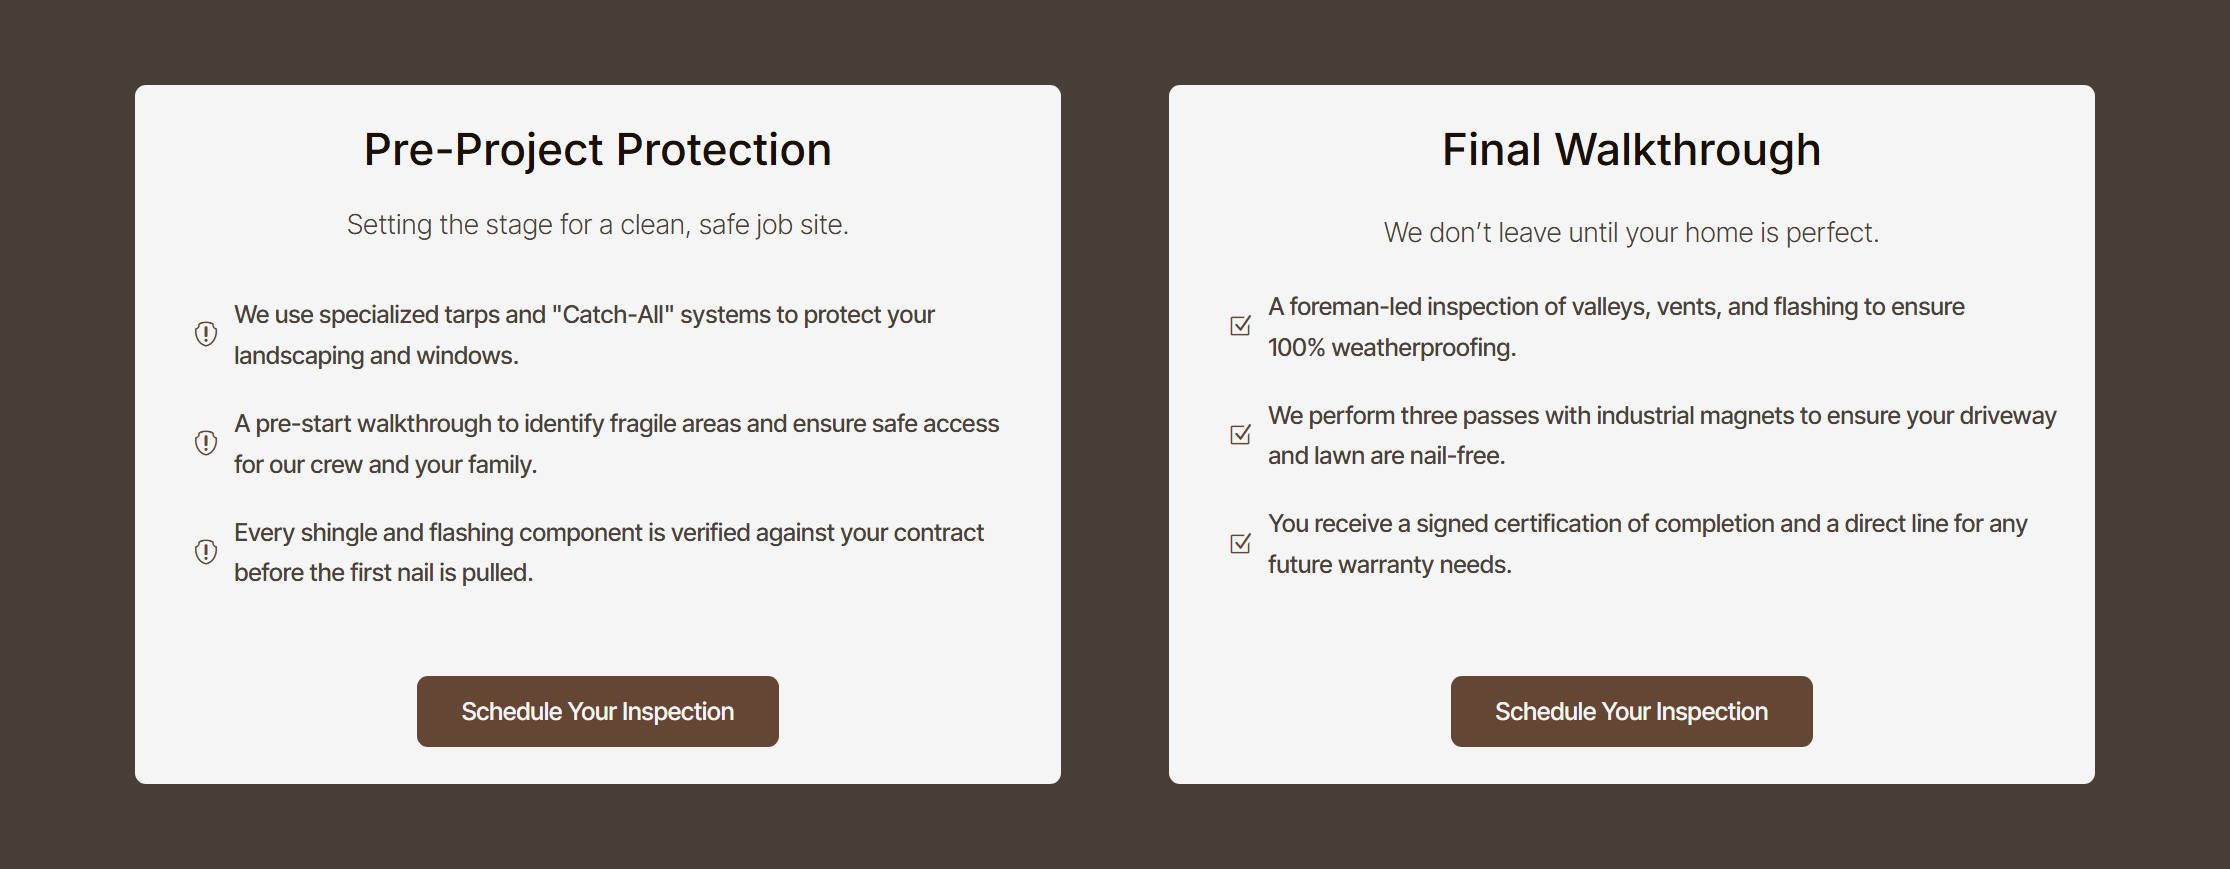
Course of Part
Add a brand new Part and select the equal two-column Flex structure. In every Column, add a Heading module, a Textual content module, an Icon Listing module with three Icon Listing Objects, and a Button module. Add your content material to every module in each columns—headings, brief descriptions, icon checklist textual content, and button labels. Select no matter icons fit your content material.
Styling
We are going to type every thing within the left column first, then extend those styles to the suitable column on the finish.
Click on the Part and assign Part – Darkish. The Row retains its Row – Normal Width default. In Column 1, assign the BG – Impartial Background Possibility Group Preset and the Button Corners Border Possibility Group Preset—the rounded corners and border settings work simply as nicely on a card-style column as they do on buttons. Then assign the Container Padding Small Spacing Possibility Group Preset to offer content material room to breathe inside the cardboard. Additionally, set the Column to Align Objects Middle and Area Between.
Click on the Heading module. Stack the H5 and Textual content Wrap Steadiness Component Presets. Set the Heading Degree to H2. The H5 preset controls the visible dimension whereas the H2 tag preserves correct doc hierarchy—the part nonetheless will get an H2 within the supply, it simply seems smaller by design. Then, align the Heading Middle.
Click on the Textual content module and assign the Darkish Textual content Component Preset. Below Design > Spacing, set the Prime Margin to -1rem. This pulls the outline nearer to the heading, breaking the column’s default flex hole in a approach that visually teams the heading and its supporting textual content.
Click on the Icon Listing module. Within the Textual content choice group, apply the Small Textual content Measurement and Darkish Textual content Possibility Group Presets. Below Design > Format, set the Vertical Hole to your Spacing – XSmall variable. Within the Icon choice group, set the Icon Prime Margin to 0. Click on the Button and stack the Main Button, Small Button, and Button Padding Small Component Presets.
With the primary Column styled, we are able to lengthen design attributes of every module on this column to the following. Right here is the Column Design Attributes being prolonged to all Columns within the Part. Observe the identical sample for the heading, textual content, icon checklist, and button.
And once more, with comparatively few on-module types, an entire part is finished.
Badge Part
Add a brand new Part with a single-column Flex structure. Contained in the Column, add an Icon Listing module with three Icon Listing Objects. Enter your badge labels and select an icon for every.
![]()
Click on the Part and assign the BG – Impartial Background Possibility Group Preset and the Patterned SVG Background CSS Possibility Group Preset. The SVG sample provides refined visible texture with out competing with the content material.
Click on the Icon Listing module. Apply the Regular Textual content Measurement Possibility Group Preset within the Textual content choice group. Below Design > Format, set the Flex Course to Row, Justify Content material to Middle, Align Objects to Middle, and the Horizontal Hole to 3rem. Within the Icon choice group, set the Icon Prime Margin to 0, and within the regular Spacing Possibility Group, set Padding Backside to 0 as nicely.
After a handful of presets and structure assignments, the part is finished.
![]()
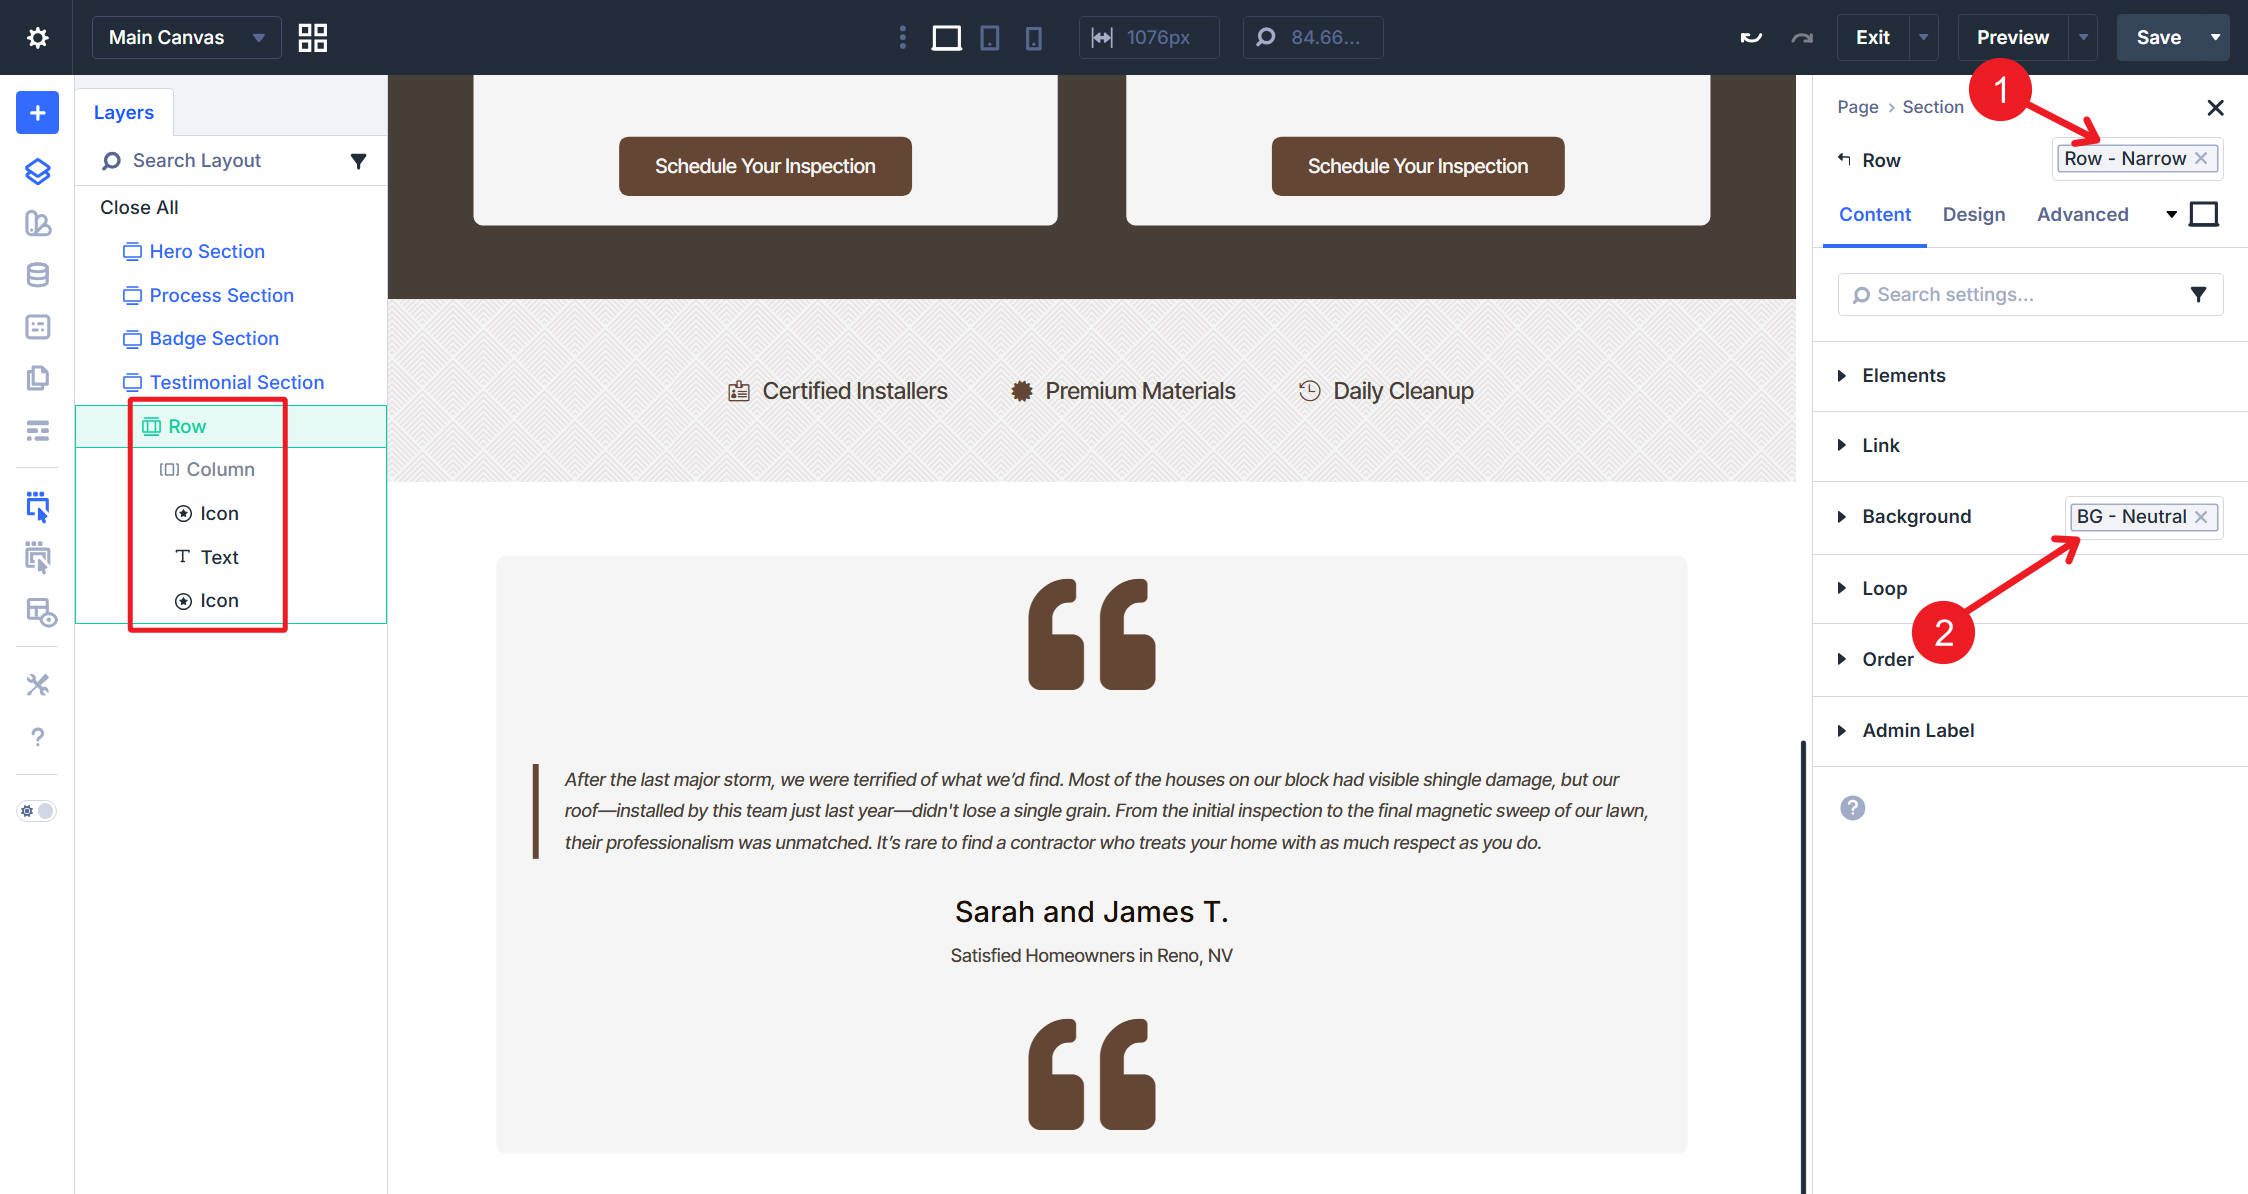
Testimonial Part
Add a brand new Part with a single-column Flex structure. Assign the Row – Slim Component Preset to the Row. Additionally, set the row to BG – Impartial. Contained in the Column, add an Icon module, a Textual content module, and one other Icon module.
Select a citation mark icon for each Icon modules. Set every to make use of the Secondary Mild colour variable, an Icon Measurement of 55, and Alignment to Left. On the second Icon module, go to Design > Rework, then set Rotate Z to 180 levels. This adjustments it to appear like a closing citation mark and strikes it to the opposite facet.
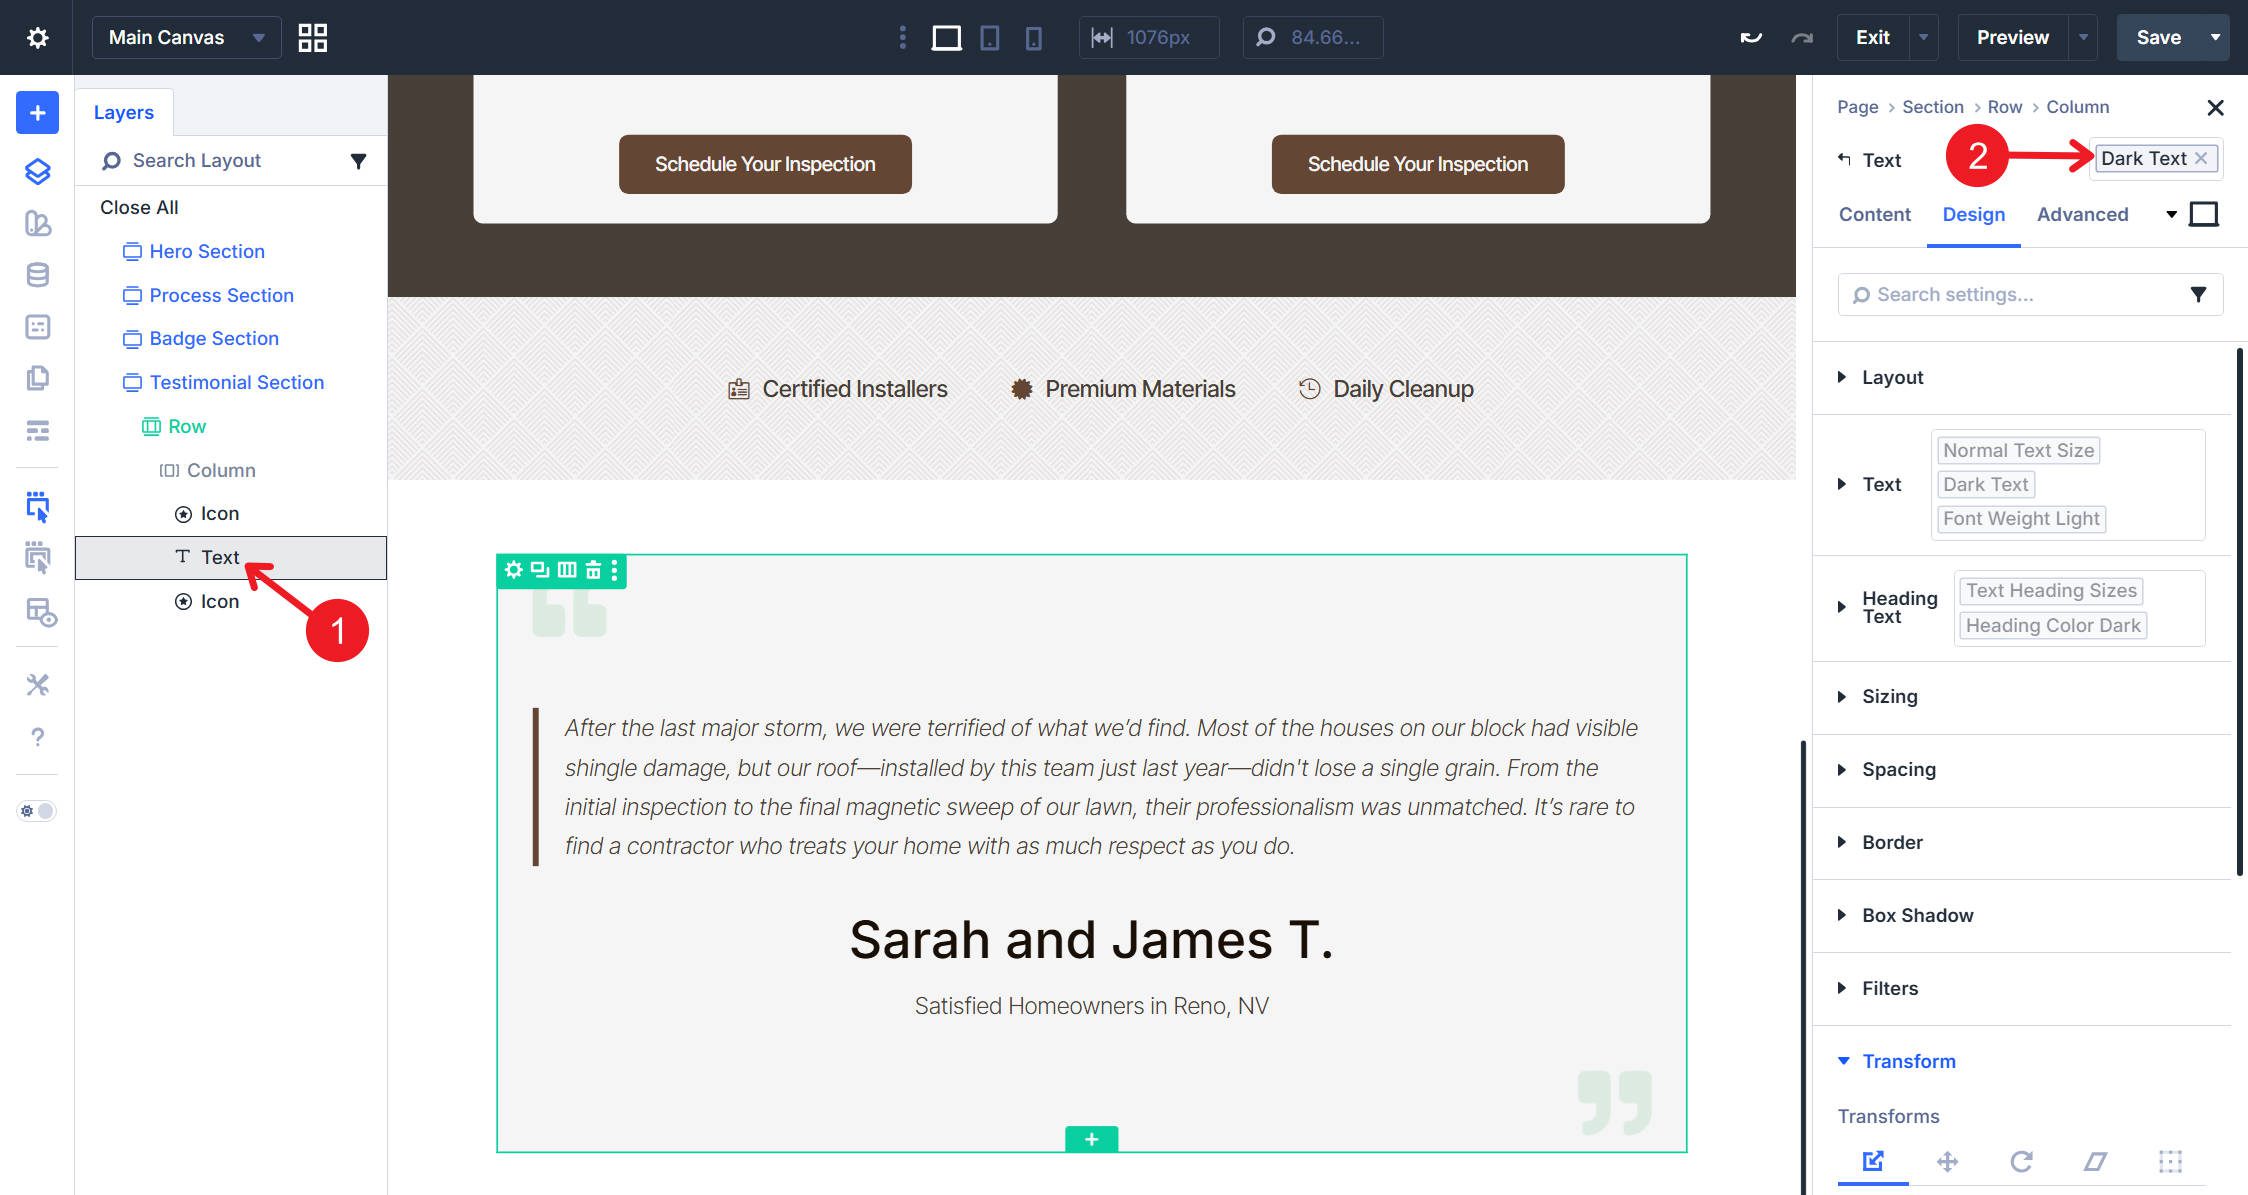
Click on the Textual content module and assign the Darkish Textual content Component Preset. Enter your testimonial as a blockquote, adopted by the particular person’s title as a heading and a brief label in regular textual content beneath it.
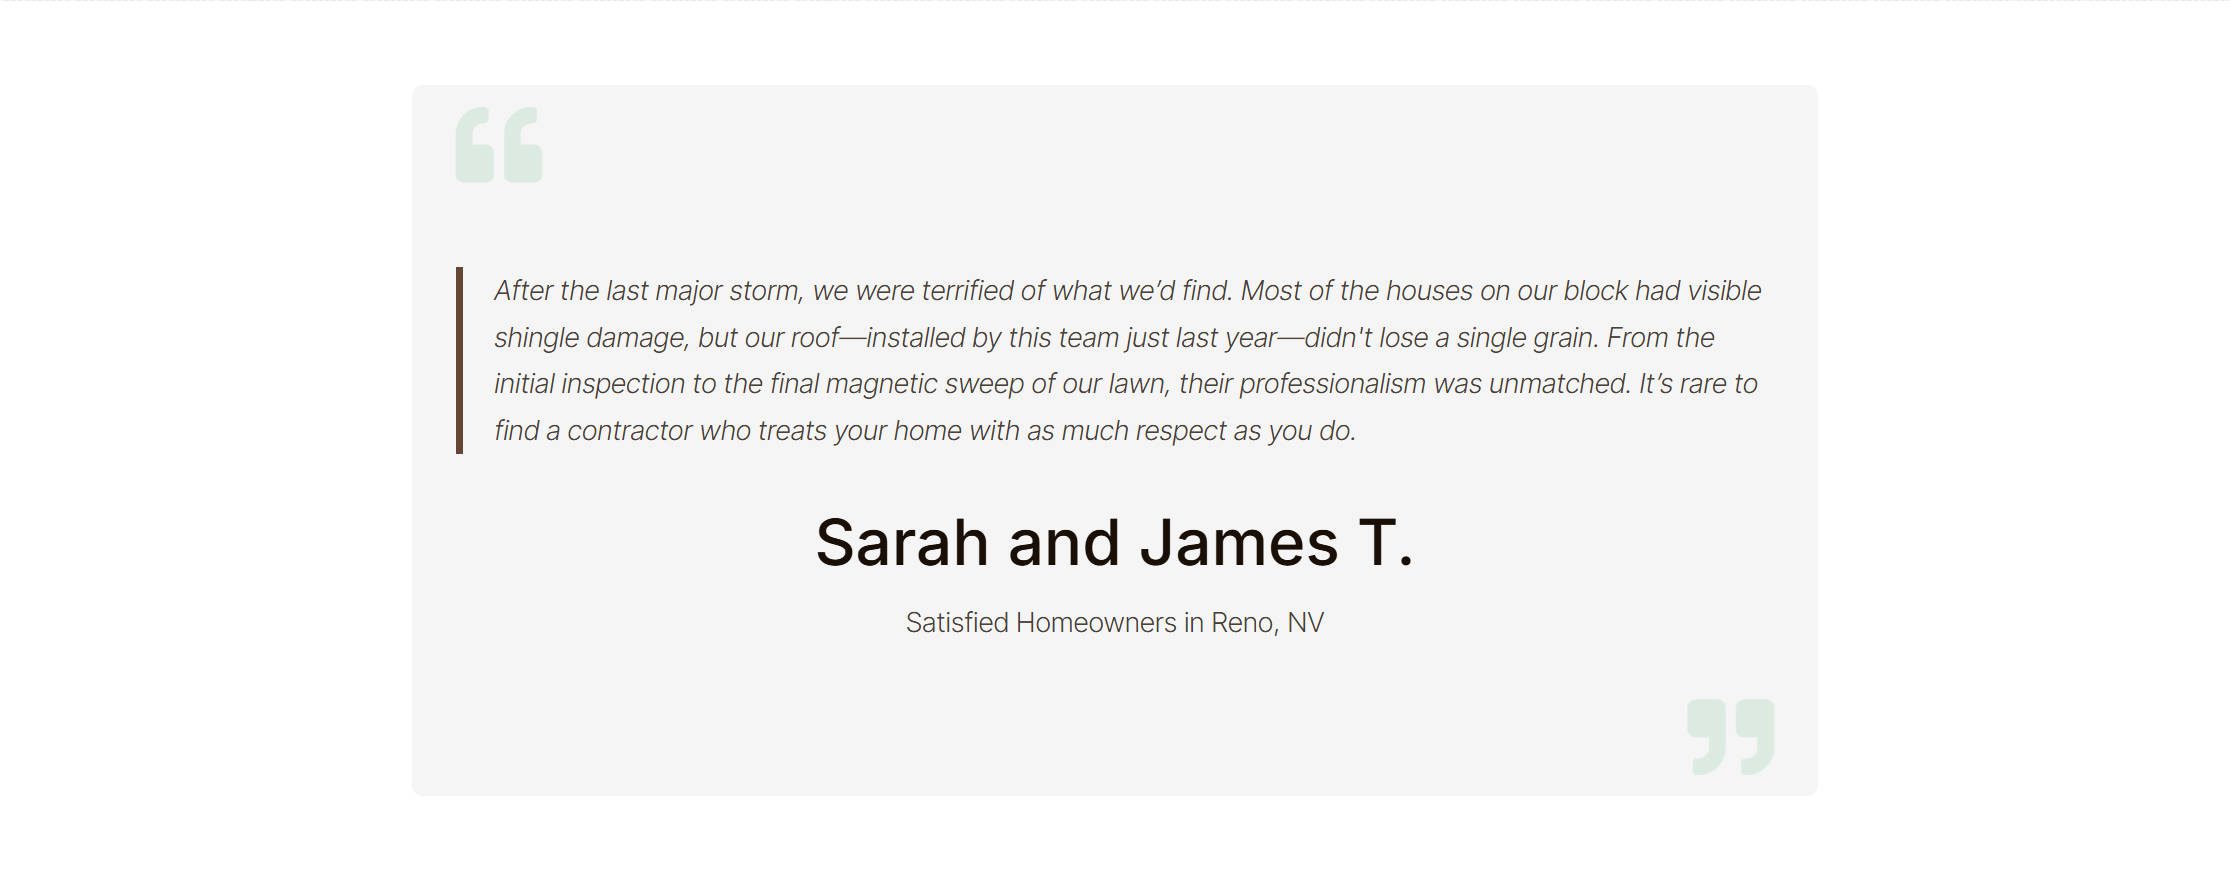
And with that, we now have our fourth and ultimate part for this tutorial.
Begin Constructing In Divi 5 Right this moment!
This Divi 5 design system method scales to any complexity. Add extra colour variants for various background varieties. Create extra button sizes for various contexts. Construct specialised Part presets for particular web page varieties. The modular structure helps progress with out the overhead of conventional preset administration.
The design system you constructed handles 80% of the layouts most websites want. Single-column and double-column sections, correctly configured with Flexbox, cowl hero sections, function blocks, content material areas, and CTAs. The typography and colour techniques adapt to any content material sort. The button variants deal with main, secondary, and tertiary actions.

")


