

How to Start a Shopify Store — Simple, Step-by-Step Guide

On this tutorial, I’m going to point out you methods to begin a Shopify retailer from scratch. I’ll stroll you thru the steps concerned in a easy, jargon-free approach — and show you how to get your retailer stay shortly and simply.
(Plus, on the finish of the put up, I’ll offer you some bonus suggestions on how to make sure that your model new ecommerce retailer turns into a profitable one).
Prepared? Let’s dive in.
1. Get every thing you want on your Shopify retailer prepared
Earlier than constructing your Shopify retailer, it’s a good suggestion to have every thing you want for it handy — this may velocity up the method and result in a better-looking retailer. The important thing stuff you’ll often want are:
- A enterprise thought
- A robust enterprise title
- A emblem
- Merchandise
- Images of your merchandise
- Content material on your retailer’s pages (about us, contact us, FAQs and so on.)
2. Begin a free trial
The following factor that you just’ll must do is begin a free trial of Shopify. The free trial allows you to attempt the product out for 3 days, after which you solely pay $1 for the first three months of your Shopify subscription.

You don’t must enter any bank card particulars to create your Shopify account and begin your trial — nonetheless, you can be requested a number of onboarding questions on the kind of enterprise you’re creating on Shopify.

Though you may skip these questions if you want, it may be a good suggestion to offer as a lot data to Shopify as attainable, as a result of the platform tailors your retailer’s setup information based mostly in your solutions.

When you’ve answered Shopify’s questions, you’ll end up inside your model new Shopify account! Now you may add merchandise, choose a theme and configure your cost and transport choices.

Let’s begin with the ‘including merchandise’ bit.
Don’t miss out — obtain our free Shopify Startup Equipment


Our free Shopify Startup Equipment is a should for anybody pondering of constructing an internet retailer with Shopify. Containing a complete e-book on beginning a Shopify retailer, video tutorials, PDF cheatsheets and way more, it’s packed filled with sensible recommendation on methods to get a Shopify enterprise off the bottom. It’s out there without cost to Type Manufacturing unit readers — however for a restricted time solely.
3. Add merchandise to your Shopify retailer
When you’ve signed up on your Shopify free trial, you could be tempted to begin selecting themes and taking part in round along with your new retailer’s design.
(To be honest, this may be essentially the most enjoyable a part of beginning a Shopify retailer!).
Nevertheless, it’s significantly better so as to add your merchandise first.
It’s because your product vary can have a large affect on the feel and appear of your retailer — and accordingly, it’s greatest to keep away from spending a very long time selecting and customizing a theme solely to seek out that your product pictures don’t work nicely with it.
So ideally, it is best to goal to design your retailer round your merchandise and their imagery — not the opposite approach spherical.
So as to add your first product, simply go to Merchandise > Add your merchandise in your Shopify dashboard.

Then, it’s a case of including in the important thing details about your product, specifically:
- product title
- description
- media
- class
- pricing
- stock
- transport
- variants
- search engine itemizing preview
Let’s undergo these shortly now.
Product title
That is what your clients will see once they come throughout your product both in your retailer or in Google search outcomes.
So, your title needs to be
- clear
- correct
- participating
- comparatively brief.
Product description
This discipline provides you the chance to actually promote your product!
Nevertheless, it’s vital to not write a protracted piece of blurb that goes on and on about how nice your retailer is — you could be strategic right here. So, when writing your product descriptions…
- Be very conscious of your buyer persona — the type of one that’s probably to be shopping your retailer. Tailor your product descriptions in order that they converse to your audience clearly and in a related approach.
- Make your descriptions extraordinarily straightforward to learn — clarify your merchandise in easy phrases and use headings, bullet factors and brief paragraphs to put out your copy (this may assist potential clients entry key details about your merchandise shortly; and search engines like google and yahoo like this method to copywriting too).
- Spotlight any distinctive promoting factors (USPs) related along with your merchandise — options that elevate them above comparable items. Embody any incentives or particular gives related to them (low cost codes, the truth that you supply free transport and so on.).
- Overcome objections — attempt to work out why a possible buyer would really feel nervous about parting with money on your merchandise, and supply reassurance that calms these nerves.
Product media
The ‘media’ part of your product web page provides you the choice so as to add pictures, movies and 3D fashions of your merchandise.

There are a number of key issues to notice when importing media.
- Be certain that the standard of your product media is as excessive as attainable. If you happen to can, work with knowledgeable product photographer or videographer to create your media. If that’s not attainable, it’s effective to take your personal product pictures or shoot your personal movies — simply ensure to make use of a tool with a top quality digital camera when doing so. (Shopify allows you to add movies as much as 4K decision, so you may go to city right here in case you like!).
- Be certain that you employ the identical aspect ratio when importing product pictures — Shopify themes look a lot higher when a constant one is used.
- Pay attention to picture decision necessities — for Shopify’s product zoom characteristic to work correctly, photos must have a minimal decision of 800 x 800 pixels; and if utilizing Shopify to promote on-line by way of Amazon or Etsy, you’ll want to make sure that they’re at the very least 1000 x 1000 pixels in measurement. Shopify really suggests utilizing pictures with a minimal width of 2048 pixels (you can read Shopify’s advice on product images here).
- After you’ve uploaded a product picture, add appropriate alt text to it. Alt textual content lets guests with visibility impairments perceive your content material higher, and helps search engines like google and yahoo index it extra precisely too.
- Be careful for video size and file sizes – in case you’re importing your personal product movies to Shopify (i.e., somewhat than embedding YouTube and Vimeo ones), guarantee that they don’t exceed 10 minutes in size and 1GB in measurement.
Class
In Shopify, the class discipline is used to categorise merchandise based mostly on ‘taxonomies’ utilized by Google Buying, Fb Store, Tiktok and different platforms. There’s a big checklist of classes to select from, and it’s vital to select the correct one on your product, as a result of doing so could make it extra seen on all these providers.
Moreover, you should use classes to arrange your collections in numerous methods all through your retailer.
Merely evaluate the checklist of choices out there and choose the correct one for the product you’re including.

Pricing
Now it’s time to set your product worth!
When setting a worth for an merchandise, you could goal to strike a stability between:
- your prices — worker prices, uncooked supplies, transport, hire and so forth
- the ‘perceived worth’ of the product you’re promoting.
Value issues too excessive, and also you gained’t generate sufficient gross sales to show a revenue. However making issues too low cost by comparability to comparable items might elevate doubts in your clients’ minds in regards to the high quality of what you’re promoting on-line (if one thing sounds too good to be true, it typically is).
Pricing could be difficult — however the excellent news is there’s tons of room for trial and error with ecommerce. You may all the time take a look at the market with one worth, and alter it later based mostly on the outcomes you’re getting in your retailer.
When you’ve settled in your product worth, it’s straightforward so as to add it to Shopify — you simply enter it into the ‘worth’ discipline in your product web page.

If you happen to like, you can too enter a price into the non-compulsory ‘evaluate at worth’ discipline. This lets your guests know what the ‘full’ worth of an merchandise is, with the ‘worth’ showing as a reduced fee.
For instance, getting into $3 into the ‘worth’ discipline and $5 into the ‘evaluate at worth’ discipline will present your retailer guests one thing like this:

The ‘price per merchandise’ discipline can also be non-compulsory — it merely allows you to add the associated fee worth of an merchandise into Shopify, with the intention to see what your precise revenue per sale is.
(That is helpful for reporting functions.)

As for the ‘cost tax on this product’ choice, whether or not or not you could tick this field will rely very a lot in your product kind, location and tax standing. In case you are planning to cost tax in your items, simply tick it for now — you may edit your tax settings later.
Stock
As its title suggests, this part of the product web page allows you to hold tabs in your stock — and lets Shopify know what to do in case you run out of a specific product.

What you could enter right here will rely in your product kind (bodily, digital and so on.) and your personal necessities, however you should use the fields supplied so as to add:
- inventory maintaining models (or SKUs — a product code, mainly)
- bar codes
- amount data.
- location of your stock.
Of the above, the ‘amount’ settings are in all probability a very powerful — in case you promote bodily merchandise it is sensible to enter what number of are at the moment out there and, utilizing the ‘proceed promoting when out of inventory’ field, instruct Shopify what to do while you run out of products.
If it doesn’t take you very lengthy to make or supply your merchandise, it’s often greatest to tick the ‘proceed promoting’ choice — but when it’s going to take some time so that you can get extra inventory, it’s higher to depart it unticked (doing so will show a ‘offered out’ discover beside your merchandise till you’ve let Shopify know that the merchandise is again in inventory).
In case you are utilizing a number of places to retailer your merchandise, you should use the situation settings supplied to let Shopify know what number of merchandise you’re storing at every of them (you may learn more about inventory locations and Shopify here).
Product transport
If you happen to’re promoting bodily merchandise, you should use the transport part to enter weight and customs data.

The load information is especially vital for calculating transport charges (I focus on how to try this in a while on this put up).
Product variants
In case your product is available in a wide range of choices — for instance totally different sizes, colours or flavors — that is the place you add them (together with the related costs, portions and SKUs for every one).

You may create as much as 3 choices for every Shopify product (for instance measurement, shade, materials); and as much as 100 variants of those.
Variants are mixtures of product choices — i.e., a big, blue shoe can be one variant; a small, pink one can be one other and so forth.
Tip: if these product and variant limits are too restrictive on your product vary, chances are you’ll want to purchase a related app from Shopify’s app retailer (Infinite Choices is a well-liked alternative).
Search engine itemizing preview
This part allows you to inform search engines like google and yahoo extra about your merchandise.

There are three fields to finish right here:
- Web page title — that is the title that often seems in search outcomes (the massive clickable heading).
- Meta description — that is the place you enter your ‘meta description,’ a bit of knowledge that’s displayed as the outline in search outcomes (although not all the time — Google typically makes use of it as a information somewhat than gospel).
- URL / deal with — the net tackle on your product.
Right here’s how all this interprets right into a Google search outcome:

For an in depth information to how it is best to method filling in these fields, you may prefer to check out our Shopify SEO guide or watch our video about Shopify search engine marketing (beneath).
However for now, listed below are some key pointers:
- When naming your merchandise, it’s all the time greatest to hold out some key phrase analysis first. Key phrase analysis instruments like Ahrefs or Semrush can inform you precisely what phrases individuals are utilizing when trying to find merchandise like yours; what number of searches there are monthly for these phrases; and the way tough it is going to be to rank for them. For instance, utilizing a key phrase analysis instrument you may uncover that there are 64,000 searches for ‘ketchup’ each month and 5,000 for ‘pink sauce’ — and that it is going to be simpler to rank extremely for ‘pink sauce.’ (You may be taught extra about key phrase analysis in our Ahrefs review or our Semrush review).
- Embody your goal key phrase in your URL. This helps Google index your merchandise extra precisely.
- Maintain your meta description across the 155-160 character mark. Attempt to hold issues brief, candy and interesting, as doing so will generate extra clickthroughs. (Longer meta descriptions are much less doubtless for use by Google, or could also be truncated).
Product group
On the correct hand facet of the product web page you’ll discover a ‘Product Group’ part. This allows you to add details about your merchandise that make it simpler to arrange collections and reductions.

The fields you could fill in are:
- Product Sort — the particular kind of product on the market
- Vendor — the producer or vendor of the product (in a variety of instances, that’s you).
- Collections — we’ll come again to collections in additional depth in a second, however mainly they’re catalogs of merchandise that you just create both manually or utilizing guidelines. Collections are vital as a result of you may show them in numerous helpful methods in your retailer — for instance as a characteristic on your private home web page, or in your navigation.
- Tags — these are key phrases that you could affiliate along with your merchandise. They matter as a result of you should use them to mechanically create collections, and so they assist your clients find merchandise extra simply once they search your Shopify retailer.
Product standing
When you’re proud of all the knowledge you’ve entered in your product web page, you may activate your product.
That is executed by setting the product standing choice field (on the high proper nook of the web page) to ‘energetic.’

As you may see, there’s additionally an choice within the ‘Publishing’ part to handle your product’s availability on numerous ‘gross sales channels’.
By default you can be activating the product in your commonplace Shopify on-line retailer gross sales channel, however if you’re utilizing Shopify to checklist your product on different platforms, you may click on the ‘handle’ hyperlink to activate them on these channels too (you may learn more about Shopify sales channels here).
4. Create product collections on your retailer
When you’ve added a number of merchandise to your new Shopify retailer, you may set up them into ‘collections.’
Collections are teams of comparable kinds of merchandise — for instance, in case you ran an internet greetings card retailer, you may create a birthday card assortment, a Christmas card assortment and so forth.
There are three foremost the reason why you may need to do that:
- to show a sure choice of merchandise in your retailer’s dwelling web page
- to create a hyperlink in your website navigation to a specific set of merchandise
- to low cost a selected choice of merchandise.
To create a set, simply go to Merchandise > Collections in your Shopify retailer and click on ‘Create assortment.’

When you’ve accessed the gathering editor, you may enter a title, description, assortment picture, search engine marketing data and so forth — this includes the same course of to making a product.
What it’s a must to pay specific consideration to right here is the ‘Assortment kind’ field. This provides you the choice to both create a set manually, or by way of automation (Shopify refers to automated collections as ‘good’ collections).

If you happen to select the ‘guide’ choice, you’ll then be given the chance to seek for merchandise out of your catalog and add them to the gathering, one after the other.
If you happen to select the ‘good’ choice, you can be requested to arrange some easy guidelines that populate your assortment:

Within the above instance, I’m making a Christmas card assortment based mostly on product tag. Each time a product is tagged with ‘Christmas Card,’ it should mechanically be added to that assortment.
You aren’t restricted to utilizing product tags as the premise of those guidelines, nonetheless — you should use a number of different product attributes to create collections, together with product title, kind, vendor and worth:

In my opinion this ‘good assortment’ choice is one in every of Shopify’s greatest options — key competing platforms sometimes prohibit you to creating guide collections solely.
Automated collections can prevent hours of time, particularly in case you’re coping with a big product stock — so take advantage of them!
5. Create your retailer pages
By now, you’re in all probability itching to browse the Shopify theme retailer and choose a glamorous template on your retailer!
However really, the most effective factor to do subsequent is create your retailer’s pages.
As with merchandise, if in case you have your key website content material in place earlier than making use of a theme, you’ll get a significantly better sense of which templates work greatest on your retailer.
The important thing pages you’ll often must create are:
- About us — an summary of your ecommerce enterprise, your values and story.
- FAQs — a web page the place you reply regularly requested questions on your merchandise.
- Coverage pages — a web site phrases of use web page, cookie discover, privateness discover, transport coverage, returns coverage and so on.
- Contact web page — a web page containing your cellphone quantity, tackle and a contact type.
- A weblog — this allows you to share information about what you are promoting or associated content material that your clients could be excited about.
(You’ll word right here that I’ve omitted the house web page from this checklist. It’s because that is one web page that’s higher so as to add after you’ve picked a theme, because it includes extra design work utilizing your theme’s dwelling web page customizer. Extra on this in a second).
Except for the weblog, all these pages could be created in the identical approach. You merely go to On-line Retailer > Pages and click on ‘Add web page.’

It’s then a case of filling within the blanks — your web page title, content material, search engine marketing information and so on.
One factor to be careful for when creating your contact pages is the ‘theme template’ choice. You have to to set this to ‘contact’ for these.

As for weblog posts, to create these you go to On-line Retailer > Weblog Posts and click on ‘Create weblog put up’.
For now, it’s in all probability greatest simply to create one put up — a ‘welcome to our new retailer’ article or comparable; you may all the time add extra content material to your weblog as your retailer develops.
6. Create your navigation menus
When you’ve acquired your merchandise and pages in place, it’s time to create your navigation menus.
So as to add your navigation to a Shopify retailer, you go to Content material > Menus. You’ll then often discover the choice to edit two menus: a ‘foremost menu’ and a ‘footer menu.’

Of those, the ‘foremost menu’ is a very powerful for now. Click on on that hyperlink and you’ll get the choice so as to add the pages / collections you’ve simply created to it.
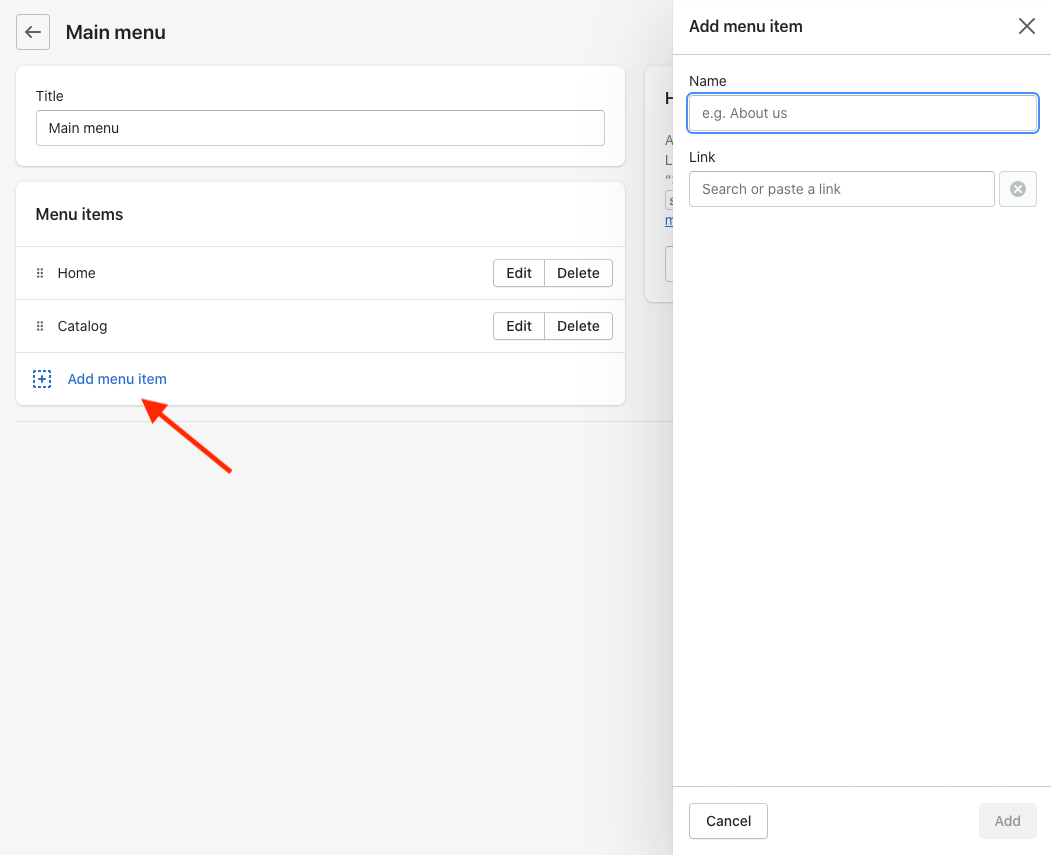
If you’re executed, simply click on the ‘Save menu’ choice.
(If you happen to like, you should use this part to create different kinds of menus too — like footer or sidebar ones, or extra advanced ‘nested’ menus. For extra detailed details about menu creation, see Shopify’s help resource on navigation).
7. Select a theme
At this level in proceedings you’ve acquired your merchandise, collections, pages and foremost navigation all sorted — so it’s lastly a good time to select your Shopify theme! To do that, you may simply go to the Shopify theme retailer, the place you’ll discover a very huge choice of themes out there.

The Shopify theme retailer is about up in a approach that makes it straightforward to seek out the correct template on your on-line retailer: you may browse utilizing a variety of filters, together with worth, trade, catalog measurement and options.
When selecting a theme, there are some key issues to remember:
- Don’t let fonts and colours sway your theme choice an excessive amount of — these are simply editable when you’ve put in a theme. Making certain {that a} theme has the options you want (for instance specific layouts, search bars and so on.) is extra vital for now.
- Most paid themes are available in 2-3 variants — verify every model earlier than deciding on one.
- You may attempt paid themes out to see how they appear earlier than shopping for them. (It’s additionally value noting that the costs listed for the paid-themes are one-off charges, not month-to-month prices.)
8. Create your private home web page
If you’ve settled in your Shopify theme, it’s time to create your retailer’s dwelling web page.
To do that, go to On-line Retailer > Themes and click on the ‘Customise’ button. This can take you to a drag-and-drop editor on your dwelling web page.
The default format and the choices out there to you right here will fluctuate a bit by theme, however all Shopify themes sometimes allow you to add sections like:
- hero photos
- slideshows
- featured collections
- photos
- textual content
- newsletter sign-up varieties
- featured merchandise

When it comes to what it is best to add to this web page, the important thing factor to recollect is to hold issues easy — don’t overwhelm your guests with data. Spotlight your greatest merchandise, keep away from litter and make it tremendous straightforward on your potential clients to seek out what they’re searching for.
💡 Tip: why not attempt a little bit of person testing?
If you happen to’re constructing your personal on-line retailer, it’s straightforward to lose perspective and objectivity about its high quality. So, while you’ve acquired a draft of your private home web page prepared, it’s a good suggestion to run it previous a number of folks to get suggestions on how engaging and user-friendly it’s.
This may be some buddies or colleagues — or you may solicit opinions from members of related Fb teams.
If folks persistently determine the identical component as needing enchancment, spend a bit extra time refining it earlier than launch.
9. Apply your model
Now it’s time to customise your retailer in order that it makes use of your personal emblem, typefaces and colours — the important thing components of what you are promoting’ model.
Including a emblem to your Shopify retailer
So as to add a emblem to a Shopify retailer, simply go to On-line Retailer > Themes > Customise and click on the ‘Header’ choice.

Click on on ‘edit your emblem in theme settings’ so as to add your Shopify emblem to your retailer header.
Customizing typefaces and colours
To customise typefaces and colours, you go to On-line Retailer > Themes > Customise and click on the ‘Theme Settings’ cog icon within the high left hand nook of the display.

Then, click on on the colours and typography choices to vary colours and fonts respectively.

Modifying these components may be very simple — you click on on what you need to change and are given the controls to take action.

Right here are some things value allowing for when choosing colours and fonts:
- Do your analysis into how colours and typefaces work collectively — or higher but, contain a graphic designer within the course of. A designer will be capable of offer you a transparent steer on good font and shade pairings, prevent time and show you how to get a extra skilled outcome.
- When selecting a shade scheme, don’t neglect accessibility. For instance, in case you choose a light-weight font shade and use it for textual content on a light-weight background, your content material shall be a lot tougher on your guests to learn (and particularly so for these with a visible impairment).
- Maintain issues easy in case you can — in case you’re not assured about shade and font choice, minimalism might be your greatest guess. A monochrome scheme utilizing sans serif fonts will in lots of instances look extra skilled than one involving a loud shade scheme and ornate typefaces.
- Think about using one font solely. This can scale back the loading time of your Shopify retailer, which may enhance person expertise (moreover, site speed is a Google ranking factor, so for search engine marketing causes it is sensible to make your design components load as shortly as attainable).
10. Arrange your transport charges
Together with your merchandise, content material and design all in place, it’s time now to show to the operational facet of issues and take into consideration:
- the way you’re going to get your merchandise to your clients
- how a lot tax you’re must cost on them
- the way you’re going to simply accept funds on-line.
Let’s begin with the primary of those, transport.
To entry your transport settings, you could go to Settings > Transport and Supply in your Shopify dashboard.

There, you’ll be capable of arrange numerous various kinds of transport charges:
- flat shipping rates — a fee per merchandise that isn’t related to product worth or weight
- charges based mostly on product worth or weight
- calculated shipping rates — charges which are decided at checkout (in ‘actual time’) by a postal firm based mostly on the burden / measurement of the order
- free shipping rates — the place the shopper doesn’t pay any postage (i.e., it’s absorbed into the price of the merchandise)
- native pickup or supply.
Which choice is for you’ll actually rely on the kind of merchandise you’re promoting, packaging prices and your clients’ typical transport locations.
However as along with your pricing technique, in case you don’t get transport zones and charges proper first time, there may be all the time the choice to revisit it, and refine your transport guidelines at a later stage.
💡 Tip: scale back transport prices through the use of the ‘Shopify Transport’ service
If you happen to stay within the US, UK, France, Canada, Italy, Spain or Australia, you may avail of discounted transport charges through the use of ‘Shopify Transport’ — a partnership between Shopify and numerous postal firms. Reductions can go as excessive as 88%, relying on plan.
11. Arrange your tax charges
Many retailers might want to cost gross sales tax or VAT (worth added tax) on purchases of their merchandise. Guidelines fluctuate significantly by nation, so it’s value asking a tax skilled how it is best to configure these on your retailer.
Shopify facilitates computerized tax calculation for sure jurisdictions (and might in truth even cater for the EU’s complex rules on VAT for digital products, VAT MOSS); utilizing this characteristic will velocity the tax setup course of up for some retailers.
Others must set tax charges in a extra guide approach.
Both approach, the tax settings in Shopify could be positioned within the Shopify dashboard by going to Settings > Taxes and Duties.

When you’re within the tax settings part, you’ll get the choice to create tax areas (guidelines for particular person international locations or areas) and specify the way you need to cost tax (for instance, you may specify that product costs needs to be inclusive or unique of tax; or whether or not tax needs to be utilized to transport charges and so on.).
As talked about above, it’s greatest to get recommendation from a tax skilled or accountant when setting these guidelines up; it’s additionally value taking a great have a look at Shopify’s official documentation on tax rates too.
12. Select a cost gateway on your retailer
As a way to settle for cost on your merchandise, you could select a cost gateway. That is mainly the software program that processes bank card purchases made in your retailer.
Shopify works with a variety of cost gateways (over 300), and has its personal one too: Shopify Funds. For a lot of retailers, Shopify Funds would be the quickest cost processor to get began with — and it’s the one one can use with out incurring transaction charges.
Shopify Funds is only available in certain countries, nonetheless — in case you stay in an unsupported location, you’ll undoubtedly want to make use of a third-party cost gateway.
To allow a cost gateway, simply go to Settings > Funds in your Shopify dashboard, and observe the directions supplied.

13. Join your area
At this level, you’ve basically accomplished all the important thing steps wanted to get your Shopify retailer stay — and in reality, if you would like, you may merely publish it proper now utilizing the ‘myshopify’ URL that was created for you when beginning your free trial.
Nevertheless, it’s typically preferable to make use of a customized area on your retailer — i.e., yoursitename.com. Your individual area will work significantly better from a branding viewpoint, and can assist your website guests belief your retailer extra too.
It’s possible you’ll have already got registered a customized area already — but when not, there are two methods to purchase one:
- from a site title supplier (resembling Namecheap, Gandi, Community Options and so on.).
- direct from Shopify.
If you happen to select the primary choice, attempt to purchase a site from a good registrar. Specifically, it’s value selecting one which facilitates two issue authentication.
This helps hold your area — one of the vital vital enterprise property you’ll ever have! — safe.
Using Shopify to buy a domain will make the method of connecting it to your retailer a lot simpler — doing so shall be a easy case of clicking a button in your Shopify interface (and in case you purchase a site from Shopify, you get buyer help for it too).
The downside of this method is that you can be placing all of your eggs in a single basket — i.e., your content material administration system, internet hosting AND your area will all be related to one account. This may very well be an issue in case you ever misplaced entry to it, so some customers desire to maintain their area title and Shopify accounts separate.
Whichever method you determine on, you begin the method of area connection in the identical place: below Settings > Domains in your Shopify dashboard.

If you happen to’re shopping for a new area by way of Shopify, merely click on the ‘purchase new area’ button and observe the directions supplied.
If you happen to’re connecting an current area you will have to click on the ‘join current area’ choice, let Shopify know what the area title is and once more, observe the directions supplied.
If you happen to’re connecting a third-party area, you’ll must log into your registrar’s dashboard and alter some area title settings (DNS) in order that they level to your Shopify retailer.
For extra data on all this, it’s advisable to read Shopify’s guide to connecting domains.
14. Put together your retailer for launch
As soon as your area is related, you may simply unleash your retailer on the world instantly!
However it’s significantly better to verify that each one features of your retailer are working as anticipated first — and that’s the place a Shopify launch checklist is available in.
Going by way of a Shopify launch guidelines sometimes includes making certain that:
- funds are undoubtedly being accepted (to verify this, you’ll must run a test order through your Shopify store)
- gross sales taxes and transport choices are working as anticipated
- all product information has undoubtedly been entered accurately
- all copy is factually correct, grammatically appropriate and freed from spelling errors
- there are not any damaged hyperlinks in your retailer
- you will have the related authorized notices in place (together with, if needed, a GDPR / CCPA compliant cookie consent banner)
- any contact varieties are sending emails to the correct tackle
- any order notifications have been customized to fit your processes
- you will have added a favicon to your Shopify store (somewhat icon that represents what you are promoting on the high of your browser and in search outcomes)
- you will have enabled two-factor authentication in Shopify (this secures your account and makes it a lot tougher to hack)
If you’re executed along with your pre-launch checks, you may publish your retailer by eradicating your password. Go to On-line Retailer > Preferences and scroll right down to the ‘Retailer entry’ part to do that.

And that’s it! Your new Shopify retailer is stay and also you’re prepared to begin promoting.
However how do you flip your beautiful new retailer right into a profitable one?
15. Develop your Shopify retailer additional
As soon as your Shopify retailer is stay, it’s tempting to assume that your ecommerce journey is over. Nevertheless, it’s solely simply starting! There are a selection of issues you are able to do to make sure that going ahead, your model new Shopify retailer makes new clients and turns into a worthwhile one.
- Add extra gross sales channels. On this put up I’ve walked you thru organising a standalone on-line retailer — however Shopify allows you to join your website to many different platforms, together with Amazon, Etsy, eBay and Fb. By itemizing your merchandise on these platforms — all of which have large, current userbases — you may prolong the attain of your retailer significantly. Learn more about the other Shopify sales channels here.
- Concentrate on search engine marketing. Good search outcomes are important to getting gross sales, so getting the SEO facet of your Shopify web site proper is essential. Check out our Shopify SEO checklist here.
- Interact in content material advertising. Shopify shops include a built-in running a blog characteristic — use it to create incredible content material that pulls folks to your retailer! Achieved nicely, running a blog is an excellent strategy to generate natural visitors — you may learn how to make the most of it here. For extra basic content material advertising suggestions, take a look at our detailed step-by-step guide to content marketing here.
- Improve your retailer utilizing apps. The Shopify app store comprises an enormous variety of apps and integrations that allow you to add a variety of options to your website. From advertising apps to dropshipping providers to analytics instruments, you’ll discover a variety of helpful methods so as to add performance to your Shopify website in there.
- Use internet advertising to drive gross sales. PPC providers like Google Advertisements and social networks like Fb supply an entire host of refined methods to focus on and retarget the area of interest audiences that shall be most receptive to your merchandise.
If you happen to discovered our ‘Easy methods to Begin a Shopify Retailer’ information useful, you might also get pleasure from the next Type Manufacturing unit assets:
Replace particulars
- Part 6 was up to date with new steps relation to creating navigation menus.
- A brand new picture of the Shopify theme retailer was added to part 8.
- The steps on altering your retailer’s password had been up to date in part 14, with a brand new picture inserted.


 — All the Key Pros and Cons")


